Mechanize实战二:获取音悦台公告
发布时间:2018-07-16 23:28:37编辑:Run阅读(8078)
有些网站或论坛为了防止暴力破解,在登录框设置了一个验证码,目前针对验证码的解决方案可谓是千奇百怪,考虑到爬虫所需要的只是数据,完全可以绕过验证码,直接使用COOKIE登陆就可以了
(所有代码均在python2.7环境下测试)
直接利用Cookie获取目标页面数据
这种方法好处在于不管有没有验证码,也不管验证码有多么复杂,它都是有效的,它利用的只是Cookie,跟用户名,密码,验证码都没有关系。缺点就是操作复杂,还有就是Cookie的生存期可能不长,过一段时间就得重新操作一遍
获取Cookie的方法
获取Cookie的方法很多,不管使用哪种方法,首先都得登陆后再操作,打开登陆页面,输入用户名密码
登陆网站后进入目标页面http://u.yinyuetai.com/site-notice.html,如下:
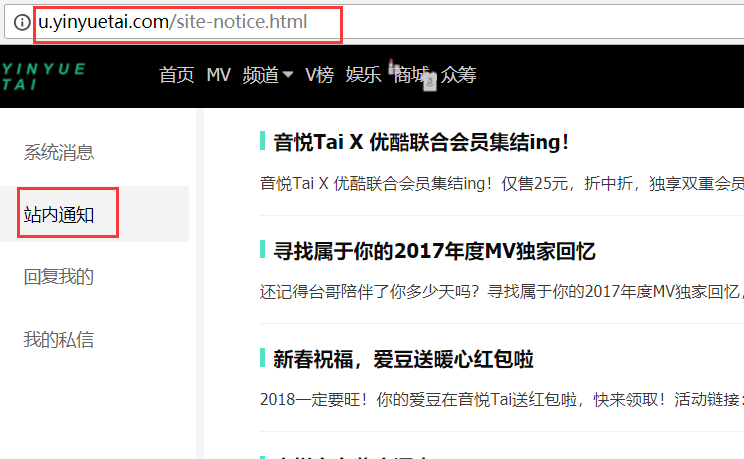
从目标页面可以获取个人的信件,站内通知,系统消息等等...现在只需要从目标界面获取Cookie就可以了,其它的数据留给bs4处理,获取Cookie的方法很多,以下只列出比较典型的几种
1 JavaScript获取Cookie
所有的浏览器默认情况下都是支持JavaScript的,因此获取Cookie最常见的方法就是在浏览器中打开目标页面,然后在地址栏输入JavaScript命令: --- F12打开,Console里面输入
javascript:document.write(document.cookie)

执行结果如下:

这种方法的好处在于无须借助任何工具就可以获取到Cookie信息,缺点是获取的Cookie信息有时会不完整,缺少关键的几项。有的网站用这种获取的Cookie可以登录,有的又不行,不通用,不可取
2 浏览器记录中获取Cookie
浏览器在登陆站点后将Cookie信息保存到文件中(以Chrome谷歌浏览器为例),这个文件的位置在C:\Users\taoru\AppData\Local\Google\Chrome\User Data\Default,文件名为Cookies,如下图
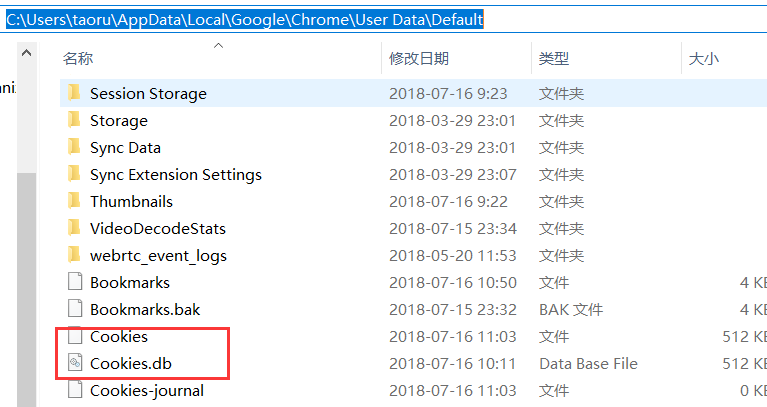
这个Cookies文件实际上是一个sqlite3的数据库,Chrome将浏览器上的所有Cookie都保存到这个数据库中,将这个Cookies文件复制一个备份,命名为:Cookies.db(尽量避免直接操作源文件)
在该目录下按Shift并单击鼠标右键,在弹出的菜单中选取"在此处打开命令窗口",在此处打开Powershell窗口
import sqlite3
conn = sqlite3.connect('Cookies.db')
for row in conn.execute('select * from cookies where host_key like "%yinyuetai.com%"'):
    print(row)
运行结果:
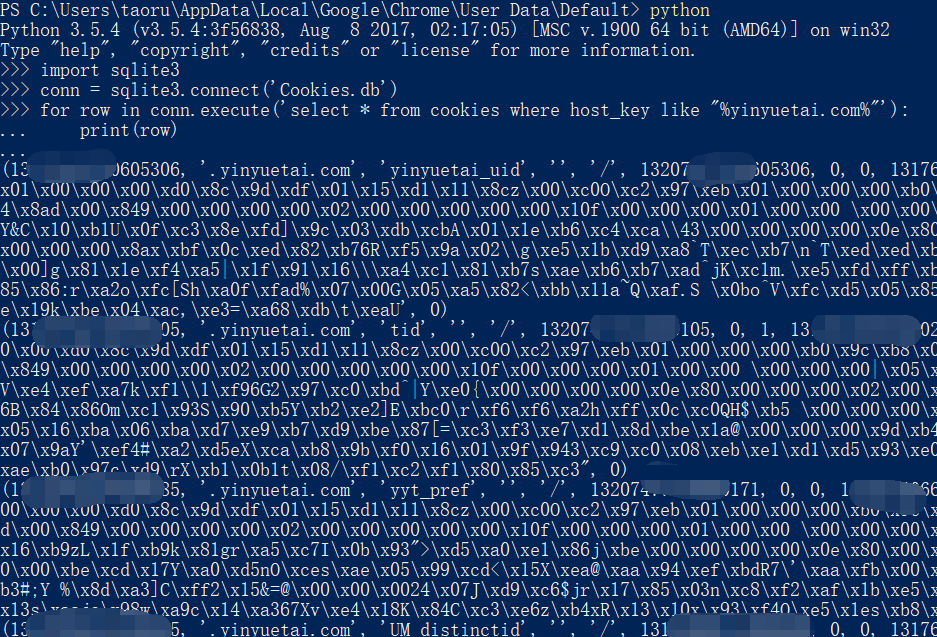
已经将所有相关的Cookie列出来了,如果要把这些数据换成可使用Cookie,还的继续将其中的encrypted_value字段解码。使用这种方法获取Cookie,好处是所有的Cookie内容都一网打尽,连用户名密码都可以用明文解读出来;坏处则是要把这种数据转换成Mechanize可用的Cookie比较麻烦,还需要安装其他的第三方模块
3 利用工具获取Cookie
最后的方法就是利用网络工具,在浏览器向服务器发送数据时截取这些数据,这些数据不仅仅包括Cookie,还有一些其他的信息,而且这些信息Mechanize还都用得上,简直就是完美.
截取浏览器和服务器之间的网络工具有很多,比如:Fiddler,Wireshark,BurpSuite,也有浏览器自带的,也就是F12开发工具
3.1 Chrome开发工具获取Cookie
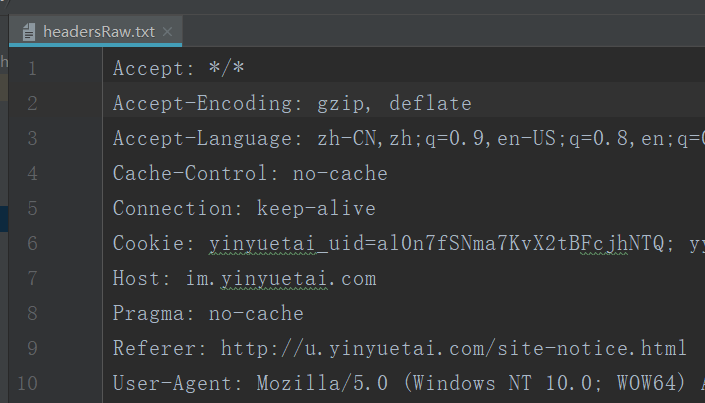
这里不单单只有Cookie信息,还有Header信息等等....
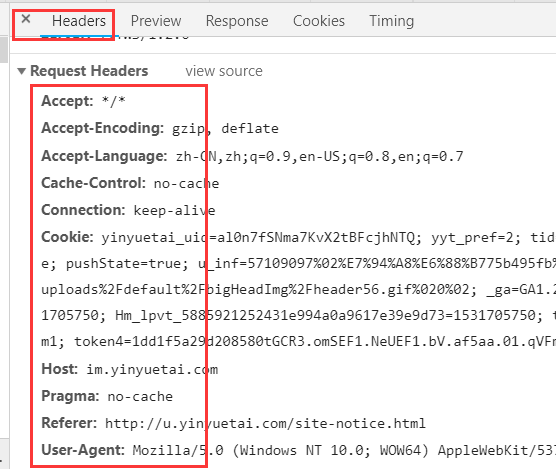
将这个Request Headers里的所有数据都复制到一个文本文件headersRaw,txt中
3.2 BurpSuite获取Cookie
BurpSuite工具简单方便,跨平台运行,功能强大
BurpSuite下载地址:https://portswigger.net/burp/communitydownload,安装一个合适的版本
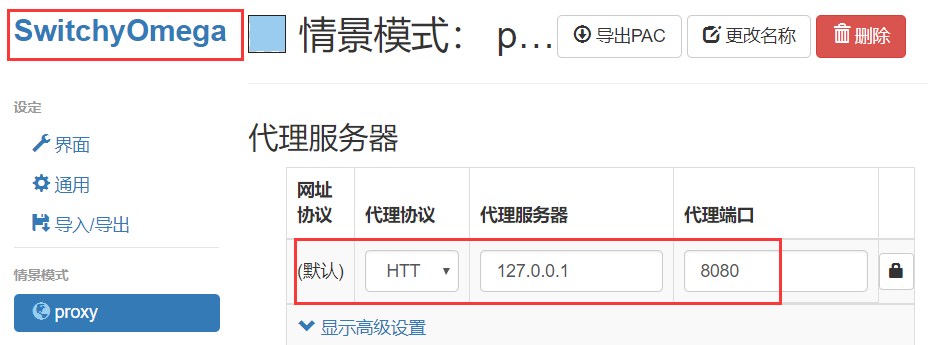
BurpSuite监控的端口是本机的8080端口,所以必须将浏览器的代理端口设置为127.0.0.1:8080
谷歌浏览器设置如下:
打开Burp Suite,重新刷新浏览器页面:
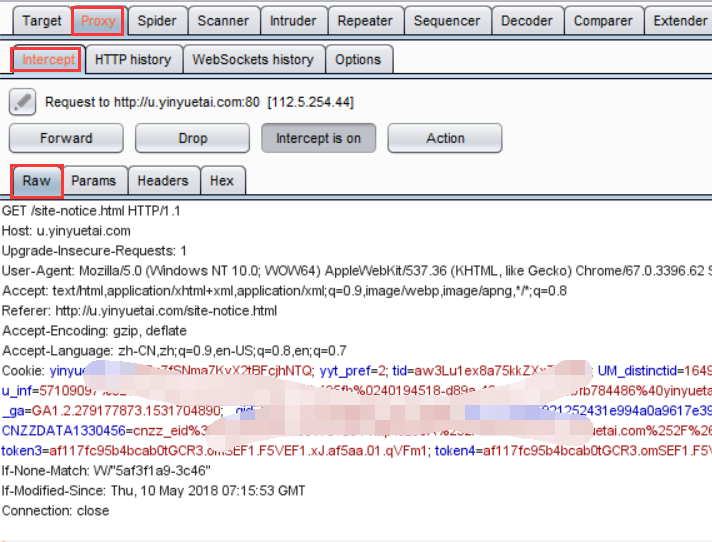
主要是获取Cookie和User-Agent的数据,将这个Raw标签内的所有内容复制到文本文件headersRaw.txt中备用
上面两种获取headersRaw.txt文件的方法任选一种都可以,然后为它写一个程序,将所需的数据按照所需的格式导出来
创建一个getHeaders.py代码如下:
#!/usr/bin/env python
# coding: utf-8

def getheaders(filename):
    headers= []
    headerList = ['User-Agent', 'Cookie']
    with open(filename, 'r') as f:
        for line in f.readlines():
            name, value = line.split(':', 1)
            if name in headerList:
                headers.append((name.strip(), value.strip()))
    return headers


if __name__ == '__main__':
    headers = getheaders('headersRaw.txt')
    print(headers)
运行结果如下:

已经将Cookie和User-Agent过滤出来并按照格式排列好了,最后所得到的headers是一个包含2个元组的列表
上面讲了那么多,都是下面做铺垫的
重点: 使用Cookie登陆并获取数据
创建一个getYinyuetai.py代码如下:
#!/usr/bin/env python
# coding: utf-8

import mechanize
from bs4 import BeautifulSoup
from mylog import MyLog as mylog
from getHeaders import getheaders
import urllib2
import codecs
import sys
import json
import re


# py2.7声明使用utf-8编码
reload(sys)
sys.setdefaultencoding('utf-8')

class Item(object):
    class_ification = None  # 分类
    title = None  # 标题
    content = None  # 内容


class GetLogin(object):
    def __init__(self):
        self.url = 'http://u.yinyuetai.com/site-notice.html'
        self.start_url = 'http://uapi.yinyuetai.com/i/news/announcement?callback=jQuery110201542904708315788
        7_1531728216131&page='
        self.end_url = '&pageSize=10'
        self.log = mylog()
        self.headerFile = 'headersRaw.txt'
        self.outFile = 'Login_content.txt'
        self.spider()

    def getResponseContent(self, url):
        self.log.info('开始使用mechanize模块得到响应')
        br = mechanize.Browser()
        br.set_handle_equiv(True)
        br.set_handle_redirect(True)
        br.set_handle_referer(True)
        br.set_handle_robots(False)
        br.set_handle_gzip(False)
        br.set_handle_refresh(mechanize._http.HTTPRefreshProcessor(), max_time=1)
        headers = getheaders(self.headerFile)
        br.addheaders = headers
        br.open(url)
        return br.response().read().decode('utf8')

    def spider(self):
        self.log.info("开始运行爬虫模块")
        items = []
        responsecontent = self.getResponseContent(self.url)
        soup = BeautifulSoup(responsecontent, 'lxml')
        tag = soup.find('head').find('title').get_text().strip()
        item = Item()
        item.class_ification = tag
        urls = self.geturls()
        for url in urls:
            fakeHeaders = {
                'User-Agent': 'Mozilla/5.0 (Windows NT 10.0; WOW64) AppleWebKit/537.36 (KHTML, like Gecko) Chrome/67.0.3396.62 Safari/537.36'}
            request = urllib2.Request(url, headers=fakeHeaders)
            response = urllib2.urlopen(request)
            html_content = response.read()
            ss = re.findall("{.*}", html_content)
            msg = json.loads(ss[0])['messages']
            for i in msg:
                item.title = i['subject']
                item.content = i['content']
                with codecs.open(self.outFile, 'a', 'utf8') as f:
                    self.log.info(item.class_ification)
                    f.write(item.class_ification + '\r\n')
                    self.log.info(item.title)
                    f.write(item.title + '\r\n')
                    self.log.info(item.content)
                    f.write(item.content + '\r\n')
                    f.write('\r\n' * 4)


    def geturls(self):
        urls = []
        num = [i for i in range(1, 5)]
        for i in num:
            url = self.start_url + str(i) + self.end_url
            urls.append(url)
        return urls


if __name__ == '__main__':
    GB = GetLogin()
创建一个mylog.py的日志模块
#!/usr/bin/env python
# coding: utf-8
import logging
import getpass
import sys


# 定义MyLog类
class MyLog(object):
    def __init__(self):
        self.user = getpass.getuser()  # 获取用户
        self.logger = logging.getLogger(self.user)
        self.logger.setLevel(logging.DEBUG)

        # 日志文件名
        self.logfile = sys.argv[0][0:-3] + '.log'  # 动态获取调用文件的名字
        self.formatter = logging.Formatter('%(asctime)-12s %(levelname)-8s %(message)-12s\r\n')

        # 日志显示到屏幕上并输出到日志文件内
        self.logHand = logging.FileHandler(self.logfile, encoding='utf-8')
        self.logHand.setFormatter(self.formatter)
        self.logHand.setLevel(logging.DEBUG)

        self.logHandSt = logging.StreamHandler()
        self.logHandSt.setFormatter(self.formatter)
        self.logHandSt.setLevel(logging.DEBUG)

        self.logger.addHandler(self.logHand)
        self.logger.addHandler(self.logHandSt)

    # 日志的5个级别对应以下的5个函数
    def debug(self, msg):
        self.logger.debug(msg)

    def info(self, msg):
        self.logger.info(msg)

    def warn(self, msg):
        self.logger.warn(msg)

    def error(self, msg):
        self.logger.error(msg)

    def critical(self, msg):
        self.logger.critical(msg)


if __name__ == '__main__':
    mylog = MyLog()
    mylog.debug(u"I'm debug 中文测试")
    mylog.info(u"I'm info 中文测试")
    mylog.warn(u"I'm warn 中文测试")
    mylog.error(u"I'm error 中文测试")
    mylog.critical(u"I'm critical 中文测试")
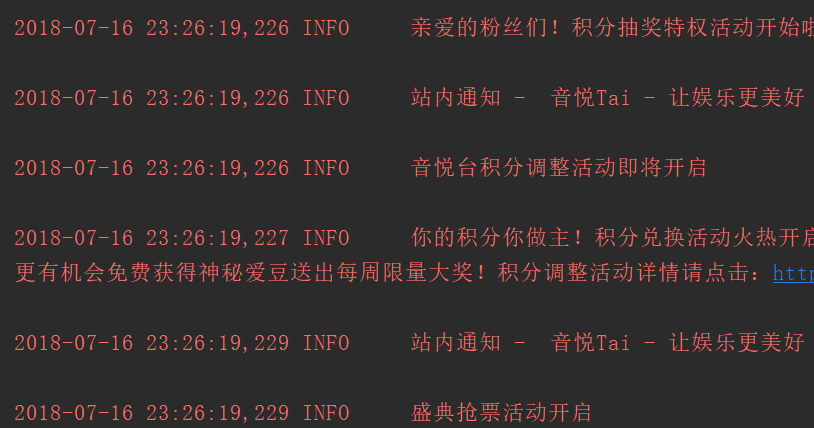
运行主程序getYinyuetai.py
pycharm运行截图:
Login_content.txt截图:

上一篇: bs4爬虫实战四--获取音悦台榜单
下一篇: 没有了
- openvpn linux客户端使用
52078
- H3C基本命令大全
51956
- openvpn windows客户端使用
42176
- H3C IRF原理及 配置
39019
- Python exit()函数
33524
- openvpn mac客户端使用
30482
- python全系列官方中文文档
29109
- python 获取网卡实时流量
24145
- 1.常用turtle功能函数
24048
- python 获取Linux和Windows硬件信息
22391
- LangChain1.0-Agent-部署/上线(开发人员必备)
164°
- LangChain1.0-Agent-Spider实战(爬虫函数替代API接口)
188°
- LangChain1.0-Agent(进阶)本地模型+Playwright实现网页自动化操作
200°
- LangChain1.0-Agent记忆管理
182°
- LangChain1.0-Agent接入自定义工具与React循环
199°
- LangChain1.0-Agent开发流程
189°
- LangChain1.0调用vllm本地部署qwen模型
217°
- LangChain-1.0入门实践-搭建流式响应的多轮问答机器人
219°
- LangChain-1.0入门实战-1
226°
- LangChain-1.0教程-(介绍,模型接入)
235°
- 姓名:Run
- 职业:谜
- 邮箱:383697894@qq.com
- 定位:上海 · 松江
