python编写mysql类实现mysq
发布时间:2019-09-08 09:09:46编辑:auto阅读(2249)
前言
我们都知道利用python实现mysql的操作是件很简单的事情,只需要熟练使用MySQLdb模块就能实现mysql的增删改查操作。
为了更好地整合mysql的操作,使用python的类讲mysql的操作整合到一起,是个不错的思路。这里我编写了一个简单的class,来实现对mysql的操作与查询。
操作
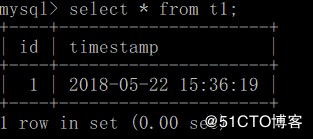
本例中,我们准备在mysql的iceny中创建了一张测试表t1,字段为id和timestamp,主要存储系统的时间戳,并在该表中进行增、删、改、查的操作:
当前mysql的状态:

MySQLdb为python的第三方模块,使用之前需提前安装该模块,这里推荐pip安装:
pip install MySQL-python
注:python3.4之后Mysql-python已经不被支持了,可以换成mysqlclient模块。
编写mysql的class类:
#!/usr/local/env python3.6
# -*- coding: UTF-8 -*-

import MySQLdb

class Mysql(object):
    def __init__(self,host,port,user,passwd,db,charset='utf8'):
        """初始化mysql连接"""
        try:
            self.conn = MySQLdb.connect(host,user,passwd,db,int(port))
        except MySQLdb.Error as e:
            errormsg = 'Cannot connect to server\nERROR(%s):%s' % (e.args[0],e.args[1])
            print(errormsg)
            exit(2)
        self.cursor = self.conn.cursor()

    def exec(self,sql):
        """执行dml,ddl语句"""
        try:
           self.cursor.execute(sql)
           self.conn.commit()
        except:
           self.conn.rollback()

    def query(self,sql):
        """查询数据"""
        self.cursor.execute(sql)
        return self.cursor.fetchall()

    def __del__(self):
        """ 关闭mysql连接 """
        self.conn.close()
        self.cursor.close()
创建mysql对象:
mysql_test = Mysql('192.168.232.128','3306','root','123456','iceny')创建表t1:
mysql_test.exec('create table t1 (id int auto_increment primary key,timestamp TIMESTAMP)') 
往t1插入一条数据:
mysql_test.exec('insert into t1 (id,timestamp) value (NULL,CURRENT_TIMESTAMP)') 
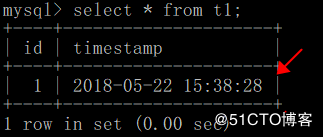
更新id为1的数据时间戳,改为执行当前的系统时间:

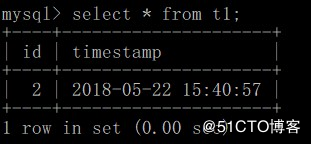
再插入一条数据,查询该表数据:
mysql_test.exec('insert into t1 (id,timestamp) value (NULL,CURRENT_TIMESTAMP)')
result = mysql_test.query('select * from t1')
print(result) 
可以看到查询出来的结果是存放在一个元祖中。
删除表中id = 1的数据:
mysql_test.exec('delete from t1 where id = 1') 
以上就是通过python编写简单的class类操作mysql增删改查的简单实现,这已经能够应付日常工作中大量的mysql操作了。
上一篇: 利用Python的pip命令安装nump
下一篇: Python:免安装的开发环境
- openvpn linux客户端使用
52035
- H3C基本命令大全
51892
- openvpn windows客户端使用
42127
- H3C IRF原理及 配置
38976
- Python exit()函数
33472
- openvpn mac客户端使用
30426
- python全系列官方中文文档
29059
- python 获取网卡实时流量
24084
- 1.常用turtle功能函数
24000
- python 获取Linux和Windows硬件信息
22347
- LangChain1.0-Agent-部署/上线(开发人员必备)
74°
- LangChain1.0-Agent-Spider实战(爬虫函数替代API接口)
114°
- LangChain1.0-Agent(进阶)本地模型+Playwright实现网页自动化操作
130°
- LangChain1.0-Agent记忆管理
119°
- LangChain1.0-Agent接入自定义工具与React循环
138°
- LangChain1.0-Agent开发流程
136°
- LangChain1.0调用vllm本地部署qwen模型
156°
- LangChain-1.0入门实践-搭建流式响应的多轮问答机器人
173°
- LangChain-1.0入门实战-1
174°
- LangChain-1.0教程-(介绍,模型接入)
177°
- 姓名:Run
- 职业:谜
- 邮箱:383697894@qq.com
- 定位:上海 · 松江
