python 连接 hive
发布时间:2019-08-09 09:56:34编辑:auto阅读(2074)
由于版本的不同,Python 连接 hive 的方式也就不一样。
在网上搜索关键字 python hive 的时候可以找到一些解决方案。大部分是这样的,首先把hive 根目录下的$HIVE_HOME/lib/py拷贝到 python 的库中,也就是 site-package 中,或者干脆把新写的 python 代码和拷贝的 py 库放在同一个目录下,然后用这个目录下提供的 thrift 接口调用。示例也是非常简单的。类似这样:
import sys
from hive_service import ThriftHive
from hive_service.ttypes import HiveServerException
from thrift import Thrift
from thrift.transport import TSocket
from thrift.transport import TTransport
from thrift.protocol import TBinaryProtocol

def hiveExe(sql):

    try:
        transport = TSocket.TSocket('127.0.0.1', 10000)
        transport = TTransport.TBufferedTransport(transport)
        protocol = TBinaryProtocol.TBinaryProtocol(transport)
        client = ThriftHive.Client(protocol)
        transport.open()

        client.execute(sql)

        print "The return value is : "
        print client.fetchAll()
        print "............"
        transport.close()
    except Thrift.TException, tx:
        print '%s' % (tx.message)

if __name__ == '__main__':
    hiveExe("show tables")
或者是这样的:
#!/usr/bin/env python

import sys

from hive import ThriftHive
from hive.ttypes import HiveServerException
from thrift import Thrift
from thrift.transport import TSocket
from thrift.transport import TTransport
from thrift.protocol import TBinaryProtocol

try:
    transport = TSocket.TSocket('14.18.154.188', 10000)
    transport = TTransport.TBufferedTransport(transport)
    protocol = TBinaryProtocol.TBinaryProtocol(transport)

    client = ThriftHive.Client(protocol)
    transport.open()

    client.execute("CREATE TABLE r(a STRING, b INT, c DOUBLE)")
    client.execute("LOAD TABLE LOCAL INPATH '/path' INTO TABLE r")
    client.execute("SELECT * FROM test1")
    while (1):
      row = client.fetchOne()
      if (row == None):
        break
      print rowve
    client.execute("SELECT * FROM test1")
    print client.fetchAll()

    transport.close()

except Thrift.TException, tx:
    print '%s' % (tx.message)
但是都解决不了问题,从 netstat 中查看可以发现 TCP 连接确实是建立了,但是不执行 hive 指令。也许就是版本的问题。
还是那句话,看各种中文博客不如看官方文档。
项目中使用的 hive 版本是0.13,此时此刻官网的最新版本都到了1.2.1了。中间间隔了1.2.0、1.1.0、1.0.0、0.14.0。但是还是参考一下官网的方法试试吧。
首先看官网的 setting up hiveserver2
可以看到启动 hiveserver2 可以配置最大最小线程数,绑定的 IP,绑定的端口,还可以设置认证方式。(之前一直不成功正式因为这个连接方式)然后还给了 python 示例代码。
import pyhs2

with pyhs2.connect(host='localhost',
                   port=10000,
                   authMechanism="PLAIN",
                   user='root',
                   password='test',
                   database='default') as conn:
    with conn.cursor() as cur:
        #Show databases
        print cur.getDatabases()

        #Execute query
        cur.execute("select * from table")

        #Return column info from query
        print cur.getSchema()

        #Fetch table results
        for i in cur.fetch():
            print i
在拿到这个代码的时候,自以为是的把认证信息给去掉了。然后运行发现跟之前博客里介绍的方法结果一样,建立了 TCP 连接,但是就是不执行,也不报错。这是几个意思?然后无意中尝试了一下原封不动的使用上面的代码。结果可以用。唉。。。
首先声明一下,hive-site.xml中默认关于 hiveserver2的配置我一个都没有修改,一直是默认配置启动 hiveserver2。没想到的是默认配置是有认证机制的。
然后再写一点,在安装 pyhs2的时候还是遇到了点问题,其实还是要看官方文档的,我只是没看官方文档直接用 pip安装导致了这个问题。安装 pyhs2需要确定已经安装了几个依赖包。直接看在 github 上的 wiki 吧。哪个没安装就补上哪一个就好了。
To install pyhs2 on a clean CentOS 6.4 64-bit desktop....

(as root or with sudo)

get ez_setup.py from https://pypi.python.org/pypi/ez_setup
python ez_setup.py
easy_install pip
yum install gcc-c++
yum install cyrus-sasl-devel.x86_64
yum install python-devel.x86_64
pip install pyhs2
写了这么多,其实是在啰嗦自己遇到的问题。下面写一下如何使用 python
连接 hive。
python 连接 hive 是基于 thrift 完成的。所以需要服务器端和客户端的配合才能使用。
在服务器端需要启动 hiveserver2 服务,启动方法有两种, 第二种方法只是对第一种方法的封装。
1. $HIVE_HOME/bin/hive --server hiveserver2
2. $HIVE_HOME/bin/hiveserver2
默认情况下就是hiveserver2监听了10000端口。也可以通过修改 hive-site.xml 或者在启动的时候添加参数来实现修改默认配置。
另外一方面,在客户端需要安装 python 的依赖包 pyhs2。安装方法在上面也介绍了,基本上就是用 pip install pyhs2,如果安装不成功,安装上面提到的依赖包就可以了。
最后运行上面的示例代码就可以了,配置好 IP 地址、端口、数据库、表名称就可以用了,默认情况下认证信息不需要修改。
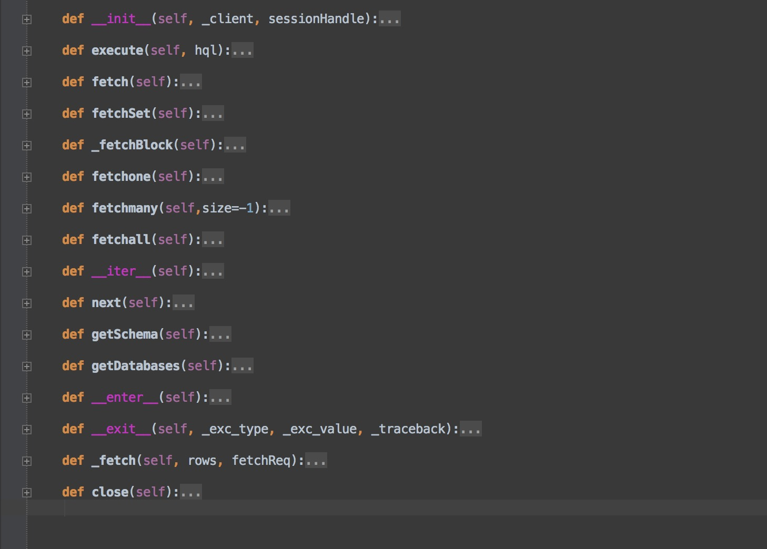
另外补充一点 fetch 函数执行速度是比较慢的,会把所有的查询结果返回来。可以看一下 pyhs2 的源码,查看一下还有哪些函数可以用。下图是 Curor 类的可以使用的函数。

一般 hive 表里的数据比较多,还是一条一条的读比较好,所以选择是哟功能 fetchone函数来处理数据。fetchone函数如果读取成功会返回列表,否则 None。可以把示例代码修改一下,把 fetch修改为:
    count = 0
    while (1):
        row = cur.fetchone()
        if (row is not None):
            count += 1
            print count, row
        else:
            print "it's over"
上一篇: Python 中gzip模块完成对文件的
下一篇: 关于Python读取文件的路径中斜杠问题
- openvpn linux客户端使用
52057
- H3C基本命令大全
51925
- openvpn windows客户端使用
42150
- H3C IRF原理及 配置
38995
- Python exit()函数
33495
- openvpn mac客户端使用
30447
- python全系列官方中文文档
29083
- python 获取网卡实时流量
24114
- 1.常用turtle功能函数
24019
- python 获取Linux和Windows硬件信息
22370
- LangChain1.0-Agent-部署/上线(开发人员必备)
124°
- LangChain1.0-Agent-Spider实战(爬虫函数替代API接口)
154°
- LangChain1.0-Agent(进阶)本地模型+Playwright实现网页自动化操作
167°
- LangChain1.0-Agent记忆管理
149°
- LangChain1.0-Agent接入自定义工具与React循环
176°
- LangChain1.0-Agent开发流程
162°
- LangChain1.0调用vllm本地部署qwen模型
183°
- LangChain-1.0入门实践-搭建流式响应的多轮问答机器人
189°
- LangChain-1.0入门实战-1
189°
- LangChain-1.0教程-(介绍,模型接入)
206°
- 姓名:Run
- 职业:谜
- 邮箱:383697894@qq.com
- 定位:上海 · 松江
