一、shutil模块
高级的 文件、文件夹、压缩包 处理模块
shutil.copyfileobj(fsrc, fdst[, length])
将文件内容拷贝到另一个文件中
import shutil
shutil.copyfileobj(open('old.xml','r'), open('new.xml', 'w'))
shutil.copyfile(src, dst)
拷贝文件
shutil.copymode('f1.log', 'f2.log') #目标文件必须存在
shutil.copy(src, dst)
拷贝文件和权限
import shutil
shutil.copy('f1.log', 'f2.log')
shutil.copy2(src, dst)
拷贝文件和状态信息
import shutil
shutil.copy2('f1.log', 'f2.log')
shutil.ignore_patterns(*patterns)
shutil.copytree(src, dst, symlinks=False, ignore=None)
递归的去拷贝文件夹
import shutil

shutil.copytree('folder1', 'folder2', ignore=shutil.ignore_patterns('*.pyc', 'tmp*')) #目标目录不能存在,#注意对folder2目录父级目录要有可写权限,ignore的意思是排除
shutil.rmtree(path[, ignore_errors[, onerror]])
递归的去删除文件
import shutil
shutil.rmtree('folder1')
shutil.move(src, dst)
递归的去移动文件,它类似mv命令,其实就是重命名。
import shutil
shutil.move('folder1', 'folder3')
shutil.make_archive(base_name, format,...)
创建压缩包并返回文件路径,例如:zip、tar
创建压缩包并返回文件路径,例如:zip、tar
- base_name: 压缩包的文件名,也可以是压缩包的路径。只是文件名时,则保存至当前目录,否则保存至指定路径,
如 data_bak =>保存至当前路径
如:/tmp/data_bak =>保存至/tmp/ - format: 压缩包种类,“zip”, “tar”, “bztar”,“gztar”
- root_dir: 要压缩的文件夹路径(默认当前目录)
- owner: 用户,默认当前用户
- group: 组,默认当前组
- logger: 用于记录日志,通常是logging.Logger对象
#1、将 /data 下的文件打包放置当前程序目录
import shutil
ret = shutil.make_archive("data_bak", 'gztar', root_dir='/data')

#2、将 /data下的文件打包放置 /tmp/目录
import shutil
ret = shutil.make_archive("/tmp/data_bak", 'gztar', root_dir='/data')
shutil 对压缩包的处理是调用 ZipFile 和 TarFile 两个模块来进行的,详细:


import zipfile

# 压缩
z = zipfile.ZipFile('laxi.zip', 'w')
z.write('a.log')
z.write('data.data')
z.close()

# 解压
z = zipfile.ZipFile('laxi.zip', 'r')
z.extractall(path='.')
z.close()
import tarfile

# 压缩
>>> t=tarfile.open('/tmp/egon.tar','w')
>>> t.add('/test1/a.py',arcname='a.bak')
>>> t.add('/test1/b.py',arcname='b.bak')
>>> t.close()


# 解压
>>> t=tarfile.open('/tmp/egon.tar','r')
>>> t.extractall('/egon')
>>> t.close()
二、shelve模块
shelve模块比pickle模块简单,只有一个open函数,返回类似字典的对象,可读可写;key必须为字符串,而值可以是python所支持的数据类型
import shelve

f=shelve.open(r'sheve.txt')
# f['stu1_info']={'name':'egon','age':18,'hobby':['piao','smoking','drinking']}
# f['stu2_info']={'name':'gangdan','age':53}
# f['school_info']={'website':'http://www.pypy.org','city':'beijing'}

print(f['stu1_info']['hobby'])
f.close()
三、xml模块
xml是实现不同语言或程序之间进行数据交换的协议,跟json差不多,但json使用起来更简单,不过,古时候,在json还没诞生的黑暗年代,大家只能选择用xml呀,至今很多传统公司如金融行业的很多系统的接口还主要是xml。
xml的格式如下,就是通过<>节点来区别数据结构的:
<?xml version="1.0"?>
<data>
    <country name="Liechtenstein">
        <rank updated="yes">2</rank>
        <year>2008</year>
        <gdppc>141100</gdppc>
        <neighbor name="Austria" direction="E"/>
        <neighbor name="Switzerland" direction="W"/>
    </country>
    <country name="Singapore">
        <rank updated="yes">5</rank>
        <year>2011</year>
        <gdppc>59900</gdppc>
        <neighbor name="Malaysia" direction="N"/>
    </country>
    <country name="Panama">
        <rank updated="yes">69</rank>
        <year>2011</year>
        <gdppc>13600</gdppc>
        <neighbor name="Costa Rica" direction="W"/>
        <neighbor name="Colombia" direction="E"/>
    </country>
</data>
xml协议在各个语言里的都 是支持的,在python中可以用以下模块操作xml:
# print(root.iter('year')) #全文搜索
# print(root.find('country')) #在root的子节点找,只找一个
# print(root.findall('country')) #在root的子节点找,找所有
import xml.etree.ElementTree as ET

tree = ET.parse("xmltest.xml")
root = tree.getroot()
print(root.tag)

#遍历xml文档
for child in root:
    print('========>',child.tag,child.attrib,child.attrib['name'])
    for i in child:
        print(i.tag,i.attrib,i.text)

#只遍历year 节点
for node in root.iter('year'):
    print(node.tag,node.text)
#---------------------------------------

import xml.etree.ElementTree as ET

tree = ET.parse("xmltest.xml")
root = tree.getroot()

#修改
for node in root.iter('year'):
    new_year=int(node.text)+1
    node.text=str(new_year)
    node.set('updated','yes')
    node.set('version','1.0')
tree.write('test.xml')


#删除node
for country in root.findall('country'):
   rank = int(country.find('rank').text)
   if rank > 50:
     root.remove(country)

tree.write('output.xml')
#在country内添加(append)节点year2
import xml.etree.ElementTree as ET
tree = ET.parse("a.xml")
root=tree.getroot()
for country in root.findall('country'):
    for year in country.findall('year'):
        if int(year.text) > 2000:
            year2=ET.Element('year2')
            year2.text='新年'
            year2.attrib={'update':'yes'}
            country.append(year2) #往country节点下添加子节点

tree.write('a.xml.swap')
import xml.etree.ElementTree as ET


new_xml = ET.Element("namelist")
name = ET.SubElement(new_xml,"name",attrib={"enrolled":"yes"})
age = ET.SubElement(name,"age",attrib={"checked":"no"})
sex = ET.SubElement(name,"sex")
sex.text = '33'
name2 = ET.SubElement(new_xml,"name",attrib={"enrolled":"no"})
age = ET.SubElement(name2,"age")
age.text = '19'

et = ET.ElementTree(new_xml) #生成文档对象
et.write("test.xml", encoding="utf-8",xml_declaration=True)

ET.dump(new_xml) #打印生成的格式
四、configparser模块
[mogu] #section
name="mogu"  #k , v 的形式
password="123"
salary=3.1
is_cool=True

[xiaoming] #section
name="xiaoming"
password="123456"
salary=3.2
is_sb=True
import configparser

config=configparser.ConfigParser()
config.read('user.ini')

#查看所有的标题
res=config.sections() #['mogu', 'xiaoming']
print(res)

#查看标题'mogu'下所有key=value的key
options=config.options('mogu')
print(options) # ['name', 'password', 'salary', 'is_cool']

#查看标题'mogu'下所有key=value的(key,value)格式
item_list=config.items('mogu')
print(item_list) #[('name', '"mogu"'), ('password', '"123"'), ('salary', '3.1'), ('is_cool', 'True')]

#查看标题section1下user的值=>字符串格式
val=config.get('mogu','salary')
print(val) # '3.1'

#查看标题section1下age的值=>整数格式
val1=config.getint('mogu','password')
print(val1) #123

#查看标题section1下is_admin的值=>布尔值格式
val2=config.getboolean('mogu','is_cool')
print(val2) #True

#查看标题section1下salary的值=>浮点型格式
val3=config.getfloat('mogu','salary')
print(val3) #3.1
改写
#删除整个标题section2
config.remove_section('xiaoming')

#删除标题'mogu'下的某个k1和k2
config.remove_option('mogu','name')
config.remove_option('mogu','salary')

#判断是否存在某个标题
print(config.has_section('mogu'))

#判断标题'mogu'下是否有user
print(config.has_option('mogu',''))


#添加一个标题
config.add_section('zhangsan')

#在标题zhangsan下添加name=xiaosan,age=58的配置
config.set('zhangsan','name','xiaosan')
config.set('zhangsan','age','58') #报错,必须是字符串


#最后将修改的内容写入文件,完成最终的修改
config.write(open('user.ini','w'))
import configparser

config = configparser.ConfigParser()
config["DEFAULT"] = {'ServerAliveInterval': '45',
                     'Compression': 'yes',
                     'CompressionLevel': '9'}

config['bitbucket.org'] = {}
config['bitbucket.org']['User'] = 'hg'
config['topsecret.server.com'] = {}
topsecret = config['topsecret.server.com']
topsecret['Host Port'] = '50022'  # mutates the parser
topsecret['ForwardX11'] = 'no'  # same here
config['DEFAULT']['ForwardX11'] = 'yes'
with open('example.ini', 'w') as configfile:
    config.write(configfile)
五、subprocess模块
import subprocess
cmd=input('输入命令吧:').strip()
obj=subprocess.Popen(
    '%s'%cmd,
    shell=True,
    stdout=subprocess.PIPE,
    stderr=subprocess.PIPE
)

res=obj.stdout.read()
print(res.decode('gbk'))

print('='*30)
res1=obj.stderr.read()
print(res1.decode('gbk'))
 1 import  subprocess
 2
 3 '''
 4 sh-3.2# ls /Users/egon/Desktop |grep txt$
 5 mysql.txt
 6 tt.txt
 7 事物.txt
 8 '''
 9
10 res1=subprocess.Popen('ls /Users/jieli/Desktop',shell=True,stdout=subprocess.PIPE)
11 res=subprocess.Popen('grep txt$',shell=True,stdin=res1.stdout,
12                  stdout=subprocess.PIPE)
13
14 print(res.stdout.read().decode('utf-8'))
15
16
17 #等同于上面,但是上面的优势在于,一个数据流可以和另外一个数据流交互,可以通过爬虫得到结果然后交给grep
18 res1=subprocess.Popen('ls /Users/jieli/Desktop |grep txt$',shell=True,stdout=subprocess.PIPE)
19 print(res1.stdout.read().decode('utf-8'))
20
21
22 #windows下:
23 # dir | findstr 'test*'
24 # dir | findstr 'txt$'
25 import subprocess
26 res1=subprocess.Popen(r'dir C:\Users\Administrator\PycharmProjects\test\函数备课',shell=True,stdout=subprocess.PIPE)
27 res=subprocess.Popen('findstr test*',shell=True,stdin=res1.stdout,
28                  stdout=subprocess.PIPE)
29
30 print(res.stdout.read().decode('gbk')) #subprocess使用当前系统默认编码,得到结果为bytes类型,在windows下需要用gbk解码
六、内置函数
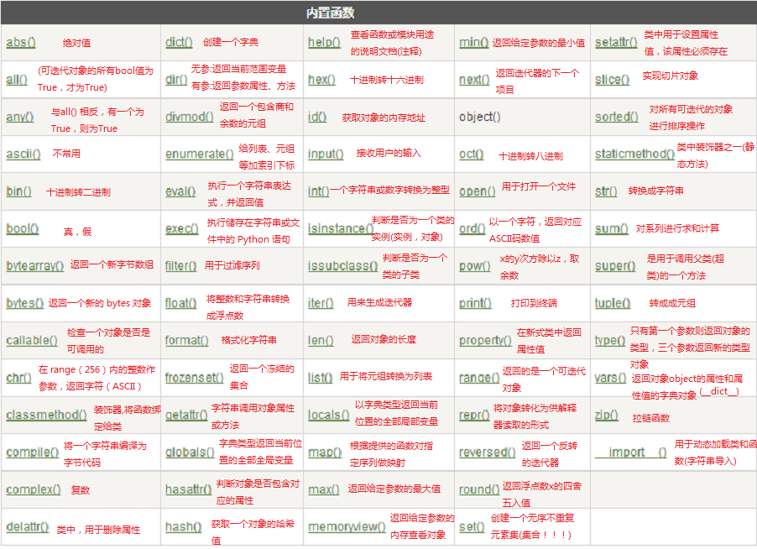
上述图片看不到的部分可在新标签页打开图片
详细请参考:http://www.runoob.com/python3/python3-built-in-functions.html
七、异常处理
一、什么是异常
异常就是程序运行时发生错误的信号(在程序出现错误时,则会产生一个异常,若程序没有处理它,则会抛出该异常,程序的运行也随之终止),在python中,错误触发的异常如下

而错误分成两种
#语法错误示范一
if
#语法错误示范二
def test:
    pass
#语法错误示范三
class Foo
    pass
#语法错误示范四
print(haha
#TypeError:int类型不可迭代
for i in 3:
    pass
#ValueError
num=input(">>: ") #输入hello
int(num)
#NameError
aaa
#IndexError
l=['bb','aa']
l[3]
#KeyError
dic={'name':'mogu'}
dic['age']
# AttributeError
class Foo:pass
Foo.x
#ZeroDivisionError:无法完成计算
res1=1/0
res2=1+'str'
二、异常的种类
在python中不同的异常可以用不同的类型(python中统一了类与类型,类型即类)去标识,一个异常标识一种错误
AttributeError   # 试图访问一个对象没有的树形,比如foo.x,但是foo没有属性x
IOError          # 输入/输出异常;基本上是无法打开文件
ImportError      # 无法引入模块或包;基本上是路径问题或名称错误
IndentationError # 语法错误(的子类) ;代码没有正确对齐
IndexError       # 下标索引超出序列边界,比如当x只有三个元素,却试图访问x[5]
KeyError         # 试图访问字典里不存在的键
KeyboardInterrupt# Ctrl+C被按下
NameError        # 使用一个还未被赋予对象的变量
SyntaxError      # Python代码非法,代码不能编译(个人认为这是语法错误,写错了)
TypeError        # 传入对象类型与要求的不符合
UnboundLocalError# 试图访问一个还未被设置的局部变量,基本上是由于另有一个同名的全局变量,导致你以为正在访问它
ValueError       # 传入一个调用者不期望的值,即使值的类型是正确的
ArithmeticError
AssertionError
AttributeError
BaseException
BufferError
BytesWarning
DeprecationWarning
EnvironmentError
EOFError
Exception
FloatingPointError
FutureWarning
GeneratorExit
ImportError
ImportWarning
IndentationError
IndexError
IOError
KeyboardInterrupt
KeyError
LookupError
MemoryError
NameError
NotImplementedError
OSError
OverflowError
PendingDeprecationWarning
ReferenceError
RuntimeError
RuntimeWarning
StandardError
StopIteration
SyntaxError
SyntaxWarning
SystemError
SystemExit
TabError
TypeError
UnboundLocalError
UnicodeDecodeError
UnicodeEncodeError
UnicodeError
UnicodeTranslateError
UnicodeWarning
UserWarning
ValueError
Warning
ZeroDivisionError
三、异常处理
为了保证程序的健壮性与容错性,即在遇到错误时程序不会崩溃,我们需要对异常进行处理,
如果错误发生的条件是可预知的,我们需要用if进行处理:在错误发生之前进行预防
AGE=10
while True:
    age=input('>>: ').strip()
    if age.isdigit(): #只有在age为字符串形式的整数时,下列代码才不会出错,该条件是可预知的
        age=int(age)
        if age == AGE:
            print('you got it')
            break
如果错误发生的条件是不可预知的,则需要用到try...except:在错误发生之后进行处理
#基本语法为
try:
    被检测的代码块
except 异常类型:
    try中一旦检测到异常,就执行这个位置的逻辑
#举例
try:
    f=open('a.txt')
    g=(line.strip() for line in f)
    print(next(g))
    print(next(g))
    print(next(g))
    print(next(g))
    print(next(g))
except StopIteration:
    f.close()
更多用法:
#1 异常类只能用来处理指定的异常情况,如果非指定异常则无法处理。
s1 = 'hello'
try:
    int(s1)
except IndexError as e: # 未捕获到异常,程序直接报错
    print e

#2 多分支
s1 = 'hello'
try:
    int(s1)
except IndexError as e:
    print(e)
except KeyError as e:
    print(e)
except ValueError as e:
    print(e)

#3 万能异常Exception
s1 = 'hello'
try:
    int(s1)
except Exception as e:
    print(e)

#4 多分支异常与万能异常
#4.1 如果你想要的效果是,无论出现什么异常,我们统一丢弃,或者使用同一段代码逻辑去处理他们,那么骚年,大胆的去做吧,只有一个Exception就足够了。
#4.2 如果你想要的效果是,对于不同的异常我们需要定制不同的处理逻辑,那就需要用到多分支了。

#5 也可以在多分支后来一个Exception
s1 = 'hello'
try:
    int(s1)
except IndexError as e:
    print(e)
except KeyError as e:
    print(e)
except ValueError as e:
    print(e)
except Exception as e:
    print(e)

#6 异常的其他机构
s1 = 'hello'
try:
    int(s1)
except IndexError as e:
    print(e)
except KeyError as e:
    print(e)
except ValueError as e:
    print(e)
#except Exception as e:
#    print(e)
else:
    print('try内代码块没有异常则执行我')
finally:
    print('无论异常与否,都会执行该模块,通常是进行清理工作')

#7 主动触发异常
try:
    raise TypeError('类型错误')
except Exception as e:
    print(e)

#8 自定义异常
class EgonException(BaseException):
    def __init__(self,msg):
        self.msg=msg
    def __str__(self):
        return self.msg

try:
    raise EgonException('类型错误')
except EgonException as e:
    print(e)

#9 断言:assert 条件
assert 1 == 1
assert 1 == 2

#10 总结try..except

1:把错误处理和真正的工作分开来
2:代码更易组织,更清晰,复杂的工作任务更容易实现;
3:毫无疑问,更安全了,不至于由于一些小的疏忽而使程序意外崩溃了;
四、什么时候用异常处理
首先try...except是你附加给你的程序的一种异常处理的逻辑,与你的主要的工作是没有关系的,这种东西加的多了,会导致你的代码可读性变差。
只有在错误发生的条件无法预知的情况下,才应该加上try...except
