LNMP_nginx安装_3
发布时间:2019-08-05 16:35:13编辑:auto阅读(2151)
cd /usr/local/src/
wget http://nginx.org/download/nginx-1.6.2.tar.gz
tar zxvf nginx-1.6.2.tar.gz
cd nginx-1.6.2
./configure --prefix=/usr/local/nginx --with-pcre
./configure --prefix=/usr/local/nginx --user=nobody --group=nobody --with-http_stub_status_module --with-http_ssl_module
make
make install
启动nginx:
/usr/local/nginx/sbin/nginx
错误信息:
错误2:
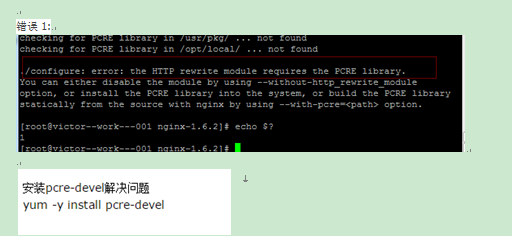
./configure: error: the HTTP rewrite module requires the PCRE library. You can either disable the module by using --without-http_rewrite_module option, or install the PCRE library into the system, or build the PCRE library statically from the source with
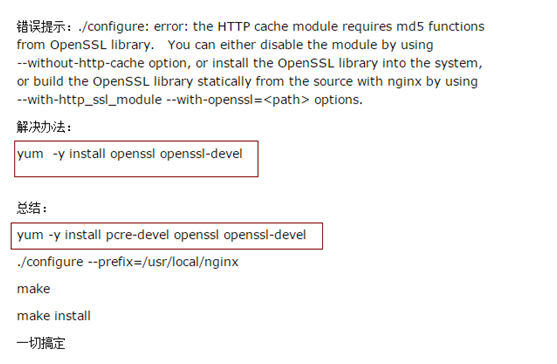
yum install -y pcre-devel openssl openssl-devel这个还不行,
ftp://ftp.csx.cam.ac.uk/pub/software/programming/pcre/pcre-8.38.tar.gz
./configure
make &&make install
编写nginx启动脚本
vim /etc/init.d/nginx //加入如下内容
#!/bin/bash
# chkconfig: - 30 21
# description: http service.
# Source Function Library
. /etc/init.d/functions
# Nginx Settings
NGINX_SBIN="/usr/local/nginx/sbin/nginx"
NGINX_CONF="/usr/local/nginx/conf/nginx.conf"
NGINX_PID="/usr/local/nginx/logs/nginx.pid"
RETVAL=0
prog="Nginx"
start() {
echo -n $"Starting $prog: "
mkdir -p /dev/shm/nginx_temp
daemon $NGINX_SBIN -c $NGINX_CONF
RETVAL=$?
echo
return $RETVAL
}
stop() {
echo -n $"Stopping $prog: "
killproc -p $NGINX_PID $NGINX_SBIN -TERM
rm -rf /dev/shm/nginx_temp
RETVAL=$?
echo
return $RETVAL
}
reload(){
echo -n $"Reloading $prog: "
killproc -p $NGINX_PID $NGINX_SBIN -HUP
RETVAL=$?
echo
return $RETVAL
}
restart(){
stop
start
}
configtest(){
$NGINX_SBIN -c $NGINX_CONF -t
return 0
}
case "$1" in
start)
start
;;
stop)
stop
;;
reload)
reload
;;
restart)
restart
;;
configtest)
configtest
;;
*)
echo $"Usage: $0 {start|stop|reload|restart|configtest}"
RETVAL=1
esac
exit $RETVAL
保存后,执行
chmod a+x /etc/init.d/nginx
chkconfig --add nginx
chkconfig nginx on
错误:
/usr/local/nginx/sbin/nginx: error while loading shared libraries: libpcre.so.1:
1、首先确认已经安装好pcre 软件(nginx 依赖该软件)
对于/lib/* 32位系统来说:
#查看lib库 |
2 | # ls /lib/ |grep pcre |
3 | libpcre.so.0 |
4 | libpcre.so.0.0.1 |
5 | #添加软连接 |
6 | # ln -s /lib/libpcre.so.0.0.1 /lib/libpcre.so.1 |
ps: 也有可能 pcre lib文件在目录:/usr/local/lib/
对于/lib64/* 64位系统来说:
#查看lib库 |
2 | # ls /lib64/ |grep pcre |
3 | libpcre.so.0 |
4 | libpcre.so.0.0.1 |
5 | #添加软连接 |
6 | # ln -s /lib64/libpcre.so.0.0.1 /lib64/libpcre.so.1 |
也有可能 pcre lib文件在目录:/usr/local/lib64/。
配置nginx
vim /usr/local/nginx/conf/nginx.conf //清空原来的配置,加入如下内容:
user nobody nobody;
worker_processes 2;
error_log /usr/local/nginx/logs/nginx_error.log crit;
pid /usr/local/nginx/logs/nginx.pid;
worker_rlimit_nofile 51200;
events
{
use epoll;
worker_connections 6000;
}
http
{
include mime.types;
default_type application/octet-stream;
server_names_hash_bucket_size 3526;
server_names_hash_max_size 4096;
log_format combined_realip '$remote_addr $http_x_forwarded_for [$time_local]'
'$host "$request_uri" $status'
'"$http_referer" "$http_user_agent"';
sendfile on;
tcp_nopush on;
keepalive_timeout 30;
client_header_timeout 3m;
client_body_timeout 3m;
send_timeout 3m;
connection_pool_size 256;
client_header_buffer_size 1k;
large_client_header_buffers 8 4k;
request_pool_size 4k;
output_buffers 4 32k;
postpone_output 1460;
client_max_body_size 10m;
client_body_buffer_size 256k;
client_body_temp_path /usr/local/nginx/client_body_temp;
proxy_temp_path /usr/local/nginx/proxy_temp;
fastcgi_temp_path /usr/local/nginx/fastcgi_temp;
fastcgi_intercept_errors on;
tcp_nodelay on;
gzip on;
gzip_min_length 1k;
gzip_buffers 4 8k;
gzip_comp_level 5;
gzip_http_version 1.1;
gzip_types text/plain application/x-javascript text/css text/htm application/xml;
include vhosts/*.conf;
}
mkdir /usr/local/nginx/conf/vhosts
vi jzg.conf
// 加入
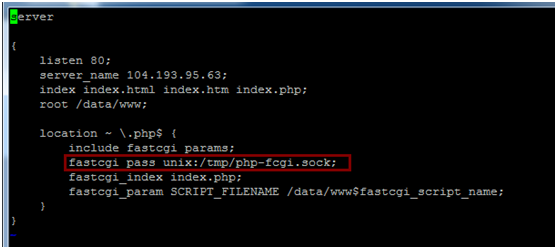
server
{
listen 80;
server_name localhost;
index index.html index.htm index.php;
root /data/www;
location ~ \.php$ {
include fastcgi_params;
fastcgi_pass unix:/tmp/php-fcgi.sock;
fastcgi_index index.php;
fastcgi_param SCRIPT_FILENAME /data/www$fastcgi_script_name;
}
}
/usr/local/nginx/sbin/nginx -t 检查配置文件
重新加载/usr/local/nginx/sbin/nginx -s reload
这里会出现一个错误:
2016/07/16 16:52:02 [crit] 23561#0: *89 connect() tounix:/tmp/php-fcgi.sock failed (2: No such file or directory) while connectingto upstream, client: 103.242.111.113, server: localhost, request: "GET/install/ HTTP/1.1", upstream:"fastcgi://unix:/tmp/php-fcgi.sock:", host: "104.193.95.63"
1.Touch /tmp/php-fcgi.sock
2.Chown nobody:nobody /tmp/php-fcgi.sock (这里要先写文件进去,才能改权限)
3.编辑vi /usr/local/nginx/conf/vhosts/jzq.conf
PHP:
vim /usr/local/php/etc/php-fpm.conf //把之前的内容清空,然后写入如下配置:
[global]
pid = /usr/local/php/var/run/php-fpm.pid
error_log = /usr/local/php/var/log/php-fpm.log
[www]
listen = /tmp/php-fcgi.sock
user = php-fpm
group = php-fpm
listen.owner = nobody //和后面的nginx的一致
listen.group = nobody // 同上
pm = dynamic
pm.max_children = 50
pm.start_servers = 20
pm.min_spare_servers = 5
pm.max_spare_servers = 35
pm.max_requests = 500
rlimit_files = 1024
重启php-fpm与nginx就可以了,l s-all查看/dev/shm/php-cgi.sock由普通文件变成s开头的unix套接字
上一篇: 指针与数组的关联3 --声明
下一篇: 3_Oracle_Admin_SPFIL
- openvpn linux客户端使用
52059
- H3C基本命令大全
51927
- openvpn windows客户端使用
42152
- H3C IRF原理及 配置
38996
- Python exit()函数
33497
- openvpn mac客户端使用
30449
- python全系列官方中文文档
29084
- python 获取网卡实时流量
24116
- 1.常用turtle功能函数
24021
- python 获取Linux和Windows硬件信息
22372
- LangChain1.0-Agent-部署/上线(开发人员必备)
125°
- LangChain1.0-Agent-Spider实战(爬虫函数替代API接口)
157°
- LangChain1.0-Agent(进阶)本地模型+Playwright实现网页自动化操作
168°
- LangChain1.0-Agent记忆管理
152°
- LangChain1.0-Agent接入自定义工具与React循环
177°
- LangChain1.0-Agent开发流程
163°
- LangChain1.0调用vllm本地部署qwen模型
184°
- LangChain-1.0入门实践-搭建流式响应的多轮问答机器人
190°
- LangChain-1.0入门实战-1
190°
- LangChain-1.0教程-(介绍,模型接入)
207°
- 姓名:Run
- 职业:谜
- 邮箱:383697894@qq.com
- 定位:上海 · 松江


