Python3:用QQ邮箱发送邮件
发布时间:2019-07-31 09:30:51编辑:auto阅读(2349)
1. 环境
操作系统 | Win10 |
IDE | PyCharm Community 2018.1 |
Python | 3.5 |
2. 设置QQ邮箱
QQ邮箱是SSL认证的邮箱系统,要用QQ邮箱发送邮件,需要开启POP3/ SMTP服务,并获取授权码。
2.1 开启POP3/IMAP/SMTP/Exchange/CardDAV/CalDAV服务
1) 打开QQ邮箱,点击【设置】

2)在【账户】tab页,找到【POP3/IMAP/SMTP/Exchange/CardDAV/CalDAV服务】,点击【开启】POP3/SMTP服务

2.1 QQ号申请第二代密码保护
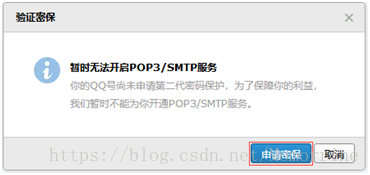
如果QQ号还没申请第二代密码保护,则会弹出【验证保密】对话框
1)在【验证保密】对话框中,点击【申请密保】按钮
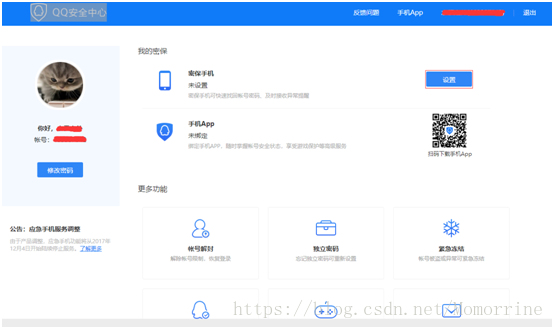
2) 弹出【QQ安全中心】页面,点击【密保手机】右边的【设置】按钮
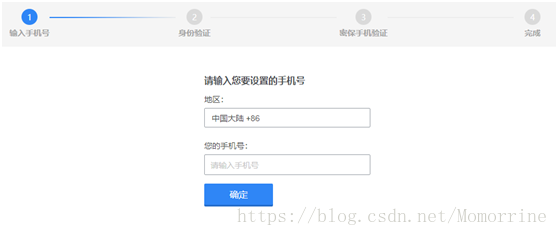
3) 输入手机号码后,点击【确定】按钮,手机上会收到验证码
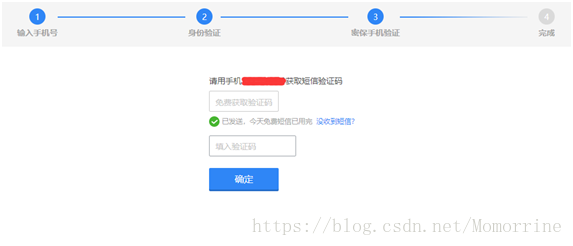
4)输入手机上收到的验证码后,点击【确定】按钮
5) 申请成功
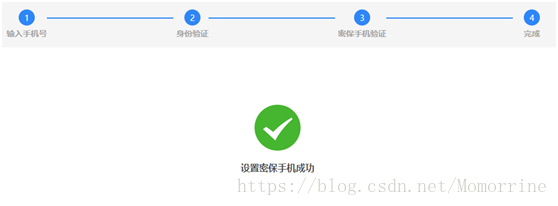
2.3 继续开启POP3/IMAP/SMTP/Exchange/CardDAV/CalDAV服务
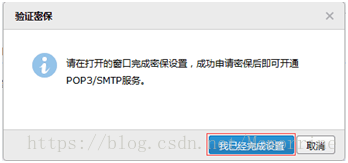
1) QQ号码申请第二代密保成功后,点击【验证密保】对话框中的【我已经完成设置】按钮
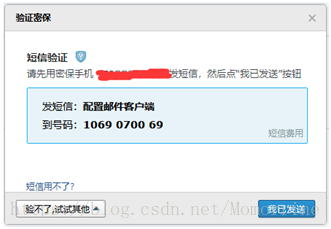
2) 用手机往1069070069发送内容为【配置邮件客户端】的短信后,点击【我已发送】按钮
3) 弹出【开启POP3/SMTP】对话框,其中的虚线框中就是授权码
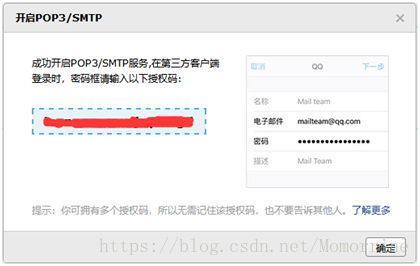
2.4 获取授权码
如果之前已经开启了POP3/SMTP服务,而已经忘了之前申请的授权码的话,可以点击下图中的【生成授权码】链接。

可以重新发送短信获取授权码。试了一下,旧授权码和新授权码都可以用。
3. 代码
前面已经提到过,QQ邮箱是SSL认证的邮箱系统,因此用QQ邮箱发送邮件,需要创建一个SMTP_SSL对象,而不是SMTP对象,然后用发送邮箱及之前获取到的授权码login,最后调用sendmail()发送邮件。
import smtplib

smtpserver = "smtp.qq.com"
smtpport = 465
from_mail = "aaaaa@qq.com"
to_mail = ["bbbbb@qq.com"]
password = "****************"   # 16位授权码

try:
    smtp = smtplib.SMTP_SSL(smtpserver,smtpport)
    smtp.login(from_mail,password)
    smtp.sendmail(from_mail,to_mail,msg.as_string())
except(smtplib.SMTPException) as e:
    print(e.message)
finally:
    smtp.quit()
用try-except-finally括起来,是为了捕捉可能的错误信息。
这很简单,但细心的读者应该注意到,上面代码中所有的方法的参数都有定义,唯独sendmail(from_addr, to_addrs, msg)的第3个参数msg,即邮件的发送内容没有定义,而发送邮件的关键就在于此。发送内容的格式是SMTP规定的,如果不符合规定,即会导致邮件发送失败。
邮件主要包括三个部分:一是我称之为属性的部分,二是正文,三是附件。包含各部分内容的是一个MIMEMultipart对象,其实邮件的任何部分都是可以为空的,甚至都为空,还是可以成功发送的。下面主要讨论的就是这三部分内容的组织。
3.1 组织邮件属性
邮件的属性,我指的是诸如发件人、主题、收件人、抄送等。
from email.mime.multipart import MIMEMultipart
from email.header import Header

subject = "test report"
from_name = "水云之外"
from_mail = "aaaaaa@qq.com"
to_mail = ["bbbbbb@qq.com"]
cc_mail = ["cccccc@qq.com"]

msg = MIMEMultipart()
msg["Subject"] = Header(subject, "utf-8")
msg["From"] = Header(from_name + " <" + from_mail + ">", "utf-8")
msg["To"] = Header(",".join(to_mail), "utf-8")
msg["Cc"] = Header(",".join(cc_mail), "utf-8")
3.2 组织邮件正文
3.2.1 文本格式正文
用正文字符串生成一个plain类型的MIMEText对象,可指定编码,然后黏贴到代表邮件全部内容的MIMEMultipart对象中。
from email.mime.multipart import MIMEMultipart
from email.mime.text import MIMEText

body = "hi, the attachment is the test report of this test, please check it in time."

msg = MIMEMultipart()
msgtext = MIMEText(body, "plain", "utf-8")
msg.attach(msgtext)
3.2.2 HTML格式正文
HTML格式的正文和文本格式的正文,唯一区别就是MIMEText对象的类型不同,是html,当然正文字符串应该是一个符合html格式的字符串。
from email.mime.multipart import MIMEMultipart
from email.mime.text import MIMEText

body = "<h3>hi, the attachment is the test report of this test, please check it in time.</h3>"

msg = MIMEMultipart()
msgtext = MIMEText(body, "html", "utf-8")
msg.attach(msgtext)
3.2.3 包含图片的正文
包含图片的正文,其实是一种特殊的html格式正文,正文字符串应符合html格式,且包含img标签,指定src,用读入图片文件创建一个MIMEImage对象,指定其属性,应和src中相匹配,最后将MIMEImage对象也黏贴到MIMEMultipart对象中。
from email.mime.multipart import MIMEMultipart
from email.mime.text import MIMEText
from email.mime.image import MIMEImage

imgbody = '''
<h3>hi, the attachment is the test report of this test, please check it in time.</h3>
<img src="cid:image1"/>
'''
imgfile = r"..\test\result.png"

msg = MIMEMultipart()
msgtext = MIMEText(imgbody, "html", "utf-8")
msg.attach(msgtext)

file = open(imgfile, "rb")
img = MIMEImage(file.read())
img.add_header("Content-ID", "<image1>")
msg.attach(img)
3.3 组织邮件附件
经验证,文本文件、HTML文件和图片文件(png),都可以用下面的代码组装到邮件内容中。生成一个MIMEBase对象,读入附件文件加载到该对象中,编码、添加头后同样黏贴到MIMEMultipart对象中。
from email.mime.multipart import MIMEMultipart
from email.mime.base import MIMEBase

attfile = r"..\test\result.html"

msg = MIMEMultipart()
att = MIMEBase("application", "octet-stream")
file = open(file, "rb")
att.set_payload(file.read())
encoders.encode_base64(att)

list = file.split("\\")
filename = list[len(list) - 1]
att.add_header("Content-Disposition", "attachment; filename='%s'" %filename)
msg.attach(att)
4. 最终代码
4.1 MailAssembler类
包含三个方法:attachAttributes()、attachBody()和attachAttachment(),分别用来组装属性、正文和附件。
from email.header import Header
from email.mime.base import MIMEBase
from email.mime.text import MIMEText
from email.mime.image import MIMEImage
from email import encoders

class MailAssembler:
    def attachAttributes(self,msg,subject,from_name,from_mail,to_mail,cc_mail=None):
        msg["Subject"] = Header(subject, "utf-8")
        msg["From"] = Header(from_name + " <" + from_mail + ">", "utf-8")
        msg["To"] = Header(",".join(to_mail), "utf-8")
        msg["Cc"] = Header(",".join(cc_mail), "utf-8")

    def attachBody(self,msg,body,type,imgfile=None):
        msgtext = MIMEText(body, type, "utf-8")
        msg.attach(msgtext)

        if imgfile != None:
            try:
                file = open(imgfile, "rb")
                img = MIMEImage(file.read())
                img.add_header("Content-ID", "<image1>")
                msg.attach(img)
            except(Exception) as err:
                print(str(err))
            finally:
                if file in locals():
                    file.close()

    def attachAttachment(self,msg,attfile):
        att = MIMEBase("application", "octet-stream")

        try:
            file = open(attfile, "rb")
            att.set_payload(file.read())
            encoders.encode_base64(att)
        except(Exception) as err:
            print(str(err))
        finally:
            if file in locals():
                file.close()

        if "\\" in attfile:
            list = attfile.split("\\")
            filename = list[len(list) - 1]
        else:
            filename = attfile
        att.add_header("Content-Disposition", "attachment; filename='%s'" %filename)

        msg.attach(att)
4.2 MailSender类
只有一个sendMail()方法,初始化的时候保存了发送的相关参数,之后就可以用该方法发送其参数msg了。
import smtplib

class MailSender:
    def __init__(self,smtpserver,smtpport,password,from_mail,to_mail,cc_mail=None):
        self.smtpserver = smtpserver
        self.smtpport = smtpport
        self.password = password
        self.from_mail = from_mail
        self.to_mail = to_mail
        self.cc_mail = cc_mail

    def sendMail(self,msg):
        try:
            smtp = smtplib.SMTP_SSL(self.smtpserver, self.smtpport)
            smtp.login(self.from_mail, self.password)
            if self.cc_mail == None:
                smtp.sendmail(self.from_mail, self.to_mail, msg.as_string())
            else:
                smtp.sendmail(self.from_mail, self.to_mail+self.cc_mail, msg.as_string())
            print("successful")
        except(smtplib.SMTPRecipientsRefused):
            print("Recipient refused")
        except(smtplib.SMTPAuthenticationError):
            print("Auth error")
        except(smtplib.SMTPSenderRefused):
            print("Sender refused")
        except(smtplib.SMTPException) as e:
            print(e.message)
        finally:
            smtp.quit()
4.3 主程序
在主程序中,调用了MailAssembler和MailSender的方法,完成邮件内容的组装和发送。邮件正文包含文字和图片,并有两个附件。
from email.mime.multipart import MIMEMultipart
from src.MailContent import MailAssembler
from src.MailSender import MailSender

subject = "test report"
from_name = "水云之外"
from_mail = "aaaaaa@qq.com"
to_mail = ["bbbbbb@qq.com"]
cc_mail = ["cccccc@qq.com"]
imgbody = '''
<h3>hi, the attachment is the test report of this test, please check it in time.</h3>
<img src="cid:image1"/>
'''
file1 = r"..\test\result.html"
file2 = r"..\test\result.txt"
imgfile = r"..\test\result.png"

smtpserver = "smtp.qq.com"
smtpport = 465
password = "****************"     # 授权码

msg = MIMEMultipart()
assembler = MailAssembler()
sender = MailSender(smtpserver,smtpport,password,from_mail,to_mail,cc_mail)
assembler.attachAttributes(msg,subject,from_name,from_mail,to_mail,cc_mail)
assembler.attachBody(msg,imgbody,"html",imgfile)
assembler.attachAttachment(msg,file1)
assembler.attachAttachment(msg,file2)
sender.sendMail(msg)
5. 参考文献
[1] 使用python发送QQ邮件 https://www.cnblogs.com/lovealways/p/6701662.html
[2] Python发送邮件(常见四种邮件内容)https://blog.csdn.net/xiaosongbk/article/details/60142996
[3] Selenium3+python3-发送添加附件的邮件 https://www.cnblogs.com/liyanqi/p/7885014.html
上一篇: 使用timeit测试python语句执行
下一篇: python3.2 实现在同一行打印,实
- openvpn linux客户端使用
52060
- H3C基本命令大全
51929
- openvpn windows客户端使用
42154
- H3C IRF原理及 配置
38996
- Python exit()函数
33499
- openvpn mac客户端使用
30450
- python全系列官方中文文档
29084
- python 获取网卡实时流量
24117
- 1.常用turtle功能函数
24023
- python 获取Linux和Windows硬件信息
22373
- LangChain1.0-Agent-部署/上线(开发人员必备)
129°
- LangChain1.0-Agent-Spider实战(爬虫函数替代API接口)
158°
- LangChain1.0-Agent(进阶)本地模型+Playwright实现网页自动化操作
169°
- LangChain1.0-Agent记忆管理
152°
- LangChain1.0-Agent接入自定义工具与React循环
177°
- LangChain1.0-Agent开发流程
163°
- LangChain1.0调用vllm本地部署qwen模型
184°
- LangChain-1.0入门实践-搭建流式响应的多轮问答机器人
194°
- LangChain-1.0入门实战-1
193°
- LangChain-1.0教程-(介绍,模型接入)
207°
- 姓名:Run
- 职业:谜
- 邮箱:383697894@qq.com
- 定位:上海 · 松江
