Ubuntu离线安装软件包
发布时间:2019-02-02 18:21:06编辑:admin阅读(4741)
一、应用场景
a.当我们需要在多台电脑安装同一个软件,并且这个软件很大,下载需要很长时间时
b.需要安装软件的ubuntu不能上网
二、离线安装包的制作
环境说明
系统是 ubuntu-16.04.5-server-amd64,默认已经安装好了python3,版本为3.5.2
安装制定软件
更改ubuntu的更新源为阿里云,默认的速度太慢了
sudo vi /etc/apt/sources.list
内容如下:
deb http://mirrors.aliyun.com/ubuntu/ xenial main restricted
deb http://mirrors.aliyun.com/ubuntu/ xenial-updates main restricted
deb http://mirrors.aliyun.com/ubuntu/ xenial universe
deb http://mirrors.aliyun.com/ubuntu/ xenial-updates universe
deb http://mirrors.aliyun.com/ubuntu/ xenial multiverse
deb http://mirrors.aliyun.com/ubuntu/ xenial-updates multiverse
deb http://mirrors.aliyun.com/ubuntu/ xenial-backports main restricted universe multiverse
deb http://mirrors.aliyun.com/ubuntu xenial-security main restricted
deb http://mirrors.aliyun.com/ubuntu xenial-security universe
deb http://mirrors.aliyun.com/ubuntu xenial-security multiverse
通过如下指令下载XXXX软件所需要的deb包,比如安装python3-pip
sudo apt-get -y install python3-pip
执行完上述指令后,XXXX软件的安装包就下载到了/var/cache/apt/archives目录下
生成依赖关系
新建一个文件夹
在项目根目录新建文件夹offlinePackage
sudo mkdir /offlinePackage
拷贝下载的deb包
将下载的deb包拷贝到上述新建的文件夹下
sudo cp -r /var/cache/apt/archives /offlinePackage
修改文件夹权限
修改文件夹的权限,可读可写可执行
sudo chmod 777 -R /offlinePackage/
建立deb包的依赖关系
sudo dpkg-scanpackages /offlinePackage/ /dev/null |gzip >/offlinePackage/Packages.gz
如果出现错误:sudo: dpkg-scanpackages: command not found
则需要安装dpkg-dev工具
sudo apt-get install dpkg-dev
打包成压缩包
sudo tar zcvf offlinePackage.tar.gz /offlinePackage/
保存offlinePackage.tar.gz文件到U盘或服务器
三、在另外一台Ubuntu上离线安装
拷贝文件到根目录
插入U盘或光盘,将offlinePackage.tar.gz复制到根目录下,解压
sudo tar zxvf offlinePackage.tar.gz -C /
添加到系统源
注意:我们在添加之前可以先将原来的源备份
sudo cp /etc/apt/sources.list /etc/apt/sources.list.back
将安装包所在和源路径添加到系统源source.list
sudo vi /etc/apt/sources.list
内容如下:
deb file:/// offlinePackage/
注意:offlinePackage前面有一个空格
更新系统源
sudo apt-get update
输出:
W: The repository 'file: offlinePackage/ Release' does not have a Release file.
N: Data from such a repository can't be authenticated and is therefore potentially dangerous to use.N: See apt-secure(8) manpage for repository creation and user configuration details.
大概意思是,这是不安全的更新源
离线安装
此时,在没有网络的情况下,我们就可以安装我们之间下载的XXXX软件了
比如安装python3-pip,注意:由于上面已经提示不安全了,所以安装软件时,必须要加--allow-unauthenticated
否则报错 E: There were unauthenticated packages and -y was used without --allow-unauthenticated
sudo apt-get -y install python3-pip --allow-unauthenticated
注意:
兼容性问题,如果我们制作安装包时,用的是64位的ubuntu,那么该离线包只能在其他64位系统上安装。
有些软件对ubuntu server和ubuntu desktop版也不兼容。总之,在什么系统下制作的离线包,就在什么系统下安装。
查看pip3版本
pip3 -V
输出:
pip 8.1.1 from /usr/lib/python3/dist-packages (python 3.5)
说明安装成功了!
本文参考链接:
https://blog.csdn.net/wangqiulin123456/article/details/39582269
四、使用deb http方式
上线使用的是file方式,只能本机使用。那么其他服务器要使用,就不行了!
这个时候,需要使用http方式。可以让局域网的其他服务器使用!
安装nginx
sudo apt-get install -y nginx
搭建项目索引页
这里不使用域名,直接访问IP地址作为主页!
注释掉nginx的默认首页
sudo vim /etc/nginx/nginx.conf
找到以下内容,将sites-enabled注释掉
include /etc/nginx/conf.d/*.conf;#include /etc/nginx/sites-enabled/*;
进入目录conf.d,新建文件deb.conf
vim /etc/nginx/conf.d/deb.conf
内容如下:
server {
    listen 80;
    server_name localhost;
    root /offlinePackage;

    location / {
        autoindex on;
    }
}
检查配置文件是否正确
sudo nginx -t
如果出现以下提示,表示ok
nginx: the configuration file /etc/nginx/nginx.conf syntax is ok
nginx: configuration file /etc/nginx/nginx.conf test is successful
加载配置
nginx -s reload
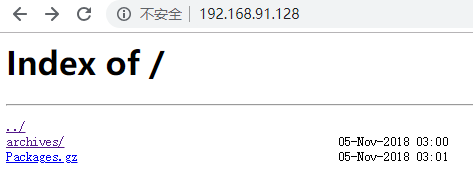
访问索引页
访问url: http://192.168.91.128/ ,效果如下:

更新ubuntu数据库
编辑配置文件
sudo vim /etc/apt/sources.list
最后一行增加
deb http://192.168.91.128 /
注意:保证有空格,否则会提示格式错误。
最后一个是斜杠
使用apt-get update来更新一下
sudo apt-get update
之后,就可以安装软件了!
务必注意:使用apt-get install -y 软件名,后面一定要带--allow-unauthenticated,因为它是私有的,还没有签名!
本文从参考链接:
https://www.jianshu.com/p/ee870d63c175
上一篇: CMDB管理系统
下一篇: Python 离线环境
- openvpn linux客户端使用
52076
- H3C基本命令大全
51954
- openvpn windows客户端使用
42175
- H3C IRF原理及 配置
39018
- Python exit()函数
33522
- openvpn mac客户端使用
30478
- python全系列官方中文文档
29106
- python 获取网卡实时流量
24143
- 1.常用turtle功能函数
24047
- python 获取Linux和Windows硬件信息
22390
- LangChain1.0-Agent-部署/上线(开发人员必备)
159°
- LangChain1.0-Agent-Spider实战(爬虫函数替代API接口)
186°
- LangChain1.0-Agent(进阶)本地模型+Playwright实现网页自动化操作
194°
- LangChain1.0-Agent记忆管理
175°
- LangChain1.0-Agent接入自定义工具与React循环
196°
- LangChain1.0-Agent开发流程
184°
- LangChain1.0调用vllm本地部署qwen模型
212°
- LangChain-1.0入门实践-搭建流式响应的多轮问答机器人
214°
- LangChain-1.0入门实战-1
220°
- LangChain-1.0教程-(介绍,模型接入)
227°
- 姓名:Run
- 职业:谜
- 邮箱:383697894@qq.com
- 定位:上海 · 松江
