python3-基本图像操作
发布时间:2021-07-27 23:55:06编辑:run阅读(3985)
不同的python库都可以用于基本的图像操作,几乎所有库都以numpy ndarray存储图像
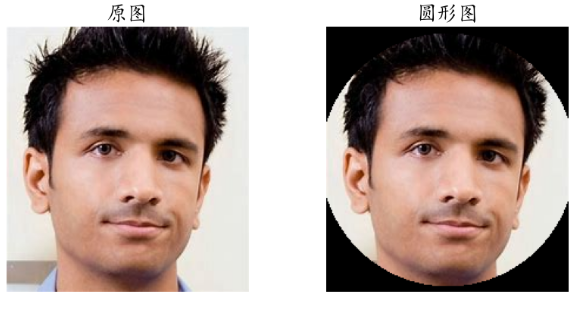
使用numpy数组切片成圆形图
import matplotlib.image as mpimg
import matplotlib.pylab as plt
import numpy as np

# 使用numpy数组切片和掩模在人物图像上创建圆形掩模
# 指定默认字体
plt.rcParams['font.sans-serif'] = ['KaiTi']
# 解决保存图像是负号'-'显示为方块的问题
plt.rcParams['axes.unicode_minus'] = False
lena = mpimg.imread(r'D:\image_processing\jpgs\c.jpg')
test = mpimg.imread(r'D:\image_processing\jpgs\c.jpg')
lx, ly, _ = lena.shape
x, y = np.ogrid[0:lx, 0:ly]
mask = (x - lx / 2) ** 2 + (y - ly / 2) ** 2 > lx * ly / 4
lena[mask, :] = 0
plt.figure(figsize=(10,10))
plt.subplot(221), plt.imshow(test), plt.title('原图', size=20),plt.axis('off')
plt.subplot(222), plt.imshow(lena), plt.title('圆形图', size=20),plt.axis('off')
plt.show()
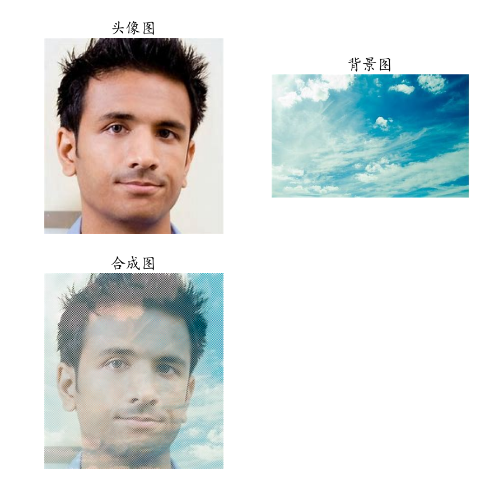
简单的图像合并,将背景图和人物图合并成一张新图
from PIL import Image
import matplotlib.pylab as plt

# 指定默认字体
plt.rcParams['font.sans-serif'] = ['KaiTi']
# 解决保存图像是负号'-'显示为方块的问题
plt.rcParams['axes.unicode_minus'] = False
im1 = Image.open(r'D:\image_processing\jpgs\c.jpg')
im2 = Image.open(r'D:\image_processing\jpgs\aa.jpg')
w1 = im1.width  # 图片的宽
h1 = im1.height  # 图片的高
im3 = Image.new('RGB', (w1, h1), 'black')
n = 0
for y in range(h1):
    for x in range(w1):
        if y % 2 == 0:
            if n % 2 == 0:
                im3.putpixel((x, y), im1.load()[x, y])
            else:
                im3.putpixel((x, y), im2.load()[x, y])
            n += 1
        else:
            if n % 2 == 0:
                im3.putpixel((x, y), im2.load()[x, y])
            else:
                im3.putpixel((x, y), im1.load()[x, y])
            n += 1
plt.figure(figsize=(10,10))
plt.subplot(221), plt.imshow(im1), plt.title('头像图', size=20),plt.axis('off')
plt.subplot(222), plt.imshow(im2), plt.title('背景图', size=20),plt.axis('off')
plt.subplot(223), plt.imshow(im3), plt.title('合成图', size=20),plt.axis('off')
plt.show()
下一篇: python3-PIL图像实战1
- openvpn linux客户端使用
52076
- H3C基本命令大全
51954
- openvpn windows客户端使用
42174
- H3C IRF原理及 配置
39017
- Python exit()函数
33521
- openvpn mac客户端使用
30476
- python全系列官方中文文档
29106
- python 获取网卡实时流量
24143
- 1.常用turtle功能函数
24044
- python 获取Linux和Windows硬件信息
22389
- LangChain1.0-Agent-部署/上线(开发人员必备)
158°
- LangChain1.0-Agent-Spider实战(爬虫函数替代API接口)
186°
- LangChain1.0-Agent(进阶)本地模型+Playwright实现网页自动化操作
194°
- LangChain1.0-Agent记忆管理
175°
- LangChain1.0-Agent接入自定义工具与React循环
194°
- LangChain1.0-Agent开发流程
184°
- LangChain1.0调用vllm本地部署qwen模型
212°
- LangChain-1.0入门实践-搭建流式响应的多轮问答机器人
214°
- LangChain-1.0入门实战-1
220°
- LangChain-1.0教程-(介绍,模型接入)
225°
- 姓名:Run
- 职业:谜
- 邮箱:383697894@qq.com
- 定位:上海 · 松江
