Kubernetes1.18.1 ELK收集nginx日志
发布时间:2021-01-08 10:34:21编辑:admin阅读(4883)
一、概述
在k8s集群中,已经部署了nginx应用,需要使用elk来收集日志。
注意:elk并没有放在k8s集群中,使用单独的服务器进行安装。不推荐elk放在k8s集群中!
其中filebeat,使用DaemonSet方式部署,这样就可以自动收集了。
二、部署
环境说明
操作系统:centos 7.6
k8s版本:1.18.1
ip地址:10.212.82.63
配置:2核4g
主机名:k8s-master
操作系统:centos 7.6
k8s版本:1.18.1
ip地址:10.212.82.65
配置:2核4g
主机名:k8s-node01
日志说明
nginx容器,默认的日志路径为:/var/log/nginx,所以在部署时,我会将此目录映射到宿主机的/opt/log/nginx目录
部署filebeat时,需要将/opt/log/nginx目录挂载到filebeat容器中,这样才能读取nginx日志。
elk
本文使用elk版本,统一采用7.5.1
由于资源紧张,我这里演示效果,在 k8s-node01 部署elk。在实际生产环境中,请单独部署。
关于elasticsearch和head插件安装,请参考链接:
https://www.cnblogs.com/xiao987334176/p/13565468.html
关于logstash安装,请参考链接:
https://www.cnblogs.com/xiao987334176/p/13565790.html
关于kibana安装,请参考链接:
https://www.cnblogs.com/xiao987334176/p/13570301.html
请确保elk工作正常,kibana能看到 logstash收集到的/var/log/messages日志信息。
nginx
登录到主机k8s-node01,创建日志目录
mkdir -p /opt/log/nginx
登录到主机k8s-master,部署nginx
新建文件 nginx-deployment.yaml,内容如下:
apiVersion: apps/v1
kind: Deployment
metadata:
  name: nginx-1
spec:
  selector:
    matchLabels:
      run: nginx-1
  replicas: 1
  template:
    metadata:
      labels:
        run: nginx-1
    spec:
      containers:
      - name: nginx-1
        image: nginx:stable-alpine
        ports:
        - containerPort: 80
        volumeMounts:
          - mountPath: /var/log/nginx
            name: nginx-log
      restartPolicy: Always
      volumes:
        - name: nginx-log
          hostPath:
            path: /opt/log/nginx
新建文件 nginx-service.yaml,内容如下:
apiVersion: v1
kind: Service
metadata:
  name: nginx-1
  labels:
    run: nginx-1
spec:
  type: NodePort
  ports:
  - port: 80
    name: nginx-port
    targetPort: 80
    protocol: TCP
    nodePort: 30008
  selector:
    run: nginx-1
开始正式部署
kubectl apply -f nginx-service.yaml
kubectl apply -f nginx-deployment.yaml
filebeat
filebeat的镜像,需要在官方的基础上,做一次封装。因为配置文件,需要调整一下。由于资源紧张,这里并没有使用私有仓库harbor或者云产商的私有仓库,直接使用本地存储。
登录到主机k8s-node01,新建目录,并创建dockerfile
mkdir -p /opt/filebeat
cd /opt/filebeatvi dockerfile
内容如下:
FROM elastic/filebeat:7.5.1ADD filebeat.yml /usr/share/filebeat/filebeat.yml
新建文件filebeat.yml,内容如下:
# 收集系统日志
filebeat.inputs:
- type: log
  enabled: true
  paths:
    - /opt/log/nginx/access.log
  fields:
    log_source: nginx-access

- type: log
  enabled: true
  paths:
    - /opt/log/nginx/error.log
  fields:
    log_source: nginx-error


filebeat.config:
  modules:
    path: ${path.config}/modules.d/*.yml
    reload.enabled: false

processors:
- add_cloud_metadata: ~
- add_docker_metadata: ~

output.elasticsearch:
  hosts: '10.212.82.65:9200'
  indices:
    - index: "filebeat-nginx-%{+yyyy.MM.dd}"
说明:
这里是读取2个日志文件,分别是access.log和error.log。然后将内容输出到elasticsearch
请根据实际情况修改!
生成镜像
docker build -t my-filebeat:v1 .
登录主机k8s-master,新建filebeat.yaml,内容如下:
apiVersion: apps/v1
kind: DaemonSet
metadata:
  name: filebeat-1
spec:
  selector:
    matchLabels:
      run: filebeat-1
  template:
    metadata:
      labels:
        run: filebeat-1
    spec:
      containers:
      - name: filebeat-1
        image: my-filebeat:v1
        imagePullPolicy: IfNotPresent
        volumeMounts:
          - mountPath: /opt/log
            name: log
      restartPolicy: Always
      volumes:
        - name: log
          hostPath:
            path: /opt/log
注意:这里采用DaemonSet方式部署,必须挂载目录/opt/log,否则无法读取。
正式部署
kubectl apply -f filebeat.yaml
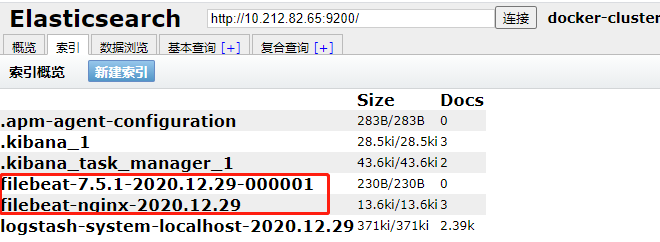
访问elasticsearch head插件,查看filebeat索引是否存在

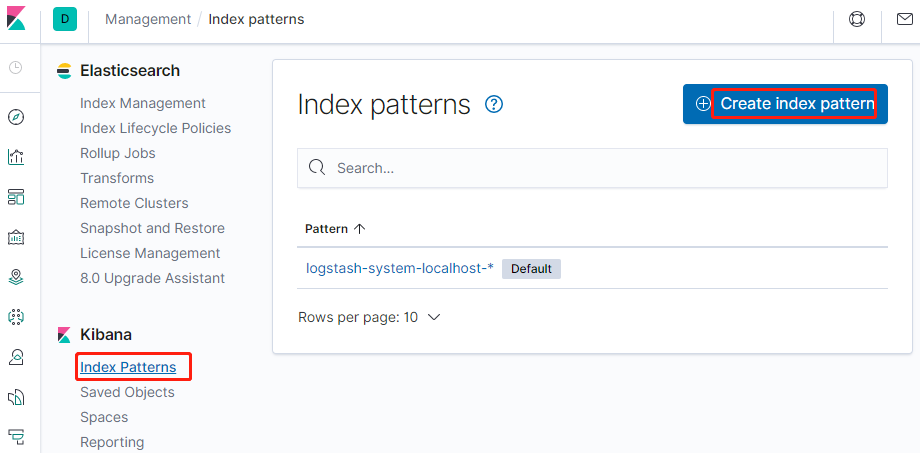
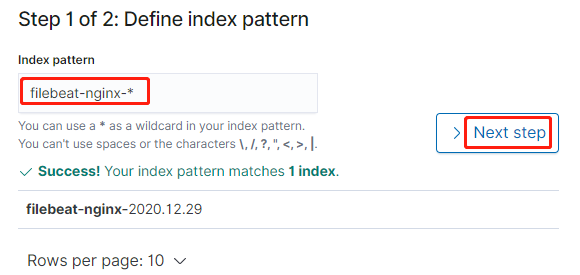
登录kibana,新建索引filebeat

索引名称为:filebeat-nginx-*

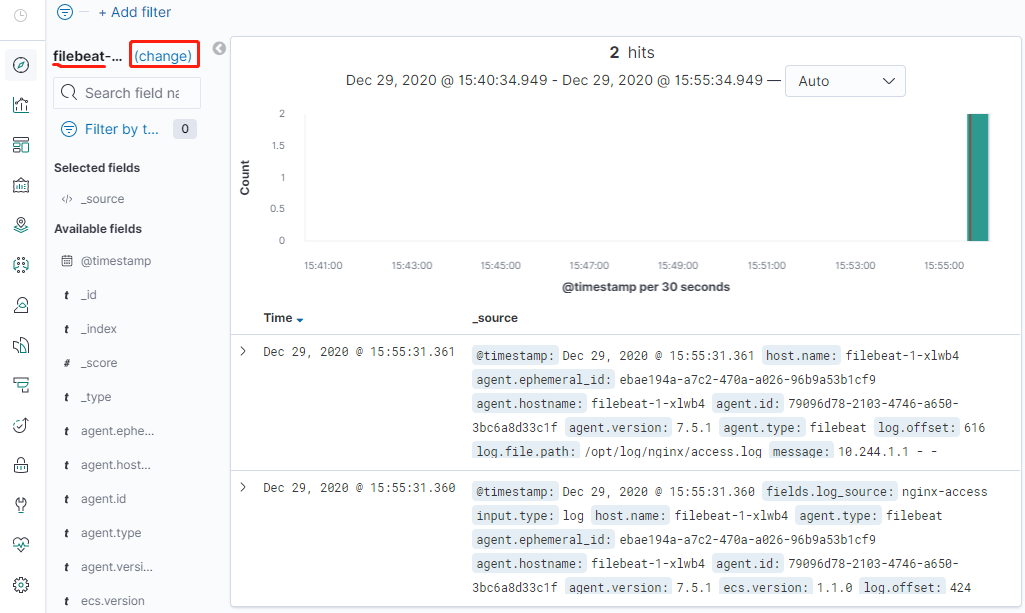
添加索引之后,返回主页面
点击change,切换索引到filebeat-nginx-*,然后刷新几遍nginx访问页面,效果如下:

上一篇: docker方式部署禅道
下一篇: Istio 是什么?
- openvpn linux客户端使用
52004
- H3C基本命令大全
51837
- openvpn windows客户端使用
42090
- H3C IRF原理及 配置
38941
- Python exit()函数
33445
- openvpn mac客户端使用
30389
- python全系列官方中文文档
29031
- python 获取网卡实时流量
24052
- 1.常用turtle功能函数
23977
- python 获取Linux和Windows硬件信息
22320
- LangChain1.0-Agent(进阶)大模型+Playwright实现网页自动化操作
33°
- LangChain1.0-Agent记忆管理
33°
- LangChain1.0-Agent接入自定义工具与React循环
61°
- LangChain1.0-Agent开发流程
59°
- LangChain1.0调用vllm本地部署qwen模型
94°
- LangChain-1.0入门实践-搭建流式响应的多轮问答机器人
111°
- LangChain-1.0入门实战-1
112°
- LangChain-1.0教程-(介绍,模型接入)
127°
- Ubuntu本地部署dots.ocr
545°
- Python搭建一个RAG系统(分片/检索/召回/重排序/生成)
2718°
- 姓名:Run
- 职业:谜
- 邮箱:383697894@qq.com
- 定位:上海 · 松江
