python使用pika操作rabbitmq
发布时间:2020-03-26 10:34:57编辑:admin阅读(4869)
一、概述
python 连接操作rabbitMQ 主要是使用pika库
pip3 install pika==1.1.0
官方对于pika有如下介绍
Since threads aren’t appropriate to every situation, it doesn’t require threads.
Pika core takes care not to forbid them, either.
The same goes for greenlets, callbacks, continuations, and generators.
 An instance of Pika’s built-in  connection adapters isn’t thread-safe, however.
线程并不适用于每种场景, 因此并不要求使用线程。 但是pika并不禁用线程, 对于
greenlets, callbacks也一样。 一个pika建立的连接并不是线程安全的
因此在多线程中共享一个pika连接不是线程安全的, 当然也有一种使用:
with one exception: you may call the connection method add_callback_threadsafe from
 another thread to schedule a callback within an active pika connection.
使用add_callback_threadsafe方法callback 一个pika连接从另外一个线程中
pika提供建立连接方式:
pika.adapters.asyncio_connection.AsyncioConnection - 用于python 3 AsyncIO的I/O异步模式
pika.BlockingConnection - 同步模式, 简单易用
pika.SelectConnection - 没有第三方依赖包的异步模式
pika.adapters.tornado_connection.TornadoConnection - 基于Tornado 的异步IO请求模式
pika.adapters.twisted_connection.TwistedProtocolConnection - 基于Twisted’的异步IO请求模式
二、普通版rabbitmq
环境说明
| 操作系统 | ip | 主机名 | 配置 | rabbitmq版本 |
| centos 6.9 | 192.168.31.7 | mq_01 | 1核2g | 3.8.2 |
| centos 6.9 | 192.168.31.216 | mq_02 | 1核2g | 3.8.2 |
| centos 6.9 | 192.168.31.214 | mq_03 | 1核2g | 3.8.2 |
| ubuntu 16.04 | 192.168.31.229 | mq_client | 1核2g | N/A |
注意:3台mq服务器,已经开启ssl。开启ssl之后,使用明文传输和使用ssl传输,都是可以的。
最经典的hello world
生产者
producer.py
import pika

auth = pika.PlainCredentials('admin', 'admin123')
connection = pika.BlockingConnection(pika.ConnectionParameters('192.168.31.7', '5672', '/', auth))
channel = connection.channel()

channel.queue_declare(queue='TEST01')

channel.basic_publish(exchange='',
                      routing_key='TEST01',
                      body='Hello World!')
print(" [x] Sent 'Hello World!'")
connection.close()
执行脚本
# python3 produce.py
 [x] Sent 'Hello World!'
消费者
consumer.py
import pika

auth = pika.PlainCredentials('admin', 'admin123')
connection = pika.BlockingConnection(pika.ConnectionParameters(host='192.168.31.7',port=5672,virtual_host= '/', credentials=auth))
channel = connection.channel()

channel.queue_declare(queue='TEST01')

def callback(ch, method, properties, body):
    print(" [x] Received %r" % body)

channel.basic_consume(on_message_callback=callback,
                      queue='TEST01',
                      auto_ack=True)

print(' [*] Waiting for messages. To exit press CTRL+C')
channel.start_consuming()
执行脚本
# python3 consumer.py
 [*] Waiting for messages. To exit press CTRL+C
 [x] Received b'Hello World!'
使用CTRL+C 结束脚本
三、SSL版rabbitmq
客户端采用的是ubuntu 16.04,因为发现centos 7.6编译python 3.7时,导入ssl报错,无法解决。
ubuntu 16.04可以解决导入ssl模块问题。
ubuntu 16.04安装python3-openssl
apt-get install -y python3-openssl
生产者
下载github示例代码,编辑配置文件
git clone https://github.com/Nepitwin/RabbitSSL
cd RabbitSSL-master/Python
vi configuration.py
修改红色部分
import pika
import ssl


ssl_opts = {
    "ca_certificate": "ca_certificate.pem",
    "client_certificate": "client_certificate.pem",
    "client_key": "client_key.pem",
    "cert_reqs": ssl.CERT_REQUIRED,
    "ssl_version": ssl.PROTOCOL_TLSv1_2
}

rabbit_opts = {
    "host": "192.168.31.7",
    "port": 5671,
    "user": "admin",
    "password": "admin123",
}

rabbit_queue_opts = {
    "queue": "python_ssl",
    "message": "Hello SSL World :)"
}

context = ssl.create_default_context(cafile=ssl_opts["ca_certificate"])
# 忽略证书验证
context = ssl._create_unverified_context()

context.load_cert_chain(ssl_opts["client_certificate"], ssl_opts["client_key"])
ssl_options = pika.SSLOptions(context, rabbit_opts["host"])
parameters = pika.ConnectionParameters(host=rabbit_opts["host"],
                                       port=rabbit_opts["port"],
                                       credentials=pika.PlainCredentials(rabbit_opts["user"], rabbit_opts["password"]),
                                       ssl_options=ssl_options)
注意:由于证书是不受信任的,因此必须要关闭证书验证,否则会运行报错,提示证书验证失败!
执行脚本
# python3 rabbitssl_send.py
 [x] Sent 'Hello SSL World :)!'
消费者
执行脚本
# python3 rabbitssl_consume.py
 [*] Waiting for messages. To exit press CTRL+C
 [x] Received b'Hello SSL World :)'
使用CTRL+C 结束脚本
备注:
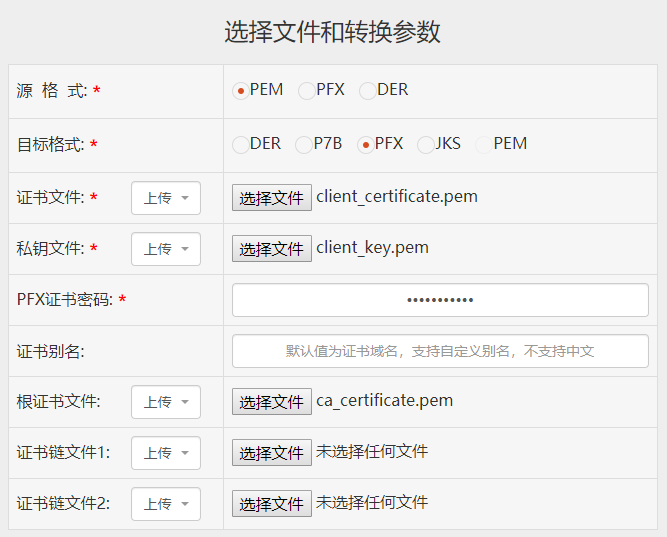
这个github项目也提供了java测试代码,但是里面提供的p12和jks证书文件不对。
需要使用python文件的3个文件,转换一下才行。
在线转换连接:
https://www.chinassl.net/ssltools/convert-ssl.html
转换p12,证书密码填:rabbitstore

下载之后,会得到一个 DESKTOP-T8LNPRN.pfx。
由于pfx和p12是同一类型文件,将后缀重名的为p12即可。
转换jks

下载之后,会得到一个 DESKTOP-T8LNPRN.jks
本文参考链接:
https://blog.csdn.net/comprel/article/details/93788782
https://blog.csdn.net/yixieling4397/article/details/79861379
https://github.com/Nepitwin/RabbitSSL
下一篇: gitlab迁移单个项目
- openvpn linux客户端使用
52054
- H3C基本命令大全
51920
- openvpn windows客户端使用
42147
- H3C IRF原理及 配置
38994
- Python exit()函数
33493
- openvpn mac客户端使用
30444
- python全系列官方中文文档
29080
- python 获取网卡实时流量
24110
- 1.常用turtle功能函数
24018
- python 获取Linux和Windows硬件信息
22369
- LangChain1.0-Agent-部署/上线(开发人员必备)
117°
- LangChain1.0-Agent-Spider实战(爬虫函数替代API接口)
151°
- LangChain1.0-Agent(进阶)本地模型+Playwright实现网页自动化操作
163°
- LangChain1.0-Agent记忆管理
148°
- LangChain1.0-Agent接入自定义工具与React循环
174°
- LangChain1.0-Agent开发流程
161°
- LangChain1.0调用vllm本地部署qwen模型
182°
- LangChain-1.0入门实践-搭建流式响应的多轮问答机器人
187°
- LangChain-1.0入门实战-1
186°
- LangChain-1.0教程-(介绍,模型接入)
200°
- 姓名:Run
- 职业:谜
- 邮箱:383697894@qq.com
- 定位:上海 · 松江
