Filebeat入门
发布时间:2020-02-16 18:52:17编辑:admin阅读(3799)
Packetbeat:网络数据包分析器,提供有关您的应用程序服务器之间交换的事务的信息。
Filebeat:从您的服务器发送日志文件。
Metricbeat:是一个服务器监视代理程序,它定期从服务器上运行的操作系统和服务收集指标。
Winlogbeat:提供Windows事件日志。
一、安装filebeat
简介
Beats 是安装在服务器上的数据中转代理。
Beats 可以将数据直接传输到 Elasticsearch 或传输到 Logstash 。
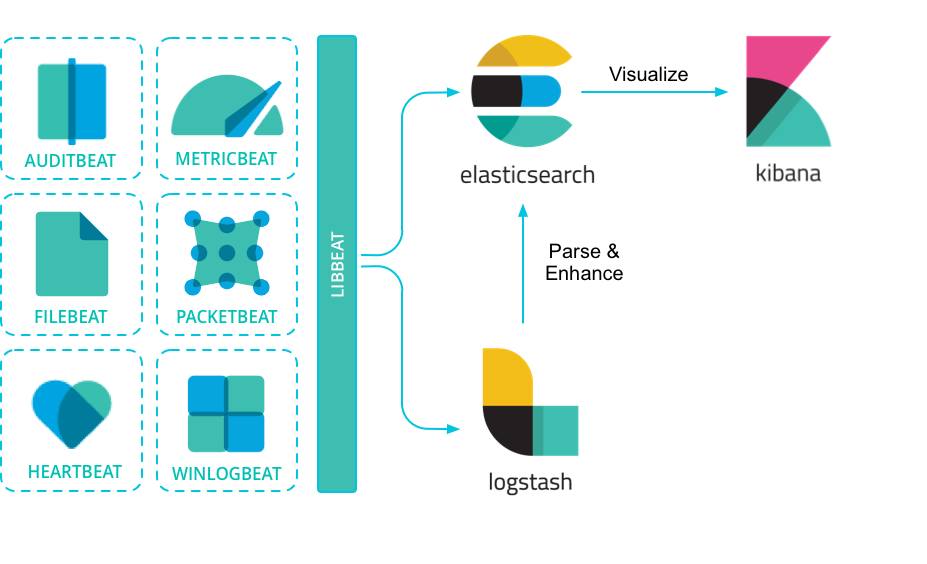
Beats 有多种类型,可以根据实际应用需要选择合适的类型。
常用的类型有:
参考
更多 Beats 类型可以参考:community-beats
FileBeat 的作用
相比 Logstash,FileBeat 更加轻量化。
在任何环境下,应用程序都有停机的可能性。 Filebeat 读取并转发日志行,如果中断,则会记住所有事件恢复联机状态时所在位置。
Filebeat带有内部模块(auditd,Apache,Nginx,System和MySQL),可通过一个指定命令来简化通用日志格式的收集,解析和可视化。
FileBeat 不会让你的管道超负荷。FileBeat 如果是向 Logstash 传输数据,当 Logstash 忙于处理数据,会通知 FileBeat 放慢读取速度。一旦拥塞得到解决,FileBeat 将恢复到原来的速度并继续传播。
基于docker安装Filebeat
官网安装文档,请参考链接:
https://www.elastic.co/guide/en/beats/filebeat/current/filebeat-installation.html
新建目录
mkdir /opt/filebeat
dockerfile
FROM ubuntu:16.04# 修改更新源为阿里云
ADD sources.list /etc/apt/sources.list
ADD filebeat-6.4.3-amd64.deb /ADD filebeat.yml /# 安装jdk
RUN apt-get update && apt-get install -y openjdk-8-jdk --allow-unauthenticated && apt-get clean all && \
    dpkg -i filebeat-6.4.3-amd64.deb && rm -rf filebeat-6.4.3-amd64.deb && \
    \cp filebeat.yml /etc/filebeat/filebeat.yml && rm -rf filebeat.yml

#EXPOSE 9092# 添加启动脚本
ADD run.sh .
RUN chmod 755 run.shENTRYPOINT [ "/run.sh"]
filebeat.yml
这个是默认的配置文件,已经去除了空行和注释部分
filebeat.inputs:- type: log
  enabled: false
  paths:    - /var/log/*.log
filebeat.config.modules:
  path: ${path.config}/modules.d/*.yml
  reload.enabled: false
setup.template.settings:
  index.number_of_shards: 3
setup.kibana:
output.elasticsearch:
  hosts: ["localhost:9200"]
run.sh
#!/bin/bash

set -e

# 添加时区
TZ=Asia/Shanghai
ln -snf /usr/share/zoneinfo/$TZ /etc/localtime && echo $TZ > /etc/timezone

# 判断变量是否存在
if [ -z $elasticsearch ];then
    echo "elasticsearch参数为空"
    exit
fi

# 开启日志收集
sed -i "3s?false?true?g" /etc/filebeat/filebeat.yml
# 修改elasticsearch地址
sed -i "13s?localhost?$elasticsearch?g" /etc/filebeat/filebeat.yml

# 启动filebeat
/etc/init.d/filebeat start

# hold住进
tail -f /etc/filebeat/filebeat.yml
目录结构如下:
./├── dockerfile
├── filebeat-6.4.3-amd64.deb
├── filebeat.yml
├── run.sh└── sources.list
生成镜像
docker build -t filebeat-6.4.3 /opt/filebeat
配置
配置文件
首先,需要知道的是:filebeat.yml 是 filebeat 的配置文件。配置文件的路径会因为你安装方式的不同而变化。
Beat 所有系列产品的配置文件都基于 YAML 格式,FileBeat 当然也不例外。
filebeat.yml 部分配置示例:
filebeat:
  prospectors:
    - type: log
      paths:
        - /var/log/*.log
      multiline:
        pattern: '^['
        match: after
更多 filebeat 配置内容可以参考:配置 filebeat
更多 filebeat.yml 文件格式内容可以参考:filebeat.yml 文件格式
重要配置项
filebeat.prospectors
(文件监视器)用于指定需要关注的文件。
示例
filebeat.prospectors:- type: log
  enabled: true
  paths:    - /var/log/*.log
output.elasticsearch
如果你希望使用 filebeat 直接向 elasticsearch 输出数据,需要配置 output.elasticsearch 。
示例
output.elasticsearch:
  hosts: ["192.168.1.42:9200"]
output.logstash
如果你希望使用 filebeat 向 logstash输出数据,然后由 logstash 再向elasticsearch 输出数据,需要配置 output.logstash。
注意
相比于向 elasticsearch 输出数据,个人更推荐向 logstash 输出数据。
因为 logstash 和 filebeat 一起工作时,如果 logstash 忙于处理数据,会通知 FileBeat 放慢读取速度。一旦拥塞得到解决,FileBeat 将恢复到原来的速度并继续传播。这样,可以减少管道超负荷的情况。
示例
output.logstash:
  hosts: ["127.0.0.1:5044"]
此外,还需要在 logstash 的配置文件(如 logstash.conf)中指定 beats input 插件:
input {
  beats {
    port => 5044 # 此端口需要与 filebeat.yml 中的端口相同
  }
}

# The filter part of this file is commented out to indicate that it is
# optional.
# filter {
#
# }

output {
  elasticsearch {
    hosts => "localhost:9200"
    manage_template => false
    index => "%{[@metadata][beat]}-%{[@metadata][version]}-%{+YYYY.MM.dd}"
    document_type => "%{[@metadata][type]}"
  }
}
setup.kibana
如果打算使用 Filebeat 提供的 Kibana 仪表板,需要配置 setup.kibana 。
示例
setup.kibana:
  host: "localhost:5601"
setup.template.settings
在 Elasticsearch 中,索引模板用于定义设置和映射,以确定如何分析字段。
在 Filebeat 中,setup.template.settings 用于配置索引模板。
Filebeat 推荐的索引模板文件由 Filebeat 软件包安装。如果您接受 filebeat.yml 配置文件中的默认配置,Filebeat在成功连接到 Elasticsearch 后自动加载模板。
您可以通过在 Filebeat 配置文件中配置模板加载选项来禁用自动模板加载,或加载自己的模板。您还可以设置选项来更改索引和索引模板的名称。
参考
更多内容可以参考:filebeat-template
说明
如无必要,使用 Filebeat 配置文件中的默认索引模板即可。
setup.dashboards
Filebeat 附带了示例 Kibana 仪表板。在使用仪表板之前,您需要创建索引模式 filebeat- *,并将仪表板加载到Kibana 中。为此,您可以运行 setup 命令或在 filebeat.yml 配置文件中配置仪表板加载。
为了在 Kibana 中加载 Filebeat 的仪表盘,需要在 filebeat.yml 配置中启动开关:
setup.dashboards.enabled: true
参考
更多内容可以参考:configuration-dashboards
命令
filebeat 提供了一系列命令来完成各种功能。
执行命令方式:
./filebeat COMMAND
参考
更多内容可以参考:command-line-options
说明
个人认为命令行没有必要一一掌握,因为绝大部分功能都可以通过配置来完成。且通过命令行指定功能这种方式要求每次输入同样参数,不利于固化启动方式。
最重要的当然是启动命令 run 了。
示例 指定配置文件启动
./filebeat run -e -c filebeat.yml -d "publish"
./filebeat -e -c filebeat.yml -d "publish" # run 可以省略
模块
Filebeat 提供了一套预构建的模块,让您可以快速实施和部署日志监视解决方案,并附带示例仪表板和数据可视化。这些模块支持常见的日志格式,例如Nginx,Apache2和MySQL 等。
运行模块的步骤
配置 elasticsearch 和 kibana
output.elasticsearch:
  hosts: ["myEShost:9200"]
  username: "elastic"
  password: "elastic"setup.kibana:
  host: "mykibanahost:5601"
  username: "elastic"
  password: "elastic
初始化环境
执行下面命令,filebeat 会加载推荐索引模板。
./filebeat setup -e
指定模块
执行下面命令,指定希望加载的模块。
./filebeat -e --modules system,nginx,mysql
参考
更多内容可以参考: 配置 filebeat 模块 | filebeat 支持模块
原理
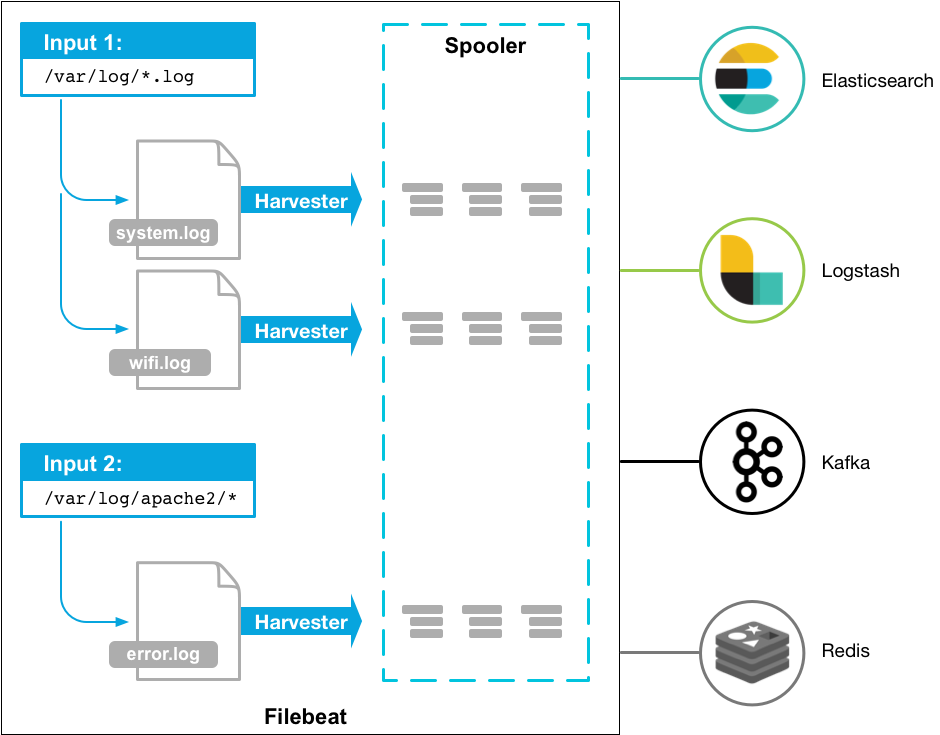
Filebeat 有两个主要组件:
harvester:负责读取一个文件的内容。它会逐行读取文件内容,并将内容发送到输出目的地。
prospector:负责管理 harvester 并找到所有需要读取的文件源。比如类型是日志,prospector 就会遍历制定路径下的所有匹配要求的文件。
filebeat.prospectors:
- type: log
  paths:
    - /var/log/*.log
    - /var/path2/*.log
Filebeat保持每个文件的状态,并经常刷新注册表文件中的磁盘状态。状态用于记住 harvester 正在读取的最后偏移量,并确保发送所有日志行。
Filebeat 将每个事件的传递状态存储在注册表文件中。所以它能保证事件至少传递一次到配置的输出,没有数据丢失。
资料
二、测试filebeat
环境介绍
| 操作系统 | IP地址 | 相关镜像 |
| ubuntu-16.04.5-server-amd64 | 192.168.0.162 | elasticsearch-6.4.3,elasticsearch-head-ubuntu,kibana-6.4.3 |
| ubuntu-16.04.5-server-amd64 | 192.168.0.156 | filebeat-6.4.3 |
安装elasticsearch
关于elasticsearch的安装,请参考链接:
https://www.cnblogs.com/xiao987334176/p/9957879.html#autoid-3-6-0
安装ElasticSearch-head
关于ElasticSearch-head插件安装,请参考链接:
https://www.cnblogs.com/xiao987334176/p/10006460.html
本文使用的是基于ubuntu16.04的镜像
请注意要修改 elasticsearch 中的2处配置,允许head插件可以访问es
安装kibana
关于kibana的安装,请参考链接:
https://www.cnblogs.com/xiao987334176/p/9957879.html#autoid-5-2-0
注意修改run.sh脚本,这里的ip定死了,要改成动态的。
#!/bin/bash

# 添加时区
TZ=Asia/Shanghai
ln -snf /usr/share/zoneinfo/$TZ /etc/localtime && echo $TZ > /etc/timezone

#elasticservers="192.168.91.128"
if [ -z $elasticservers ];then
    echo "elasticservers参数为空"
    exit
fi

# 修改配置文件
sed -i '7s@#server.host: "localhost"@server.host: "0.0.0.0"@g' /etc/kibana/kibana.yml

sed -i '28s@#elasticsearch.url: "http://localhost:9200"@elasticsearch.url: "http://localhost:9200"@g' /etc/kibana/kibana.yml

sed -i "s?localhost:9200?$elasticservers?g" /etc/kibana/kibana.yml


# 启动
/usr/share/kibana/bin/kibana "-c /etc/kibana/kibana.yml"
然后重新生成镜像
docker build -t kibana-6.4.3 /opt/kibana
启动相关容器
注意启动顺序是 elasticsearch-->elasticsearch-head-->filebeat-->kibana
启动elasticsearch
登录到 192.168.0.162 服务器
docker run -d -it --restart=always -p 9200:9200 elasticsearch-6.4.3
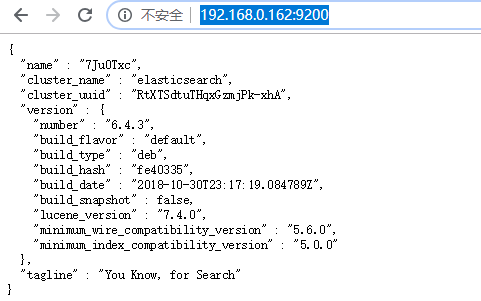
访问elasticsearch页面
http://192.168.0.162:9200/
效果如下:
启动elasticsearch-head
登录到 192.168.0.162 服务器
docker run -d -it --restart=always -p 9100:9100 elasticsearch-head-ubuntu
访问elasticsearch-head页面,输入elasticsearch地址,点击连接,效果如下:

启动 filebeat
登录到 192.168.0.156 服务器
docker run -d -it --restart=always -e elasticsearch=192.168.0.162 filebeat-6.4.3
注意要指定elasticsearch参数才行
等待1分钟,刷新elasticsearch-head页面
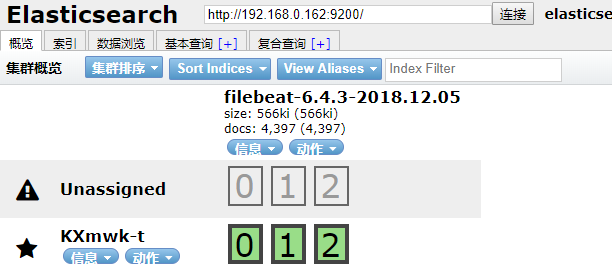
点击 数据浏览,发现数据已经发送过来了

启动kibana
登录到 192.168.0.162 服务器
docker run -d -it --restart=always -p 5601:5601 -e elasticsearch=192.168.0.162 kibana-6.4.3
等待1分钟,访问kibana页面
http://192.168.0.162:5601
选择No,不参加体验计划

点击左边的Discover,下面已经提示了index值
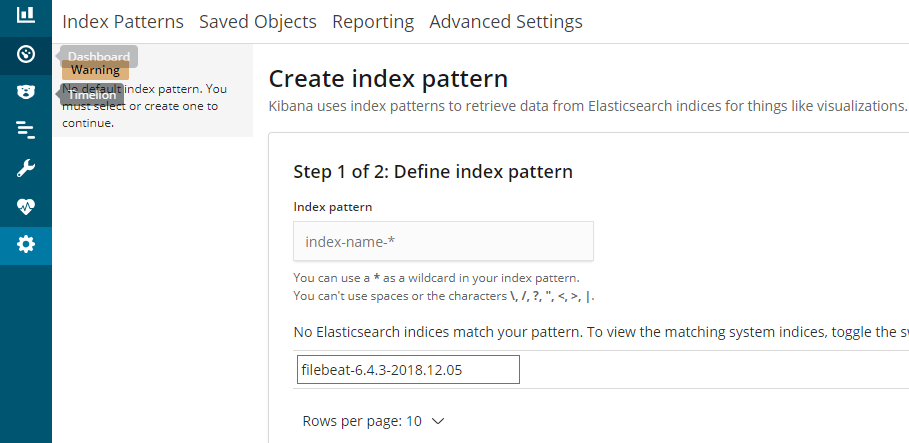
将index值复制过来,选择下一步

选择时间戳

点击左侧的discover,效果如下:
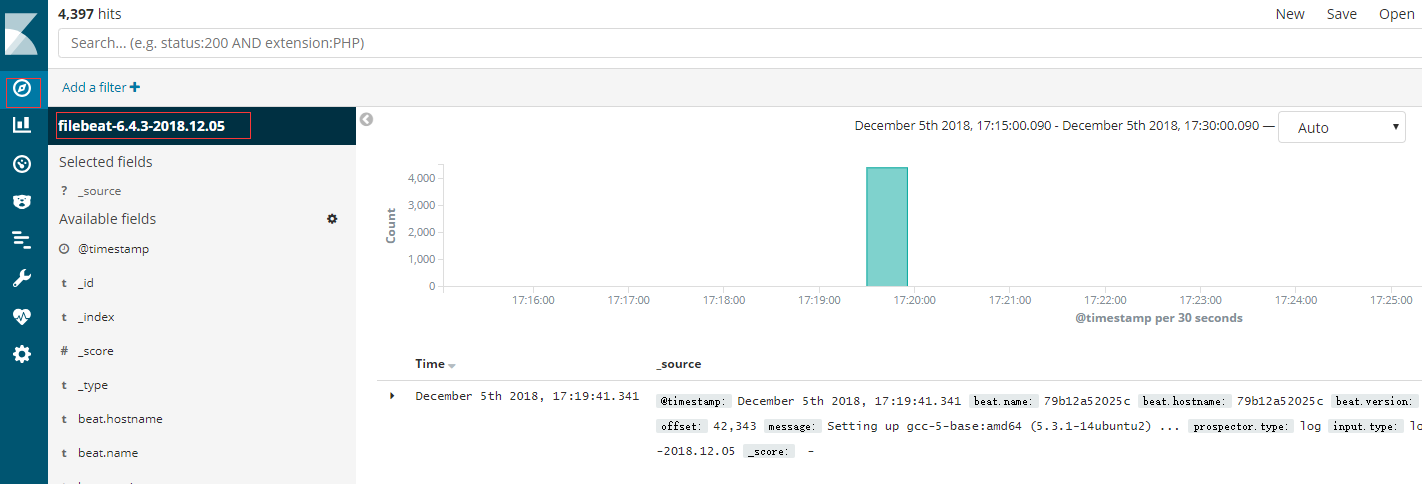
上面只是用的默认配置,修改了2个参数而已。
filebeat还可以配置一些复杂的参数,比如:
#path logs
filebeat.inputs:
- type: log
  paths:
   #- /var/log/*.log
    - /opt/*log/*.log
    - /opt/*log/*/*.log
    - /opt/*log/*/*/*.log
    - /opt/*log/*/*/*/*.log
  multiline.pattern: '^\d{4}\-\d{2}\-\d{2}'
  multiline.negate: true
  multiline.match: after
processors:
    - drop_fields: # This is optional, doesn't make a difference
        fields: ['@timestamp']
    - rename:
        fields:
            - from: message
              to: '@timestamp'
        fail_on_error: true

#elasticsearch config
output.elasticsearch.hosts: ["192.168.0.24:9200"]
output.elasticsearch.index: "xxx-%{+yyyy.MM.dd}"
setup.template.name: "xxx"
setup.template.pattern: "xxx-*"
#setup.dashboards.index: "customname-*"

#filebeat
filebeat.registry_file: /var/log/filebeat/filebeat-reg
logging.to_files: true
logging.files:
  path: /var/log/filebeat/logs
如果需要屏幕和文件日志同时写入,使用命令
filebeat -c filebeat.yml -e -d "*"
本文参考链接:
https://www.cnblogs.com/jingmoxukong/p/8185321.html
- openvpn linux客户端使用
52054
- H3C基本命令大全
51920
- openvpn windows客户端使用
42147
- H3C IRF原理及 配置
38994
- Python exit()函数
33493
- openvpn mac客户端使用
30444
- python全系列官方中文文档
29080
- python 获取网卡实时流量
24110
- 1.常用turtle功能函数
24018
- python 获取Linux和Windows硬件信息
22369
- LangChain1.0-Agent-部署/上线(开发人员必备)
117°
- LangChain1.0-Agent-Spider实战(爬虫函数替代API接口)
150°
- LangChain1.0-Agent(进阶)本地模型+Playwright实现网页自动化操作
163°
- LangChain1.0-Agent记忆管理
148°
- LangChain1.0-Agent接入自定义工具与React循环
174°
- LangChain1.0-Agent开发流程
161°
- LangChain1.0调用vllm本地部署qwen模型
182°
- LangChain-1.0入门实践-搭建流式响应的多轮问答机器人
187°
- LangChain-1.0入门实战-1
186°
- LangChain-1.0教程-(介绍,模型接入)
199°
- 姓名:Run
- 职业:谜
- 邮箱:383697894@qq.com
- 定位:上海 · 松江

