Gearman Python
发布时间:2019-09-21 10:47:35编辑:auto阅读(2384)
Gearman提供了一种通用的程序框架来将你的任务分发到不同的机器或者不同的进程当中。它提供了你进行并行工作的能力、负载均衡处理的能力,以及在不同程序语言之间沟通的能力。Gearman能够应用的领域非常广泛,从高可用的网站到数据库的复制任务。总之,Gearman就是负责分发处理的中枢系统,它的优点包括:
开源:Gearman免费并且开源而且有一个非常活跃的开源社区,如果你想来做一些贡献,请点击 。
多语言支持:Gearman支持的语言种类非常丰富。让我们能够用一种语言来编写Worker程序,但是用另外一种语言编写Client程序。
灵活:不必拘泥于固定的形式。您可以采用你希望的任何形式,例如 Map/Reduce。
快速:Gearman的协议非常简单,并且有一个用C语言实现的,经过优化的服务器,保证应用的负载在非常低的水平。
可植入:因为Gearman非常小巧、灵活。因此您可以将他置入到现有的任何系统中。
没有单点:Gearman不仅可以帮助扩展系统,同样可以避免系统的失败。
http://rfyiamcool.blog.51cto.com/
Gearman是一个用来把工作委派给其他机器、分布式的调用更适合做某项工作的机器、并发的做某项工作在多个调用间做负载均衡、或用来在调用其它语言的函数的系统。
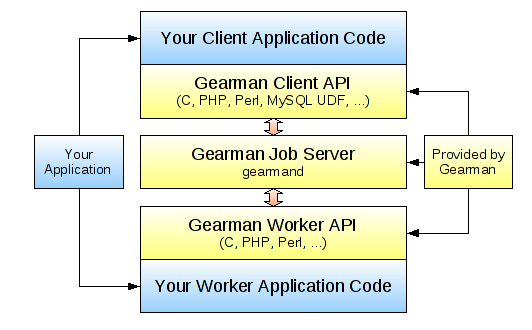
一个Gearman请求的处理过程涉及三个角色:Client -> Job -> Worker。
Client:请求的发起者,可以是C,PHP,Perl,Python,MySQL UDF等等。
Job:请求的调度者,用来负责协调把Client发出的请求转发给合适的Work;即使挂掉一台依然能正常服务。
Worker:请求的处理者,可以是C,PHP,Perl,Python等等;只要有一台worker活着,Job的分发任务都能执行。
Client的作用是提出一个 Job 任务 交给 Job Server 任务服务器。Job Server 会去寻找一个 合适的 Worker 来完成这项任务。
Worker 执行由 Client 发送过来的 Job,并且将结果通过 Job Server 返回给 Client。Gearman 提供了 Client 和 Worker 的 API,利用这些API 应用可以同 Gearman Job Server来进行通信。
Gearman 内部 Client 和 Worker 之间的通信都是通过 TCP 连接来进行的。工作的流程如下图所示:
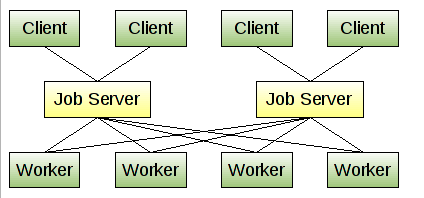
负载的方式
Job Server 可以开启多个实例,这样在其中一个发生故障的时候,可以 Failover 到其他的机器上。同时 Worker 也可以是多个实例进行运行,因为当前的服务器很多都是多核的
编译安装gearman的步骤和错误解决方法!
centos2.6 64位系统
1.安装 libevent-1.4.12-stable.tar.gz
2.安装gearmand-0.9.tar.gz
configure 报错 fatal error: uuid/uuid.h: No such file or directory
解决方法:
wget http://downloads.sourceforge.net/e2fsprogs/e2fsprogs-1.41.14.tar.gz
tar xvzf e2fsprogs-1.41.14.tar.gz
进入e2fsprogs-1.41.14目录后执行
/configure --prefix=/usr/local/e2fsprogs
make
make install
然后把uuid目录拷过去
cp -r lib/uuid/ /usr/include/
make时 报错 libgearman/.libs/libgearman.so: undefined reference to `uuid_generate'
libgearman/.libs/libgearman.so: undefined reference to `uuid_unparse'
解决方法: 重新编译e2fsprogs并加入参数
cd e2fsprogs-1.41.14
./configure --enable-elf-shlibs
make
make install
cp -rf lib/libuuid.so* /usr/lib
cd gearmand-0.29
make clean
./confugure --prefix=/usr/local/gearmand
make & make install
安装成功,此处最好重新configure,否则有可能还是报一样的错
3.安装php 的gearman 扩展 gearman-0.5.0.tgz
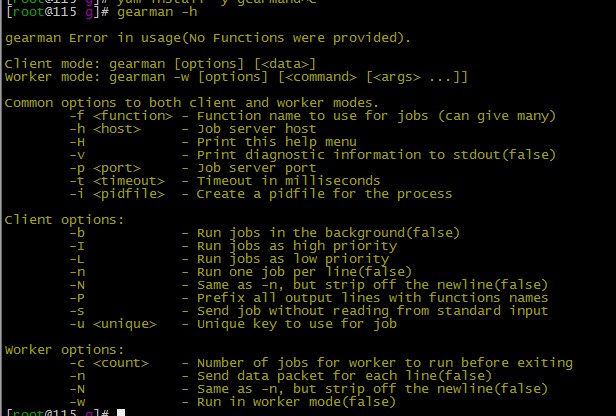
1 2 3 4 5 6 7 8 9 10 11 12 13 14 15 16 17 18 19 20 21 22 23 | Common options to both client and worker modes.-f <function> - Function name to useforjobs (can give many)处理任务的函数名-h <host> - Job server host (Job Server主机,默认是localhost)-H - Print thishelp menu-p <port> - Job server port (Job Server端口,默认是4730)-t <timeout> - Timeout inmilliseconds (执行多长时间超时,微秒)-i <pidfile> - Create a pidfile forthe process (创建进程的pid文件)Client部分参数Client options:-b - Run jobs inthe background (后台运行任务)-I - Run jobs ashigh priority (高优先级运行任务)-L - Run jobs aslow priority (低优先级运行任务)-n - Run one job per line (逐行执行任务)-N - Same as-n, but strip off the newline-P - Prefix all output lines withfunctions names (在输入结果前面加处理的函数名)-s - Send job without reading from standard input 执行任务不返回结果-u <unique> - Unique key to useforjob 任务的唯一标识Worker部分参数Worker options:-c <count> - Numberof jobs forworker to run before exiting (统计worker进程处理多少个任务后中止)-n - Send data packet foreachline-N - Same as-n, but strip off the newline-w - Run inworker mode 以worker模式运行 |
客户端的代码:
1 2 3 4 5 6 7 | from gearman importGearmanClientimportos,sysnew_client = GearmanClient(['10.2.20.115:7003'])current_request = new_client.submit_job('echo', sys.argv[1])new_result = current_request.resultprint new_result |
worker的代码:
1 2 3 4 5 6 7 8 9 10 11 12 13 | importosimportgearmanimportmathclassCustomGearmanWorker(gearman.GearmanWorker):def on_job_execute(self, current_job):print "Job started"returnsuper(CustomGearmanWorker, self).on_job_execute(current_job)def task_callback(gearman_worker, job):print job.datareturnjob.datanew_worker = CustomGearmanWorker(['10.2.20.115:7003'])new_worker.register_task("echo", task_callback)new_worker.work() |
这里再测试下 一次多task的发送
1 2 3 4 5 6 7 8 9 10 | from gearman importGearmanClientimportos,sysnew_client = gearman.GearmanClient(['10.2.20.115:7003'])new_jobs = [dict(task='echo', data=sys.argv[1]),dict(task='echo', data=sys.argv[2]),]completed_requests = new_client.submit_multiple_jobs(new_jobs)forcurrent_request incompleted_requests:assert current_request.result == current_request.job.data |
http://rfyiamcool.blog.51cto.com/1030776/1243761
工作端
工作端
客户端
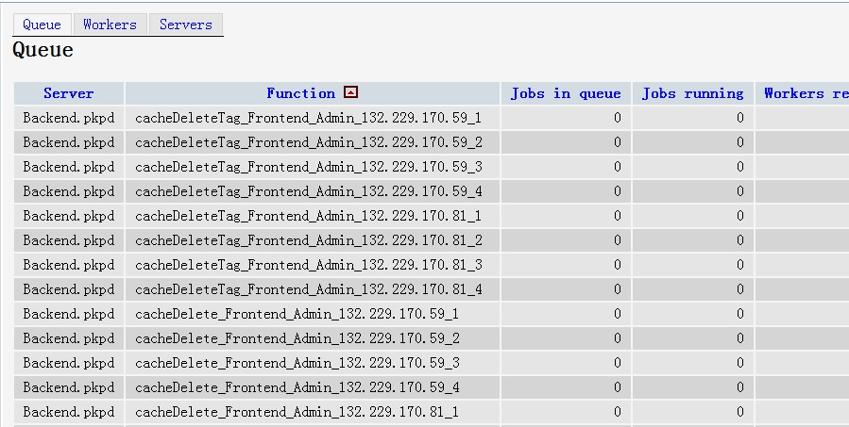
测试他的稳定行和执行的效率~
一头往里扔数据,一头取数据。。。。
以前在r710集群中的监控中,表现还是不错的。能承担主的很大压力。。
但是个人总结,要是你做的东西过于多的话,还是自主开发,可以用mq消息系统,比如redis的pub sub 配合队列中的rpush rpop 。。。
cpu 流量 io 内存~~~
开了9个worker
这个是top的情况. 看起来消耗不大。。。
http://rfyiamcool.blog.51cto.com/1030776/1243761
队列的持久化:
1 2 | 持久化队列是在0.6版本中新添的一项功能,允许将队列存放在drizzle或mysql中。0.7版本允许将队列存放在memcached。0.9版本可以将队列存放在sqlite3或postgresql。在gearman job服务器内部,所有的job队列都是存放在内存中的,这就意味着一旦服务器重启或崩溃,未执行的job将会丢失而不会被worker服务器执行。持久化队列将后台作业存放在一个外部持久的队列中。持久化队列只对后台jobs有效,因为前台jobs依附于客户端。如果job服务器挡掉了,客户端会检测到,将会从其他地方重新启动这个前台job或者返回错误。而后台jobs没有依附于客户端,如果要想让它运行则需要提交。 |
操作步骤如下
在mysql创建数据库及对应数据表
1 2 3 4 5 6 7 8 | create database gearmancreate table `gearman_queue` (`unique_key` varchar(64) NOT NULL,`function_name` varchar(255) NOT NULL,`priority` int(11) NOT NULL,`data` LONGBLOB NOT NULL,`when_to_run` INT, PRIMARY KEY (`unique_key`)) |
//在启动gearmand的时候指定扩展类型 扩展对应的端口 用户名 密码 以及数据库
1 | gearmand --queue-typemysql --mysql-host 127.0.0.1--mysql-db gearman --mysql-user "root"--mysql-password "" -w 2-d |
对于监控:
1 2 | 其实Gearman本身已经提供了相应的命令供我们查看状态:shell> (echo status; sleep 0.1) | nc 127.0.0.14730 |
也可以用zabbix 来处理得到的数值
测试gearman的接口有效性
1 2 3 4 5 6 7 8 9 10 | #!/bin/bash/usr/bin/nc -z 10.2.20.1157003> /dev/null# See ifit workedif[ $? -eq 0]; then# It worked, returnvalue is0echo 1else# Return value isnot 0, command failedecho 0fi |
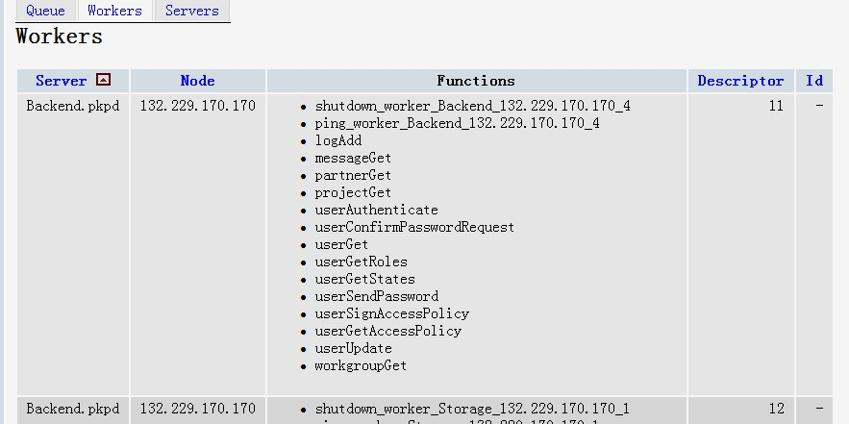
我们通过Gearman-Monitor可以看到执行的状态,效果puppet的foreman。
建议大家自己开发一套,send字符串的时候,多加一个key值,worker接受后,会把状态放到valus里面。。。 大家也可以按照自己的思路开发。
以后多写点gearman性能优化的文章,最近有个平台,我没有用gearman实现,是用zeromq还有rabbitmq来实现的。具体的思路和gearman差不多,派发方面的框架没有gearman好,但是性能要比gearman强大的多。
原文地址:http://rfyiamcool.blog.51cto.com/1030776/1243761
上一篇: shell+Python实现简单的链路监
下一篇: 学习python[3] python 读
- openvpn linux客户端使用
52057
- H3C基本命令大全
51925
- openvpn windows客户端使用
42150
- H3C IRF原理及 配置
38995
- Python exit()函数
33495
- openvpn mac客户端使用
30447
- python全系列官方中文文档
29083
- python 获取网卡实时流量
24113
- 1.常用turtle功能函数
24019
- python 获取Linux和Windows硬件信息
22370
- LangChain1.0-Agent-部署/上线(开发人员必备)
124°
- LangChain1.0-Agent-Spider实战(爬虫函数替代API接口)
154°
- LangChain1.0-Agent(进阶)本地模型+Playwright实现网页自动化操作
167°
- LangChain1.0-Agent记忆管理
149°
- LangChain1.0-Agent接入自定义工具与React循环
176°
- LangChain1.0-Agent开发流程
162°
- LangChain1.0调用vllm本地部署qwen模型
183°
- LangChain-1.0入门实践-搭建流式响应的多轮问答机器人
189°
- LangChain-1.0入门实战-1
189°
- LangChain-1.0教程-(介绍,模型接入)
206°
- 姓名:Run
- 职业:谜
- 邮箱:383697894@qq.com
- 定位:上海 · 松江
