3Python全栈之路系列之Rabbit
发布时间:2019-09-15 09:55:57编辑:auto阅读(2053)
RPC Server
Python全栈之路系列之RabbitMQ
RabbitMQ是实现了高级消息队列协议(AMQP)的开源消息代理软件。RabbitMQ服务器是用Erlang语言编写的,它可以为你的应用提供一个通用的消息发送和接收平台,并且保证消息在传输过程中的安全,RabbitMQ官网,RabbitMQ中文文档。
安装RabbitMQ
安装EPEL源
[root@anshengme ~]# yum -y install epel-release
安装erlang
[root@anshengme ~]# yum -y install erlang
安装RabbitMQ
[root@anshengme ~]# yum -y install rabbitmq-server
启动并设置开机器启动
在启动RabbitMQ之前需要hostname的解析,要不然启动不起来
[root@anshengme ~]# cat /etc/hosts
127.0.0.1   localhost localhost.localdomain localhost4 localhost4.localdomain4 anshengme
::1         localhost localhost.localdomain localhost6 localhost6.localdomain6
[root@anshengme ~]# systemctl start rabbitmq-server
[root@anshengme ~]# systemctl enable rabbitmq-server
Created symlink from /etc/systemd/system/multi-user.target.wants/rabbitmq-server.service to /usr/lib/systemd/system/rabbitmq-server.service.
查看启动状态
[root@anshengme ~]# netstat -tulnp |grep 5672
tcp        0      0 0.0.0.0:25672           0.0.0.0:*               LISTEN      37507/beam.smp
tcp6       0      0 :::5672                 :::*                    LISTEN      37507/beam.smp
![]() pika
pika
pika模块是官方认可的操作RabbitMQ的API接口。
安装pika
pip3 install pika
pika:https://pypi.python.org/pypi/pika
测试
>>> import pika
Work Queues
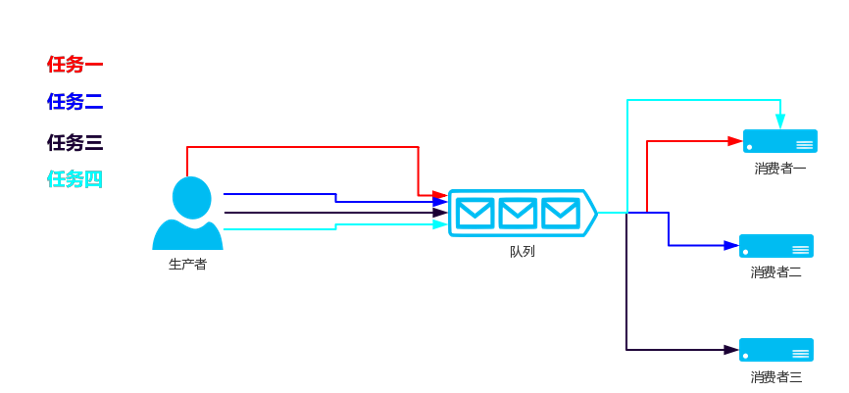
如果你启动了多个消费者,那么生产者生产的任务会根据顺序的依次让消费者来执行,这就是Work Queues模式
生产者代码
#!/usr/bin/env python
# _*_ codin:utf-8 _*_

import pika

# 连接到RabbitMQ 这是一个阻塞的连接
connection = pika.BlockingConnection(pika.ConnectionParameters('192.168.56.100'))

# 生成一个管道
channel = connection.channel()

# 通过管道创建一个队列
channel.queue_declare(queue='hello')

# 在队列内发送数据,body内容,routing_key队列,exchange交换器,通过交换器往hello队列内发送Hello World!数据
channel.basic_publish(exchange='', routing_key='hello', body='Hello World!')

# 关闭连接
connection.close()
消费者代码
#!/usr/bin/env python
# _*_ codin:utf-8 _*_

import pika
# 连接到RabbitMQ 这是一个阻塞的连接
connection = pika.BlockingConnection(pika.ConnectionParameters('192.168.56.100'))

# 生成一个管道
channel = connection.channel()

# 如果消费者连接到这个队列的时候,队列没有生成,那么消费者就生成这个队列,如果这个队列已经生成了,那么就忽略它
channel.queue_declare(queue='hello')

# 回调函数
def callback(ch, method, properties, body):
    print(" [x] Received %r" % body)

# 消费,当收到hello队列的消息的时候就,就调用callback函数,no_ack消费者在处理任务的时候要不需要确认任务已经处理完成,改为False则要确认
channel.basic_consume(callback, queue='hello', no_ack=True)

# 开始接受任务,阻塞
channel.start_consuming()
持久化
队列持久化
试想,如果我们的消费者在执行任务执行到一半时,突然down掉了,我们可以更改no_ack=False来让消费者每次执行完成完成之后确认执行完毕了再把这个任务在队列中移除移除掉,但是如果RabbitMQ的服务器停止我们的任务仍然会丢失。
首先,我们需要确保的RabbitMQ永远不会在我们的队列中失去,为了做到这一点,我们需要把durable=True,声明一个新名称的队列,为task_queue:
channel.queue_declare(queue='task_queue', durable=True)
durable需要在生产者和消费者上面都需要写上,且durable只会让我们的队列持久化,并不能够让消息持久化。
消息持久化
消息持久化只需要在添加消息的时候添加一个delivery_mode=2
channel.basic_publish(exchange='',
                      routing_key='world',
                      body='Hello World!',
                      properties=pika.BasicProperties(
                          # 2=消息持久化
                          delivery_mode=2,
                      ))
在消费者的callback函数内添加以下代码:
ch.basic_ack(delivery_tag = method.delivery_tag)
消息公平分发
每一个消费者同时只处理一个任务,比如说现在有三个消费者,刚开始来了三个任务,平均分配给了三个消费者,那么这三个消费者目前都在同时执行任务,当第四个任务到来的时候依旧会分配给第一个消费者,第五个任务到来的时候会分配给第二个消费者,以此类推。
那么以上的状况有什么不妥呢?譬如说不同的消费者执行任务的时间不同,我们现在需要的时候,当三个消费者都在执行任务的时候,比如说第二个消费者任务执行完了,其他消费者都还在执行任务,当第四个任务到来的时候希望交给第二个消费者,若要实现此功能,只需要在消费者加上一下代码即可:
channel.basic_qos(prefetch_count=1)
完整的代码如下
消费者代码
#!/usr/bin/env python
import pika
import time

connection = pika.BlockingConnection(pika.ConnectionParameters(
    host='192.168.56.100'))
channel = connection.channel()

channel.queue_declare(queue='task_queue', durable=True)
print(' [*] Waiting for messages. To exit press CTRL+C')

def callback(ch, method, properties, body):
    print(" [x] Received %r" % body)
    time.sleep(10)
    print(" [x] Done")
    ch.basic_ack(delivery_tag=method.delivery_tag)

channel.basic_qos(prefetch_count=1)
channel.basic_consume(callback,
                      queue='task_queue')

channel.start_consuming()
生产者代码
#!/usr/bin/env python
import pika
import sys

connection = pika.BlockingConnection(pika.ConnectionParameters(
    host='192.168.56.100'))
channel = connection.channel()

channel.queue_declare(queue='task_queue', durable=True)

for n in range(10):
    message = "Hello World! %s" % (n + 1)
    channel.basic_publish(exchange='',
                          routing_key='task_queue',
                          body=message,
                          properties=pika.BasicProperties(
                              delivery_mode=2,  # make message persistent
                          ))
    print(" [x] Sent %r" % message)
connection.close()
消息传输类型
之前的例子都基本都是1对1的消息发送和接收,即消息只能发送到指定的queue里,但有些时候你想让你的消息被所有的Queue收到,类似广播的效果,这时候就要用到exchange了,
Exchange在定义的时候是有类型的,以决定到底是哪些Queue符合条件,可以接收消息
| 属性 | 描述 |
|---|---|
fanout | 所有bind到此exchange的queue都可以接收消息 |
direct | 通过routingKey和exchange决定的那个唯一的queue可以接收消息 |
topic | 所有符合routingKey(此时可以是一个表达式)的routingKey所bind的queue可以接收消息 |
fanout(发布订阅)
只要有消费者,那么我生产者发布一条消息的时候所有的消费者都会被收到
# 消费者
import pika
connection = pika.BlockingConnection(pika.ConnectionParameters(host='192.168.56.100'))
channel = connection.channel()
channel.exchange_declare(exchange='logs', type='fanout')
# 不指定queue名字,rabbit会随机分配一个名字,exclusive=True会在使用此queue的消费者断开后,自动将queue删除
result = channel.queue_declare(exclusive=True)
# 获取queue的name
queue_name = result.method.queue
# 把queue绑定到exchange
channel.queue_bind(exchange='logs', queue=queue_name)
def callback(ch, method, properties, body):
    print(" [x] %r" % body)
channel.basic_consume(callback,queue=queue_name,no_ack=True)
channel.start_consuming()
# 生产者 import pika connection = pika.BlockingConnection(pika.ConnectionParameters(host='192.168.56.100')) channel = connection.channel() # fanout发送给所有人 channel.exchange_declare(exchange='logs', type='fanout') channel.basic_publish(exchange='logs', routing_key='', body="Hello World!") connection.close()
direct(关键字)
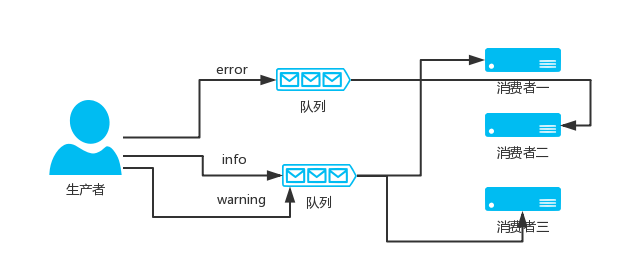
RabbitMQ还支持根据关键字发送,即:队列绑定关键字,发送者将数据根据关键字发送到消息exchange,exchange根据 关键字 判定应该将数据发送至指定队列。
生产者代码
#!/usr/bin/env python
import pika
import sys

connection = pika.BlockingConnection(pika.ConnectionParameters(
    host='192.168.56.100'))
channel = connection.channel()

channel.exchange_declare(exchange='direct_logs',
                         type='direct')

severity = sys.argv[1] if len(sys.argv) > 1 else 'info'
message = ' '.join(sys.argv[2:]) or 'Hello World!'
channel.basic_publish(exchange='direct_logs',
                      routing_key=severity,
                      body=message)
print(" [x] Sent %r:%r" % (severity, message))
connection.close()
消费者代码
#!/usr/bin/env python
import pika
import sys

connection = pika.BlockingConnection(pika.ConnectionParameters(
        host='192.168.56.100'))
channel = connection.channel()

channel.exchange_declare(exchange='direct_logs',
                         type='direct')

result = channel.queue_declare(exclusive=True)
queue_name = result.method.queue

severities = sys.argv[1:]
if not severities:
    sys.stderr.write("Usage: %s [info] [warning] [error]\n" % sys.argv[0])
    sys.exit(1)

for severity in severities:
    channel.queue_bind(exchange='direct_logs',
                       queue=queue_name,
                       routing_key=severity)

print(' [*] Waiting for logs. To exit press CTRL+C')

def callback(ch, method, properties, body):
    print(" [x] %r:%r" % (method.routing_key, body))

channel.basic_consume(callback,
                      queue=queue_name,
                      no_ack=True)

channel.start_consuming()
topic(模糊匹配)
在topic类型下,可以让队列绑定几个模糊的关键字,之后发送者将数据发送到exchange,exchange将传入”路由值“和 ”关键字“进行匹配,匹配成功,则将数据发送到指定队列。
表达式符号说明:
| 符号 | 描述 |
|---|---|
# | 表示可以匹配0个或多个单词 |
* | 表示只能匹配一个单词 |
| 发送者路由值 | 队列中 | 是否匹配 |
|---|---|---|
| ansheng.me | ansheng.* | 不匹配 |
| ansheng.me | ansheng.# | 匹配 |
消费者代码
#!/usr/bin/env python
import pika
import sys

connection = pika.BlockingConnection(pika.ConnectionParameters(
        host='192.168.56.100'))
channel = connection.channel()

channel.exchange_declare(exchange='topic_logs',
                         type='topic')

result = channel.queue_declare(exclusive=True)
queue_name = result.method.queue

binding_keys = sys.argv[1:]
if not binding_keys:
    sys.stderr.write("Usage: %s [binding_key]...\n" % sys.argv[0])
    sys.exit(1)

for binding_key in binding_keys:
    channel.queue_bind(exchange='topic_logs',
                       queue=queue_name,
                       routing_key=binding_key)

print(' [*] Waiting for logs. To exit press CTRL+C')

def callback(ch, method, properties, body):
    print(" [x] %r:%r" % (method.routing_key, body))

channel.basic_consume(callback,
                      queue=queue_name,
                      no_ack=True)

channel.start_consuming()
生产者代码
#!/usr/bin/env python
import pika
import sys
connection = pika.BlockingConnection(pika.ConnectionParameters(
        host='192.168.56.100'))
channel = connection.channel()
channel.exchange_declare(exchange='topic_logs',
                         type='topic')
routing_key = sys.argv[1] if len(sys.argv) > 1 else 'anonymous.info'
message = ' '.join(sys.argv[2:]) or 'Hello World!'
channel.basic_publish(exchange='topic_logs',
                      routing_key=routing_key,
                      body=message)
print(" [x] Sent %r:%r" % (routing_key, message))
connection.close()
RPC(Remote procedure call)
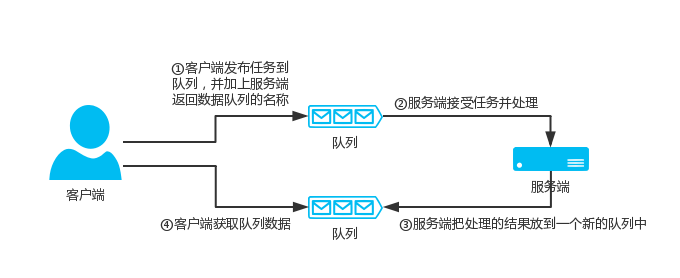
客户端发送一个任务到服务端,服务端把任务的执行结果再返回给客户端
# _*_coding:utf-8_*_
import pika

connection = pika.BlockingConnection(pika.ConnectionParameters(
    host='192.168.56.100'))
channel = connection.channel()
# 声明一个RPC QUEUE

channel.queue_declare(queue='rpc_queue')

def fib(n):
    if n == 0:
        return 0
    elif n == 1:
        return 1
    else:
        return fib(n - 1) + fib(n - 2)

def on_request(ch, method, props, body):
    # 接受传过来的值
    n = int(body)
    print(" [.] fib(%s)" % n)
    # 交给fib函数进行斐波那契处理
    response = fib(n)
    # 把结果发回去,此时消费者变成生产者
    ch.basic_publish(exchange='',
                     routing_key=props.reply_to,
                     # 客户端传过来的UUID顺便发回去
                     properties=pika.BasicProperties(correlation_id=props.correlation_id),
                     body=str(response))
    # 持久化
    ch.basic_ack(delivery_tag=method.delivery_tag)

# 同时只处理一个任务
channel.basic_qos(prefetch_count=1)
channel.basic_consume(on_request, queue='rpc_queue')
print(" [x] Awaiting RPC requests")
channel.start_consuming()
RPC Client
# _*_coding:utf-8_*_
import pika
import uuid

class FibonacciRpcClient(object):
    def __init__(self):
        self.connection = pika.BlockingConnection(pika.ConnectionParameters(
            host='192.168.56.100'))

        self.channel = self.connection.channel()

        result = self.channel.queue_declare(exclusive=True)
        # 服务端返回处理完毕的数据新Queue名称
        self.callback_queue = result.method.queue

        self.channel.basic_consume(self.on_response, no_ack=True,
                                   queue=self.callback_queue)

    def on_response(self, ch, method, props, body):
        # corr_id等于刚刚发送过去的ID,就代表这条消息是我的
        if self.corr_id == props.correlation_id:
            self.response = body

    def call(self, n):
        self.response = None
        # 生成一个唯一ID,相当于每个任务的ID
        self.corr_id = str(uuid.uuid4())
        self.channel.basic_publish(exchange='',
                                   routing_key='rpc_queue',
                                   properties=pika.BasicProperties(
                                       # 让服务端处理完成之后把数据放到这个Queue里面
                                       reply_to=self.callback_queue,
                                       # 加上一个任务ID
                                       correlation_id=self.corr_id,
                                   ),
                                   body=str(n))
        while self.response is None:
            # 不断地去Queue接受消息,但不是阻塞的,而是一直循环的去取
            self.connection.process_data_events()
        return int(self.response)

fibonacci_rpc = FibonacciRpcClient()
print(" [x] Requesting fib(30)")
response = fibonacci_rpc.call(30)
print(" [.] Got %r" % response)
上一篇: python通过python-gitla
下一篇: python链接mysql常见问题汇总
- openvpn linux客户端使用
52060
- H3C基本命令大全
51929
- openvpn windows客户端使用
42154
- H3C IRF原理及 配置
38996
- Python exit()函数
33499
- openvpn mac客户端使用
30450
- python全系列官方中文文档
29084
- python 获取网卡实时流量
24117
- 1.常用turtle功能函数
24023
- python 获取Linux和Windows硬件信息
22373
- LangChain1.0-Agent-部署/上线(开发人员必备)
129°
- LangChain1.0-Agent-Spider实战(爬虫函数替代API接口)
158°
- LangChain1.0-Agent(进阶)本地模型+Playwright实现网页自动化操作
169°
- LangChain1.0-Agent记忆管理
152°
- LangChain1.0-Agent接入自定义工具与React循环
177°
- LangChain1.0-Agent开发流程
163°
- LangChain1.0调用vllm本地部署qwen模型
184°
- LangChain-1.0入门实践-搭建流式响应的多轮问答机器人
194°
- LangChain-1.0入门实战-1
193°
- LangChain-1.0教程-(介绍,模型接入)
207°
- 姓名:Run
- 职业:谜
- 邮箱:383697894@qq.com
- 定位:上海 · 松江


