Python自动化开发学习21-Djan
发布时间:2019-09-12 07:54:16编辑:auto阅读(2123)
- request.POST
- request.GET
- request.COOKIES
- 在APP下,创建templatetags目录,目录名字很重要不能错。
- 创建任意 .py 文件,这里文件名随意,比如:myfun.py。
- 文件里创建一个template.Library()对象,名字是register。这里的对象名字必须是register。
- 然后写自己的函数,但是都用@register.simple_tag这个装饰器装饰好:
- 页面文件中加载你的文件{% load myfun %}。放在顶部就好了。只要在你使用前加载加可以,不一定要在上面。如果有extends(
{% extends 'master.html' %}),放在extends的下面。 - 使用你的函数
{% 函数名 参数1 参数2 %} - 方法一:在处理函数里使用
mark_safe(page_str)来转一下,使用前先导入模块from django.utils.safestring import mark_safe - 方法二:在前端的模板语言里,在字符串后面使用管道符调用一个内置的filter方法,{{ page_str|safe }}
- key :键
- value='' :值
- max_age=None :超时时间,单位是秒。不设置就是浏览器关闭就马上失效
- expires=None :超时时间节点,设置一个具体的日期。
rep.set_cookie(key, value, expires=datetime.datetime.strptime('2018-4-11 11:23:00', '%Y-%m-%d %H:%M:%S')),记得先 import datetime 模块 - path='/' :Cookie生效的路径,/ 表示根路径,根路径的cookie可以被任何url的页面访问
- domain=None :Cookie生效的域名
- secure=False :https传输,如果网站是https的,写cookie的时候把这个参数设置为True
- httponly=Fals :只能http协议传输,无法被JavaScript获取(不是绝对,底层抓包可以获取到也可以被覆盖)。
document.cookie获取不到设置了这个参数的cookie。 document.cookie:获取到cookie,返回的是字符串 "key1=value1; key2=value2"document.cookie = "key=value;":添加一个cookie的键值,其他参数也能加,不过说是很麻烦,就没讲。$.cookie(key):获取值$.cookie(key, vaule):设置值$.cookie(key, vaule, {options}):其他参数都以字典的形式写在第三个参数里request.get_signed_cookie(key, default=RAISE_ERROR, salt='', max_age=None):获取加密cookie,max_age是后台控制过期时间rep.set_signed_cookie(key, value, salt='', **kwargs):设置加密cookie
补充知识-路由系统(URL)
URL传递额外的参数
在url.py里,除了默认会传一个request给处理函数,还可以传递额外的参数,把一个字典作为第三个参数传入,之后就可以在处理函数里取到对应的值:
from django.urls import path
from app01 import views

urlpatterns = [
    path('extra-options/', views.extra_options, {'foo': 'bar'}),
]
处理函数views.py
from django.shortcuts import HttpResponse

def extra_options(request, foo):
    return HttpResponse(foo)
对于include()的情况,可以写在最外层,也可以在里层分别写一个:
# main.py
from django.urls import include, path

urlpatterns = [
    path('blog/', include('inner'), {'blog_id': 3}),
]

# inner.py
from django.urls import path
from mysite import views

urlpatterns = [
    path('archive/', views.archive),
    path('about/', views.about),
]
这个的效果和上面的一样:
# main.py
from django.urls import include, path

urlpatterns = [
    path('blog/', include('inner')),
]

# inner.py
from django.urls import path
from mysite import views

urlpatterns = [
    path('archive/', views.archive, {'blog_id': 3}),
    path('about/', views.about, {'blog_id': 3}),
]
命名空间
做路由分发的时候,可以把两条路由指向同一个app,像这样:
# urls.py
from django.urls import path, include

urlpatterns = [
    path('author-app01/', include('app01.urls', namespace='author-app01')),
    path('publisher-app01/', include('app01.urls', namespace='publisher-app01')),
]

# app01\urls.py
from django.urls import path
from app01 import views

app_name = 'app01'
urlpatterns =[
    path('view/', views.view, name='view'),
    path('template/', views.template, name='template'),
]
这里的 include() 里多了一个参数 namespace 。现在 http://127.0.0.1:8000/author-app01/view/ 和 http://127.0.0.1:8000/publisher-app01/view/ 访问的是同一个页面,我们需要根据 namespace 区分这个请求具体是通过那个路由发过来的。下面是在处理函数 views.py 以及html页面文件 template.html 获取到路由的方法:
def view(request):
    v = reverse('app01:view')  # 这个v就是请求的路由
    return HttpResponse(v)

def template(request):
    # 返回一个页面,在页面里通过模板语言获取到路由信息
    return render(request, 'template.html')
template.html
<div>{% url 'app01:template' %}</div>知识点就是这样,没讲应用场景
补充知识-视图(View)
视图里还有一个装饰器,应用场景比如是用户认证,某些页面一定要用户登录成功后才能访问。这部分内容会在将cookie和session的时候再学习。
请求的其他信息
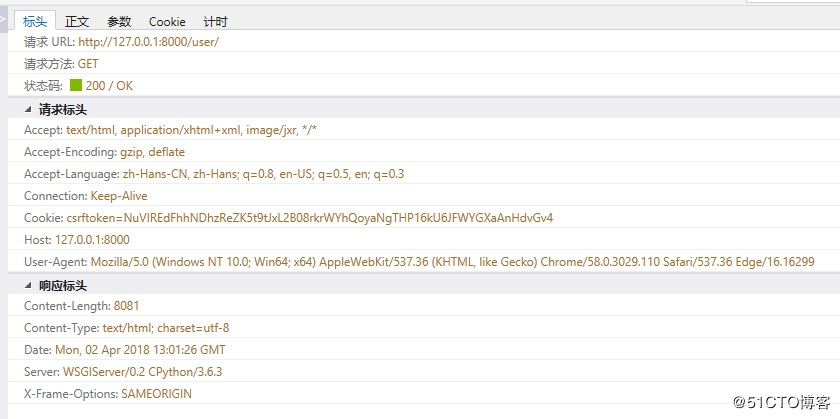
用户发来请求的时候,不仅有数据,还有请求头。比如调出控制台可以有下面这些信息。这些信息也都是客户端发出来的。
所有的信息都封装在了request这个对象里,现在就把他们找出来。先用下面的处理函数打印出request这个对象:
def get_request(request):
    print(type(request))
    return HttpResponse("OK")
打印出来的结果如下,可以看到这个确实是个类。
<class 'django.core.handlers.wsgi.WSGIRequest'>现在就去看看这个类的源码,是一个wsgi.py里的类,类名是WSGIRequest。可以用PyCharm方便的找到这个文件并且定位到这个类。像下面这样先导入这个模块,按住Shift点击WSGIRequest,就可以跳转过去。
# 打印结果:django.core.handlers.wsgi.WSGIRequest
from django.core.handlers.wsgi import WSGIRequest
def get_request(request):
    print(type(request))
    return HttpResponse("OK")
部分源码,只有开头的构造函数:
class WSGIRequest(HttpRequest):
    def __init__(self, environ):
        script_name = get_script_name(environ)
        path_info = get_path_info(environ)
        if not path_info:
            # Sometimes PATH_INFO exists, but is empty (e.g. accessing
            # the SCRIPT_NAME URL without a trailing slash). We really need to
            # operate as if they'd requested '/'. Not amazingly nice to force
            # the path like this, but should be harmless.
            path_info = '/'
        self.environ = environ
        self.path_info = path_info
        # be careful to only replace the first slash in the path because of
        # http://test/something and http://test//something being different as
        # stated in http://www.ietf.org/rfc/rfc2396.txt
        self.path = '%s/%s' % (script_name.rstrip('/'),
                               path_info.replace('/', '', 1))
        self.META = environ
        self.META['PATH_INFO'] = path_info
        self.META['SCRIPT_NAME'] = script_name
        self.method = environ['REQUEST_METHOD'].upper()
        self.content_type, self.content_params = cgi.parse_header(environ.get('CONTENT_TYPE', ''))
        if 'charset' in self.content_params:
            try:
                codecs.lookup(self.content_params['charset'])
            except LookupError:
                pass
            else:
                self.encoding = self.content_params['charset']
        self._post_parse_error = False
        try:
            content_length = int(environ.get('CONTENT_LENGTH'))
        except (ValueError, TypeError):
            content_length = 0
        self._stream = LimitedStream(self.environ['wsgi.input'], content_length)
        self._read_started = False
        self.resolver_match = None
构造函数里传入了一个environ参数,信息都在这个里面。构造函数里有一句 self.environ = environ 。所以这个值也传到实例化的对象里了,用下面的方法可以打印出来看看:
# 打印结果:django.core.handlers.wsgi.WSGIRequest
from django.core.handlers.wsgi import WSGIRequest
def get_request(request):
    # print(type(request))
    # print(request.environ)
    for k, v in request.environ.items():
        print("%s: %s" % (k, v))
    return HttpResponse("OK")
这里封装了所有的用户请求信息,都是原生的数据。其中一部分常用的,Django已经帮我们处理好了,比如下面的3个:
剩下的如果要用就要自己提取处理了。比如打印出的结构中有一条是显示用户访问使用的终端的信息的:
HTTP_USER_AGENT: Mozilla/5.0 (Windows NT 10.0; Win64; x64) AppleWebKit/537.36 (KHTML, like Gecko) Chrome/58.0.3029.110 Safari/537.36 Edge/16.16299通过这个信息可以知道用户是用什么终端发来的请求,可以知道用户用的是iPhong还是用安卓系统。还可以判断用户是手机端就发回给一个手机端的页面。如果是PC端就返回一个PC端的页面。这是一个字典,用 request.environ['HTTP_USER_AGENT'] 就可以获取到这个信息了。
补充知识-模板(Templates )
模板的继承-extends
首先先写一个完整的html页面,master.html:
<head>
    <meta charset="UTF-8">
    <title>Title</title>
    <style>
        body{
            margin: 0;
        }
        .pg-header{
            height: 48px;
            background-color: red;
        }
        .pg-content .menu{
            position: absolute;
            top: 48px;
            left: 0;
            width: 200px;
            background-color: blue;
            color: white;
        }
        .pg-content .content{
            position: absolute;
            top: 48px;
            right: 0;
            left: 200px;
            background-color: yellow;
            /*overflow: auto;*/
            /*bottom: 0;*/
        }
    </style>
    {% block css %} {% endblock %}
</head>
<body>
<div class="pg-header"></div>
<div class="pg-content">
    <div class="menu">
        <script>
            for (var i=0; i<10; i++){
                document.writeln("<p>菜单</p>")
            }
        </script>
    </div>
    {% block content %}
    <div class="content">
        <script>
            for (var i=0; i<100; i++){
                document.writeln("<p>test</p>")
            }
        </script>
    </div>
    {% endblock %}
</div>
{% block js %} {% endblock %}
</body>
也面里加了几个模板语言的block标签,这个并比影响这个页面的访问。去写好对应关系和处理函数后这个页面就能正常访问了。
现在又有另外几个页面,页面的头部以及左侧菜单都是一样的,就不需要每个页面都写了。可以继承这个页面仅仅替换掉需要替换的部分,也就是content的内容。这里已经把content的内容用 {% block content %} {% endblock %} 包起来了。
新的页面tpl1.html,首先要声明继承哪个页面,然后把要替换的内容用相同名字的block标签包起来:
{#声明继承一个页面#}
{% extends 'master.html' %}

{#追加css的内容#}
{% block css %}
    <style>
        .pg-content .tpl1{
            position: absolute;
            top: 48px;
            right: 0;
            left: 200px;
            background-color: brown;
            color: white;
        }
    </style>
{% endblock %}

{#替换掉content的内容#}
{% block content %}
    <div class="tpl1">
        <span>替换掉原来的内容</span>
    </div>
{% endblock %}

{#追加js的内容#}
{% block js %}
    <script>
        alert('测试js')
    </script>
{% endblock %}
如上面的例子中那样,把需要替换的一个或多个部分用block包起来。
注意css(style标签)和js(script标签),一般也都会需要追加css样式和js。css就接在模板的css后面写,js就还是写在最后的位置,如果有jQuery,必须要在导入jQuery静态文件的后面。
只能继承一个模板,不能继承多个。
模板的导入-include
这次写一个组件的html代码tag.html,比如这样:
<h1>这是一个小组件</h1>
<h2>没有什么内容</h2>
然后在去写完成的页面,在页面里用模板语言的include标签导入这个组件:
<!DOCTYPE html>
<html lang="en">
<head>
    <meta charset="UTF-8">
    <title>Title</title>
</head>
<body>
{% include 'tag.html' %}
{% include 'tag.html' %}
{% include 'tag.html' %}
</body>
</html>
上面的例子中看到了,模板的导入可以导入多次的。实际的应用中可能会结合模板语言的for循环,每条数据都通过这个组件渲染然后输出到页面。
内置函数
在页面里使用双大括号 {{ value }} 取值的时候,还可以加上管道符,对结果进行处理后在输出。
比如输出一个日期,首先得先有一个日期对象输出到页面:
def get_data(request):
    import datetime
    now = datetime.datetime.now()
    print(now)
    return render(request, 'get-data.html', {'now': now})
然后页面里使用模板语言可以对日期的格式进行设置:
<h3>默认的日期格式:{{ now }}</h3>
<h3>模板语句加工后:{{ now|date:"Y-m-d H:i:s" }}</h3>其他的方法还有{{ str|truncatechars:'10' }} :只输出10个字符,实际是只截取了前面7个字符,之后跟3个点(...)
使用内置函数不是重点,重点是可以自定义函数
自定义函数
要自定义函数,按照下面的步骤操作:
from django import template

register = template.Library()

@register.simple_tag
def my_fun1(a1, a2, a3):
    return "%s-%s-%s" % (a1, a2, a3)

@register.simple_tag
def my_fun2():
return "my_fun2"{% load myfun %}
<h3>{% my_fun1 'A' 'B' 'C' %}</h3>
<h3>{% my_fun2 %}</h3>上面的是simple_tag,使用装饰器 @register.simple_tag
还有一种filter,只要换成这个装饰器 @register.filter
from django import template

register = template.Library()

@register.simple_tag
def my_fun3(arg1, arg2):
    return "%s: %s" % (arg1, arg2)

@register.filter
def my_fun4(arg1, arg2):
    return "%s: %s" % (arg1, arg2)
之后在页面里使用的时候,传参的方式也是不同的,并且filter最多只能传入2个参数,并且中间连空格都不能有:
<h3>{% my_fun3 'abc' '123' %}</h3>
<h3>{{ 'abc'|my_fun4:'123' }}</h3>
如果一定要用filter,并且还要传入多个参数,只能自己处理了,比如 {{ 'abc'|my_fun4:'123,456,789' }} 这样还是传2个参数,在我们自己的函数里做分割处理。
只传入一个参数也是可以的,第二个不写就好了。但是不能没参数。像 {{ my_fun }} 这样的用法是获取通过 return render() 给的字典里查找这个key来获取值。
单独使用,明显是simple_tag更方便,参数没有限制。
但是filter能够作为if的条件:
{% if 'abc'|my_fun4:'123' == 'abc: 123' %}
    <h1>filter能够作为if的条件</h1>
{% endif %}
上面传参都是加了引号,表示传入的是字符串。不加引号,就是直接传入数字,类型是int。
也可以传入变量或者嵌套使用,比如处理函数最后这样返回 return render(request, 'my-fun.html', {'str': "987"})
<h3>{{ 'abc'|my_fun4:'def'|my_fun4:'456' }}</h3>
<h3>{{ 'xyz'|my_fun4:str }}</h3>
示例-分页
先把页面搞出来,比如要显示100条数据,现在是一次全部显示出来。
处理函数,views.py
LIST = range(100)  # 测试数据就不走数据库了
def show_list(request):
    return render(request, 'show-list.html', {'li': li})
页面,show-list.html
<ul>
    {% for item in li %}
        <li>{{ item }}</li>
    {% endfor %}
</ul>
把分页的效果弄出来,修改处理函数,一次只返回页面10条数据,通过get请求返回对应的页数,默认返回第一页。
LIST = range(100)  # 测试数据就不走数据库了
def show_list(request):
    current_page = request.GET.get('p', 1)  # 设一个默认值,如果不提交p,默认就是1
    current_page = int(current_page)  # 通过get获取到的是字符串,转成数字
    start = (current_page-1)*10
    end = current_page*10
    li = LIST[start:end]
    page_str = """
    <a href='/show-list/?p=1'>1</a>
    <a href='/show-list/?p=2'>2</a>
    <a href='/show-list/?p=3'>3</a>
    <a href='/show-list/?p=4'>4</a>
    <a href='/show-list/?p=5'>5</a>
    """
    # from django.utils.safestring import mark_safe
    # page_str = mark_safe(page_str)
    return render(request, 'show-list.html', {'li': li, 'page_str': page_str})
页面也加上选择页数的a连接的内容:
<body>
<ul>
    {% for item in li %}
        <li>{{ item }}</li>
    {% endfor %}
</ul>
{{ page_str }}
{#{{ page_str|safe }}#}
</body>
这里是有问题的,这里的a连接的html代码是处理函数传过来了,之后在页面里再用模板语言把内容加载进来。这里会有个XSS***的问题。
XSS***,大致就是你提供一个输入框给用户输入内容,然后可以把用户输入的内容在页面中显示出来,比如说论坛、评论。那么用户可以在这里输入源码,比如js脚本,然后你的后台直接不做处理就把代码返回给前端,那么前端就可能执行这段代码了。
所以默认模板语言认为加载的内容都是不安全的,所以都作为字符串加载。有2中方法可以声明这段内容是安全的,那么就能正常的在前端按照我们写的标签的样子展示出来。
两种方法可以任选一种使用,在例子里都注释掉了,现在可以放开其中一种方法。两个方法一起用试下来也不会报错
根据数据的数量,自动计算一共有多少页,
from django.utils.safestring import mark_safe
LIST = range(100)  # 测试数据就不走数据库了
def show_list(request):
    current_page = request.GET.get('p', 1)  # 设一个默认值,如果不提交p,默认就是1
    current_page = int(current_page)  # 通过get获取到的是字符串,转成数字
    start = (current_page-1)*10
    end = current_page*10
    li = LIST[start:end]
    count, remainder = divmod(len(LIST), 10)  # 取除后的整数和余数
    count = count+1 if remainder else count  # 如果除后有余数,结果就加一
    page_list = []
    for i in range(1, count+1):
        page_list.append("<a style='margin: 0 3px'' href='/show-list/?p=%s'>%s</a>" % (i, i))
    page_str = ''.join(page_list)
    page_str = mark_safe(page_str)
    return render(request, 'show-list.html', {'li': li, 'page_str': page_str})
如果不是100条数据,而是1000条甚至更多,那么下面的页码也会很多。实际应用中,一般值显示当前页以及前面后后面多少页,而不是所有的页码。简单优化一下:
from django.utils.safestring import mark_safe

LIST = range(1100)  # 测试数据就不走数据库了
def show_list(request):
    current_page = request.GET.get('p', 1)  # 设一个默认值,如果不提交p,默认就是1
    current_page = int(current_page)  # 通过get获取到的是字符串,转成数字
    per_page_count = 15  # 每页显示多少条记录,也是可以设置成通过get来提交的
    start = (current_page-1)*per_page_count
    end = current_page*per_page_count
    li = LIST[start:end]
    count, remainder = divmod(len(LIST), per_page_count)  # 取除后的整数和余数
    count = count+1 if remainder else count  # 如果除后有余数,结果就加一
    start_index = 1 if current_page < 6 else current_page-5
    end_index = count if current_page+5 > count else current_page+5
    page_list = []
    for i in range(start_index, end_index+1):
        page_list.append("<a style='margin: 0 3px'' href='/show-list/?p=%s'>%s</a>" % (i, i))
    page_str = ''.join(page_list)
    page_str = mark_safe(page_str)
    return render(request, 'show-list.html', {'li': li, 'page_str': page_str})
另外上面还把每页显示多少条记录也作为一个变量,并且可以通过get请求提交。
这里固定显示11页,这个也可以作为一个标量,不写死,方便调整
还可以进一步优化,比如前面加一个上一页,后面加一个下一页,还要直接去第一页和最后一页。还可以搞个input框,直接输入页码,跳转的那一页。
下面是部分优化的版本,有上一页和下一页,固定显示11页(可用变量调整)内容:
from django.utils.safestring import mark_safe

LIST = range(1000)  # 测试数据就不走数据库了
def show_list(request):
    current_page = request.GET.get('p', 1)  # 设一个默认值,如果不提交p,默认就是1
    current_page = int(current_page)  # 通过get获取到的是字符串,转成数字
    per_page_count = 15  # 每页显示多少条记录,也是可以设置成通过get来提交的
    page_num = 11  # 每页显示11条记录,可修改
    page_num_before = (page_num-1)//2  # 算出来前面放几页
    page_num_after = page_num-1-page_num_before  # 后面放几页
    start = (current_page-1)*per_page_count
    end = current_page*per_page_count
    li = LIST[start:end]
    count, remainder = divmod(len(LIST), per_page_count)  # 取除后的整数和余数
    count = count+1 if remainder else count  # 如果除后有余数,结果就加一
    if count <= page_num: page_num = count
    if current_page <= page_num_before:
        start_index, end_index = 1, page_num
    elif current_page + page_num_after >= count:
        start_index, end_index = count-page_num+1, count
    else:
        start_index = current_page - page_num_before
        end_index = start_index + page_num - 1
    page_list = list()
    if current_page == 1:
        page_list.append("<a style='margin: 0 3px'' href='javascript:viod(0);'>上一页</a>")
    else:
        page_list.append("<a style='margin: 0 3px'' href='/show-list/?p=%s'>上一页</a>" % (current_page-1))
    for i in range(start_index, end_index+1):
        page_list.append("<a style='margin: 0 3px'' href='/show-list/?p=%s'>%s</a>" % (i, i))
    if current_page == count:
        page_list.append("<a style='margin: 0 3px'' href='javascript:viod(0);'>下一页</a>")
    else:
        page_list.append("<a style='margin: 0 3px'' href='/show-list/?p=%s'>下一页</a>" % (current_page+1))
    page_str = ''.join(page_list)
    page_str = mark_safe(page_str)
    return render(request, 'show-list.html', {'li': li, 'page_str': page_str})
自定义功能模块
上面的分页功能代码比较多(还可以继续优化),而且别的页面里也会需要用到分页的功能。把分页的功能单独提取出来,封装到一个单独的类里,做成一个功能模块。这种功能模块也集中存放在一个文件夹里,在项目目录下创建utils文件夹,再创建一个py文件pagination.py作为模块。要用的时候,处理函数里只需要实例化这个类,调用类中的方法就可以了:
# 功能模块 utils/pagination.py 中的内容

from django.utils.safestring import mark_safe

class Page:

    def __init__(self, current_page, data_count, per_page_count=10, page_num=11):
        self.current_page = current_page
        self.data_count = data_count
        self.per_page_count = per_page_count
        self.page_num = self.total_count if self.total_count <= page_num else page_num

        self.page_num_before = (self.page_num-1)//2
        self.page_num_after = self.page_num - 1 - self.page_num_before

    @property
    def start(self):
        return (self.current_page-1) * self.per_page_count

    @property
    def end(self):
        return self.current_page * self.per_page_count

    @property
    def total_count(self):
        count, remainder = divmod(self.data_count, self.per_page_count)
        return count + 1 if remainder else count

    def page_str(self, base_url):
        if self.current_page <= self.page_num_before:
            start_index, end_index = 1, self.page_num
        elif self.current_page + self.page_num_after >= self.total_count:
            start_index, end_index = self.total_count - self.page_num + 1, self.total_count
        else:
            start_index = self.current_page - self.page_num_before
            end_index = start_index + self.page_num - 1
        page_list = list()
        if self.current_page == 1:
            page_list.append("<a style='margin: 0 3px'' href='javascript:viod(0);'>上一页</a>")
        else:
            page_list.append("<a style='margin: 0 3px'' href='%s?p=%s'>上一页</a>" % (base_url, self.current_page-1))
        for i in range(start_index, end_index+1):
            page_list.append("<a style='margin: 0 3px'' href='%s?p=%s'>%s</a>" % (base_url, i, i))
        if self.current_page == self.total_count:
            page_list.append("<a style='margin: 0 3px'' href='javascript:viod(0);'>下一页</a>")
        else:
            page_list.append("<a style='margin: 0 3px'' href='%s?p=%s'>下一页</a>" % (base_url, self.current_page+1))
        page_str = ''.join(page_list)
        return mark_safe(page_str)

# 处理函数 views.py 中的内容
LIST = range(1000)  # 测试数据就不走数据库了
from utils import pagination
def show_list(request):
    current_page = request.GET.get('p', 1)  # 设一个默认值,如果不提交p,默认就是1
    current_page = int(current_page)  # 通过get获取到的是字符串,转成数字
    page_obj = pagination.Page(current_page, len(LIST))
    li = LIST[page_obj.start:page_obj.end]
    page_str = page_obj.page_str('/show-list/')
    return render(request, 'show-list.html', {'li': li, 'page_str': page_str})
Cookie
Cookie是存放在客户端浏览器上的,以key, value 的形式保存
示例-登录
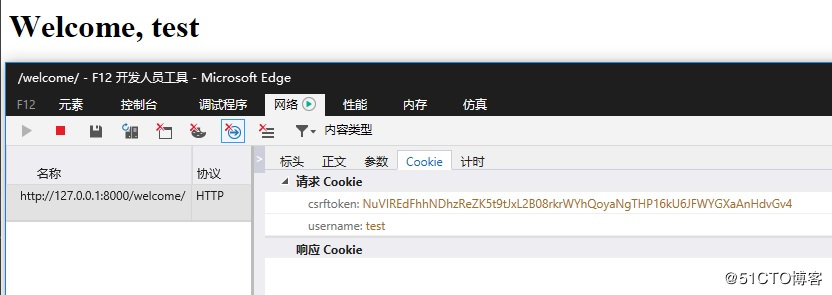
这个例子中,先通过登录页面将登录成功的用户名发送给客户端保存到cookie中。然后在欢迎页面请求客户的的cookie拿到客户端登录成功的用户名。
先把如下的2个页面做出来,login登录页面,登录成功后跳转到welcome。这次如果未登录成功想要直接访问welcome是不可以的,会跳转到login页面,要求登录。
    path('login/', views.login),
    path('welcome/', views.welcome),
页面简单一点
<!-- 登录页面,login.html -->
<form action="/login/" method="POST">
    <p><input type="text" name="username" placeholder="用户名"></p>
    <p><input type="password" name="password" placeholder="密码"></p>
    <p><input type="submit" value="登录"></p>
</form>

<!-- 欢迎页面,welcome.html -->
<h1>Welcome, {{ username }}</h1>
处理函数:
# 测试数据不走数据库了
user_info = {
    'user': {'password': 'user123'},
    'test': {'password': 'test123'},
}
def login(request):
    if request.method == 'GET':
        return render(request, 'login.html')
    if request.method == 'POST':
        usr = request.POST.get('username')
        pwd = request.POST.get('password')
        dic = user_info.get(usr)
        if not dic:
            return render(request, 'login.html', {'error_msg': "用户不存在"})
        if dic['password'] == pwd:
            # return redirect('/welcome/')
            # 先不返回对象,把对象拿到,加上cookie的内容之后再返回给客户端
            res = redirect('/welcome/')  # 这个是原本返回给客户端对对象
            res.set_cookie('username', usr)  # 给返回的对象加上cookie的内容
            return res
        else:
            return render(request, 'login.html', {'error_msg': "用户名或密码错误"})

def welcome(request):
    print(type(request.COOKIES), request.COOKIES)  # 这就是一个字典
    user = request.COOKIES.get('username')  # 这步是像客户端发请求,要求获取这个值
    if not user:
        return redirect('/login/')
    return render(request, 'welcome.html', {'username': user})
尝试直接访问welcome,还是会跳转到login。只有登录成功后才会显示欢迎页面。这里的用户名是向客户端的浏览器请求获取到的。可以打开浏览器的F12开发人员工具在网络里查看到:
Cookie的语法
获取Cookierequest.COOKIES.get('key') 或 request.COOKIES['key'] :这就是个字典,获取值使用字典的操作
设置Cookie
设置就是在把对象返回给客户端之前,先拿到这个对象:rep = render(request, ...) 或 rep = return HttpResponse(...) ,
拿到之后设置:rep.set_cookie(key,value) 参数不止这两个,所有参数如下:
如果要注销,清除cookie,那么就 rep.set_cookie(key) ,给你的key设置个空值,并且超时时间设置为马上失效。
客户端操作Cookie
jQuery有一个插件,叫jQuery.cookie,可以方便的操作cookie。要使用就先去把js文件加载到你的页面:
分页-定制每页显示的数量
利用cookie,在上前面的分页的例子的基础上,增加一个功能,用户可以定制每页显示多少条数据。Web界面上值需要追加一个select框,然后绑定事件:
<select id="page-size" onchange="changPageSize(this)">
    <option value=10>10</option>
    <option value=20>20</option>
    <option value=30>30</option>
    <option value=50>50</option>
</select>
<script src="/static/js/jquery-1.12.4.js"></script>
<script src="/static/js/jquery.cookie.js"></script>
<script>
    $(function () {
        // 当页面框架加载完成后,要获取一个cookie的值,设置select框的默认选项
        var per_page_count = $.cookie('per_page_count');  // 获取cookie值
        per_page_count && $('#page-size').val(per_page_count);  // 设置select的选项,获取不到这个cookie就不设置了
    });
    function changPageSize(ths) {
        var per_page_count = $(ths).val();
        $.cookie('per_page_count', per_page_count, {'path': '/show-list/'});
        location.reload()
    }
</script>上面给select框绑定了一个事件,当选项改变时,会获取当前select的值,然后将这个值传给cookie。这里限定了生效的路径,只有这个页面按这个cookie的值显示数据的数量,如果还有别的页面取不到这个值。貌似没什么卵用,别的页面如果有同样需求,再开一个cookie的key记录就好了,而且你加了不同的path参数,修改的应该还是用个key的内容
上面还有一段当页面加载完成后要执行的代码,没有这个会有点小问题,就是你的select选项永远是10,但是你的页面设置中cookie里取到的可能是20。就是select选项没有同步,并且会造成你无法把显示数量设置成10。
接下来去处理函数出稍加修改:
def show_list(request):
def show_list(request):
    # 增加内容:获取cookie的值
    per_page_count = request.COOKIES.get('per_page_count', '10')  # 获取cookie的值
    per_page_count = int(per_page_count)  # 获取到的永远是字符串,转为整数
    # print(type(per_page_count), per_page_count)
    current_page = request.GET.get('p', 1)
    current_page = int(current_page)
    # 实例化类的时候传入获取的值
    page_obj = pagination.Page(current_page, len(LIST), per_page_count)
    li = LIST[page_obj.start:page_obj.end]
    page_str = page_obj.page_str('/show-list/')
    return render(request, 'show-list.html', {'li': li, 'page_str': page_str})
用下来发现还有点用户体验的小问题,这个得去修改类了,不过这不是重点。重点就是学习掌握cookie的操作。
加密的Cookie
就是带签名的cookie。之前使用的cookie都是明文保存在客户端的,还可以对cookie加密。
用的时候基本就是换个方法的名字,参数里多加一个salt的关键参数。
装饰器
上面登录的例子中已经完成了登录验证的功能。实际应用中,很多页面都需要登录验证,这就需要把验证的功能独立出来并且做成装饰器。之后只要把其它处理函数装饰上即可。
FBV的装饰器
上面登录例子中的welcome函数自带了登录验证。现在welcome函数只需要完成显示页面的功能,验证的功能交给装饰器:
def auth(func):
    def inner(request, *args, **kwargs):
        # 装饰的内容,验证用户是否已经登录
        user = request.COOKIES.get('username')
        if not user:
            return redirect('/login/')
        # 装饰的内容结束,下面调用执行被装饰的函数
        return func(request, *args, **kwargs)
    return inner

@auth
def welcome(request):
    # 下面就是原来验证的功能了,现在交给装饰器
    # user = request.COOKIES.get('username')
    # if not user:
    #     return redirect('/login/')
    # 虽然装饰器登录验证的时候已经获取到user的值了,可以传过来
    # 这里不考虑装饰器,自己独立的完成处理函数的功能:获取user,在页面显示出来
    user = request.COOKIES.get('username')
    return render(request, 'welcome.html', {'username': user})
CBV的装饰器
CBV的装饰器有2中情况。一种是只装饰一个或部分方法,一种是装饰整个类中的方法。装饰器还是上面的装饰器。
单独装饰一个方法
from django import views
from django.utils.decorators import method_decorator

class Order(views.View):

    @method_decorator(auth)
    def get(self, request):
        user = request.COOKIES.get('username')
        return render(request, 'welcome.html', {'username': user})

    def post(self, request):
        pass
装饰类中的所有方法
这里利用dispatch方法是在执行其他方法前执行。我们装饰了dispatch方法,就阿是装饰了其他方法
from django import views
from django.utils.decorators import method_decorator

class Order(views.View):

    @method_decorator(auth)
    def dispatch(self, request, *args, **kwargs):
        """简单的继承并重构这个方法,然后什么都不改变,就为了加上装饰器"""
        return super(Order, self).dispatch(request, *args, **kwargs)

    def get(self, request):
        user = request.COOKIES.get('username')
        return render(request, 'welcome.html', {'username': user})

    def post(self, request):
        pass
装饰整个类
装饰的还是dispatch方法,把装饰器写在类上面
from django import views
from django.utils.decorators import method_decorator

@method_decorator(auth, name='dispatch')
class Order(views.View):

    def get(self, request):
        user = request.COOKIES.get('username')
        return render(request, 'welcome.html', {'username': user})

    def post(self, request):
        pass
上一篇: 4个数字组成不重复的3位数python脚
下一篇: python flask+psutil
- openvpn linux客户端使用
52056
- H3C基本命令大全
51925
- openvpn windows客户端使用
42150
- H3C IRF原理及 配置
38995
- Python exit()函数
33495
- openvpn mac客户端使用
30447
- python全系列官方中文文档
29083
- python 获取网卡实时流量
24113
- 1.常用turtle功能函数
24019
- python 获取Linux和Windows硬件信息
22370
- LangChain1.0-Agent-部署/上线(开发人员必备)
122°
- LangChain1.0-Agent-Spider实战(爬虫函数替代API接口)
154°
- LangChain1.0-Agent(进阶)本地模型+Playwright实现网页自动化操作
167°
- LangChain1.0-Agent记忆管理
149°
- LangChain1.0-Agent接入自定义工具与React循环
176°
- LangChain1.0-Agent开发流程
162°
- LangChain1.0调用vllm本地部署qwen模型
183°
- LangChain-1.0入门实践-搭建流式响应的多轮问答机器人
189°
- LangChain-1.0入门实战-1
189°
- LangChain-1.0教程-(介绍,模型接入)
204°
- 姓名:Run
- 职业:谜
- 邮箱:383697894@qq.com
- 定位:上海 · 松江
