理解VMwawe的3种网络模型
发布时间:2019-09-02 07:45:26编辑:auto阅读(2296)
Guest - 指的是在VMware虚拟机软件中模拟出来的系统
Host - 指物理存在的实体计算机,也称作宿主机
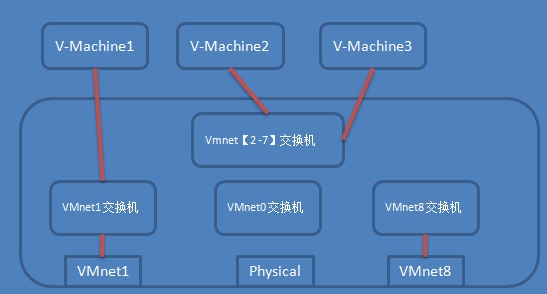
当我们选择虚拟机网络连接类型的时候, 如果选择 host-only, 那么虚拟机的网卡连接到虚拟交换机VMnet1上,并且物理主机的虚拟网卡VMnet1 也连接到虚拟交换机VMnet1 上。
如果我们选择 nat ,那么虚拟机的网卡连接到虚拟交换机VMnet8上,并且物理主机的虚拟网卡VMnet8 也连接到虚拟交换机VMnet8上。
当然, 虚拟机之间也可以连接到自定义的虚拟交换机上,可以实现虚拟机之间互通,不过此虚拟交换机并没有和物理主机有任何关联。
如果Guest手动配置IP, 那么默认网关指向 Host宿主机 VMnet1虚拟网卡的IP
如果Guest为dhcp, 那么默认网关指向 Host宿主机 VMnet1虚拟网卡的IP。请手动新增默认路由条目: route add default gw VMnet1虚拟网卡IP
最为简单的方式就是NAT,因为它不需要任何的网卡设置, IP地址也可以从虚拟的 DHCP服务器来获得,要做的仅仅就是把它的网络设置为 NAT方式即可。
至于Bridged模式,则需要额外的 IP地址,这有可能会实现不了,因为并不是每个 ISP都那么大方。
如果是 Host-Only,则又需要设置RRAS,没有几个人会愿意为了让虚拟机上网而换 OS的,所以就用 NAT最好了。在这里要强调的一点是,如果设置了Host-Only网络,非要为 VMnet1做路由,一定要用 RRAS,而不要用 Windows XP或者 2000及以上版本操作系统的 ICS,因为它会自动把内网的接口地址改为 192.168.0.1。你在安装虚拟机的时候,VMware不会正好给你的 VMware Network Adapter VMnet1虚拟网卡分配为 192.168.0.1的地址吧?这样的话会造成 VMware Network Adapter VMnet1虚拟网卡和 VMnet1网段的网络 ID不一致,自然,你的 Guest就没有办法和 Host通信了!
宿主机IP:192.168.3.100
虚拟机IP:192.168.72.129;
win 7 + VMware Workstation 10 + Putty / SecureCRT / XShell
CentOS 6.5
Host port: 你打算用本地win7(Host 宿主机) 的哪一个端口作监听端口
Virtual machine IP address : 你的linux(Guest 虚拟机) 的IP是多少,你就填多少
Virtual machine port: 你打算用监听端口映射到Guest虚拟机linux哪个端口
大纲内容
一、文档术语约定
二、虚拟网卡与虚拟交换机
三、VMware的三种网络模型
四、VMware NAT 网络模型 端口映射
| 文档版本 | 更新时间 | 备注 |
| v1 | 2016-02-10 |
版本更新信息
环境
| 操作系统版本 | 软件版本 | |
| Win 7 x64 | VMware workstation pro 12 |
一、文档术语约定
在详细介绍之前,有几个概念要说明:
二、虚拟网卡与虚拟交换机
很多朋友都曾问到关于 Guest和 Host互联,以及Guest如何连接网络,其实这并不是一件困难的事情,只要能够理解 VMware 提供的网络模型即可,今天结合实际使用经验,针对虚拟机网络设置,来详细介绍一下 VMware的 3种网络结构。
在说到 VMware的网络模型之前,先说一下 VMware的几个虚拟设备。
VMware 提供的【虚拟交换机】
■ VMnet0:这是 VMware用于虚拟桥接网络下的虚拟交换机;
■ VMnet1:这是 VMware用于虚拟 Host-Only网络下的虚拟交换机;
■ VMnet8:这是 VMware用于虚拟 NAT网络下的虚拟交换机;
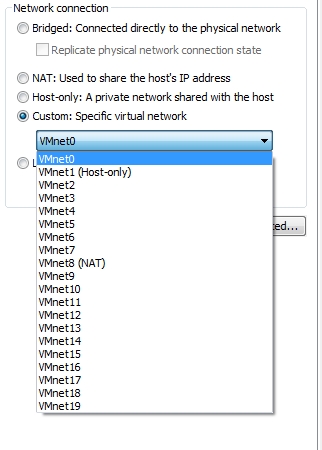
当我们把虚拟机软件vmware 安装完成后,其模拟了多个虚拟交换机。打开 vmware 软件,我们在配置虚拟机网络模型的时候,可以Bridged, NAT, Host-only, Custom 四种组网模型。选中Custom方式,将给我们提供了很多虚拟交换机。
这些都是vmware软件模拟出来的虚拟交换机。在VMware workstation 9之后的版本,虚拟交换机就增加为20个了。仅有 VMnet0, VMnet1,VMnet8这三个虚拟交换机分别连接对应的物理主机上vmware 模拟的虚拟网卡上,其他的虚拟交换机都是独立的。
VMware 提供的【虚拟网卡】
■ VMware Network Adapter VMnet1:这是 Host用于与 Host-Only虚拟网络进行通信的虚拟网卡;
■ VMware Network Adapter VMnet8:这是 Host用于与 NAT虚拟网络进行通信的虚拟网卡;
VMware安装完成之后,不仅提供了众多的虚拟交换机,而且在我们的物理主机上模拟了两块虚拟网卡,打开网络配置中心,可以看到:
这两个虚拟的网卡,和我们物理网卡处于同样的地位,我们可以看做是物理主机上安装了多块网卡(尽管是模拟的)。虚拟网卡 VMnet1 连接到虚拟交换机 VMnet1上,虚拟网卡 VMnet8 连接到虚拟交换机VMnet8 上。
通过这些模拟的网络设备(虚拟网卡, 虚拟交换机),我们可以构建复杂的网络模型,以完成学习或者实验环境的搭建。
三、VMware的三种网络模型
VMware 提供了三种网络连接方式: Bridge 模式,NAT模式,Host-Only 模式。
桥接网络:Bridged(VMnet0)
网络拓扑结构如下图所示:

Host的物理网卡和 Guest 的网卡在 VMnet0 交换机上通过虚拟网桥(交换机)进行桥接,这也就是说,我的物理网卡和我的Guest的网卡,也就是虚拟机的网卡(注:这个虚拟网卡不等于 VMware Network Adapter VMnet1或者 VMware Network Adapter VMnet8)处于同等地位,此时的 Guest就好像我的 Host所在的同一个网段上的另外一台机器。这种模式是在新建虚拟机的时候默认选择的,是将虚拟机的网卡桥接到host主机的物理网卡上面,实际上是将host主机的物理网卡设置为混杂模式,从而达到侦听多个IP的能力。
那么Guest又是如何访问互联网的呢?相当于Guest的网卡直接对接(桥接)到Host主机的物理网卡上,数据包通过物理网卡发送出去(但是它们的MAC地址不同),然后通过物理网卡连接到Internet。打个比方来说:
Host物理网卡配置如下:

可以看到,Host的IP地址是192.168.3.101,默认网关为192.168.3.1,那么如果Guest想要和Host互通并且连接互联网,应该怎么配置网卡呢?
Bridged方式相当于Host与Guest处于同一个网段(同一个局域网),那么把Guest的IP设置为192.168.3.x网段的地址,其他掩码,网关,DNS都和Host配置一样,即可。
Guest网卡配置:

配置文件修改完成后,重启网卡
# /etc/init.d/network restart

我们在Guest上利用ping命令测试连通性,可以看到Guest(192.168.3.122)能够与Host(192.168.3.101)互通。我们在看能否与外网通信?

OK,大功告成。
当然,Guest所配置的 IP地址一定要在 192.168.3.x网段没有被占用,而且我的网络管理员允许我来使用这个 IP地址(比如IP-MAC地址绑定等)。如果在 192.168.3.x网段,存在 DHCP服务器,那么 Host和 Guest 都可以把 IP地址获取方式设置为 DHCP方式。
对于笔记本有多个网卡时,需要注意的是:
注意,Bridged 方式是Auto-bridging,而且默认是桥接到有线网卡上的。
有时我们是通过wifi,也就是无线网卡上网,那么这里就必须修改,否则默认情况下会桥接到有线网卡上。
VMware中对于 Bridged 网络的定义(引用自 VMware GSX Server User’s Manual):
Bridged networking connects a virtual machine to a network using the host computer's Ethernet adapter. Bridged networking is set up automatically if you select Use bridged networking in the New Virtual Machine Wizard or if you select the Typical setup path. This selection is available on a Linux host
only if you enable the bridged networking option when you install GSX Server.
If your host computer is on an Ethernet network, bridged networking is often the easiest way to give your virtual machine access to that network. On a Windows host, you can use bridged networking to
connect to either a wired or a wireless network. On a Linux host, you can use bridged networking to connect to a wired network.
If you use bridged networking, your virtual machine needs to have its own identity on the network. For example, on a TCP/IP network, the virtual machine needs its own IP address. Your network
administrator can tell you whether IP addresses are available for your virtual machine and what networking settings you should use in the guest operating system. Generally, your guest operating system may acquire an IP address and other network details automatically from a DHCP server, or you may need to set the IP address and other details manually in the guest operating system.
If you use bridged networking, the virtual machine is a full participant in the network. It has access to other machines on the network and can be contacted by other machines on the network as if it
were a physical computer on the network. Be aware that if the host computer is set up to boot multiple
operating systems and you run one or more of them in virtual machines, you need to configure each operating system with a unique network address. People who boot multiple operating systems often assign all systems the same address, since they assume only one operating system will run at a time. If you use one or more of the operating systems in a virtual machine, this assumption is no longer true.
If you make some other selection in the New Virtual Machine Wizard and later decide you want to use bridged networking, you can make that change in the virtual machine settings editor (VM > Settings). For details, see Changing the Networking Configuration.
NAT网络:NAT(VMnet8)
网络拓扑结构:
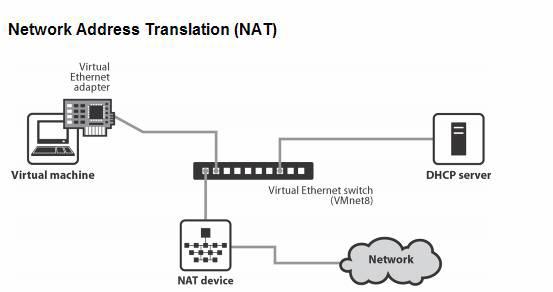
在NAT网络中,会使用到 VMnet8虚拟交换机, Host上的 VMware Network Adapter VMnet8虚拟网卡被连接到VMnet8交换机上,来与 Guest进行通信,但是 VMware Network Adapter VMnet8虚拟网卡仅仅是用于和
VMnet8 网段通信用的,它并不为 VMnet8网段提供路由功能,处于虚拟 NAT网络下的 Guest是使用虚拟的 NAT服务器来连接到Internet的。所以,即使在host中Disable掉这块虚拟网卡,Guest仍然可以联网,只是Host无法访问VMnet8网段,也就是无法访问Guest而已。VMware功能非常强大,在 NAT网络下,我们甚至可使用 Port Forwarding 功能,来把 Host的某一个TCP 或者 UDP端口映射到 Guest上!
这样说起来可能比较容易混淆,VMnet8虚拟交换机,VMware Network Adapter VMnet8虚拟网卡是什么?这里就给出给直观的解释。
什么是虚拟网卡?
在我们安装完成VMware workstation后,会自动在我们的Host主机上创建两块虚拟网卡,分别为VMware Network Adapter VMnet8(NAT) 和 VMware Network Adapter VMnet1(host only),如下图

这两块虚拟网卡和我们物理网卡处于同等地位,相当于我们Host主机安装了多块网卡(2块虚拟的VMware Virtual Ethernet Adapter)。
那么什么是虚拟交换机呢?
在我们安装完成VMware workstation后,会自动创建多个虚拟交换机,用于组件小型网络。VMware workstation 5.x 系列,会创建10个虚拟交换机,今天安装VMware workstation 10.x发现,竟然创建了20个虚拟交换机,本着版本越大越牛逼的规则,VMware workstation 功能越来越强大了。
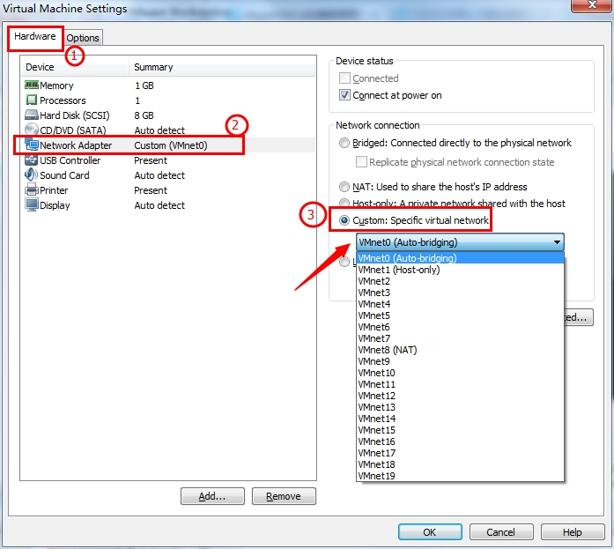
那么这些VMnet*的就是我们刚才所说的虚拟交换机了,Virtual Switch。除了VMnet0, VMnet1, VMnet8有特殊功能之外,其他的主要用于Guest与Guest之间通信,也就是连接多个Guest。假设我创建了两个虚拟机,我想让他们互通,怎么办?只需要在VMware虚拟机上设置两个虚拟机的网卡都连接到VMnetN上,然后两个虚拟机的IP处于同一个网段,那么即可互通。
好了, 回归正题,我们查看一下VMware Network Adapter VMnet8虚拟网卡的 IP地址配置:

IP地址是VMware安装过程中它自动手工指定的,但却不是由我来指定的,而是 VMware在安装的时候自动随机指定的一个 IP地址(注意,不要修改VMware Network Adapter VMnet8虚拟网卡所在的网络 ID,这样的话会造成 Host和 Guest无法通信)。那么,我的NAT网络的虚拟机的 IP地址也为 192.168.27.0这个网段,其 IP地址配置为:

查看自动获取的IP地址:

可以看到,Guest虚拟机的IP地址与Host物理机的VMware Network Adapter VMnet8虚拟网卡的IP地址属于同一个网段。那么此时,Guest与Host之间就可以互通了。
Guest ping Host :

Host ping Guest :

我们在Guest上查看一下DHCP的信息:
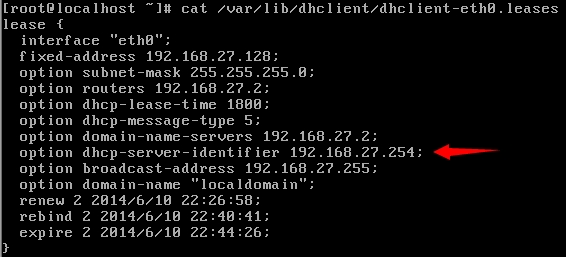
可以看出,Guest的IP地址是DHCP服务器自动分配的,DHCP服务器的地址为192.168.27.254,那为什么会有
DHCP服务器存在呢?
这是因为 VMware安装之后,VMware同时会创建一台虚拟的 DHCP服务器为虚拟机来分配 IP地址,这个 DHCP服务器,你可以ping通它,但是无法进行访问,因为实际上它就是一个系统服务(VMware DHCP Service)而已,在“开始”—> “运行” 中输入 services.msc,就会看到这个服务:
 了解了吗?
了解了吗?
当然,如果Guest需要联网,需要Host主机开启 VMware NAT Service 服务。如果我的 Host此时已经连接到了 Internet,那么我的Guest也就可以连上 Internet了。
那么 Host上的 VMware Network Adapter VMnet8虚拟网卡在这里扮演了一个什么角色呢?它仅仅是为 Host和 NAT虚拟网络提供了一个通信接口,所以,即便在 Host中Disable掉这块虚拟网卡, Guest仍然是可以上网的,只是 Host无法再访问 VMnet8网段,也即是无法访问 Guest而已。
VMware中对于 NAT网络的定义(引用自 VMware GSX Server User’s Manual):
NAT gives a virtual machine access to network resources using the host computer's IP address.
A network address translation connection is set up automatically if you follow the Custom path in the New Virtual Machine Wizard and select Use network address translation.
If you want to connect to the Internet or other TCP/IP network using the host computer's dial-up networking or broadband connection and you are not able to give your virtual machine an IP address on the external network, NAT is often the easiest way to give your virtual
machine access to that network. NAT also allows you to connect to a TCP/IP network using a Token Ring adapter on the host computer.
If you use NAT, your virtual machine does not have its own IP address on the external network. Instead, a separate private network is set up on the host computer. Your virtual machine gets an address on that network from the VMware virtual DHCP server. The VMware NAT device
passes network data between one or more virtual machines and the external network. It identifies incoming data packets intended for each virtual machine and sends them to the correct destination.
If you select NAT, the virtual machine can use many standard TCP/IP protocols to connect to other machines on the external network.
For example, you can use HTTP to browse Web sites, FTP to transfer files and Telnet to log on to other computers. In the default configuration, computers on the external network cannot initiate connections to the virtual machine. That means, for example, that the default configuration does not let you use the virtual machine as a Web server to send Web pages to computers on the external network.
If you make some other selection in the New Virtual Machine Wizard and later decide you want to use NAT, you can make that change in the virtual machine settings editor (VM > Settings). For details, see Changing the Networking Configuration. For a more thorough discussion of NAT, see Understanding NAT.
Host-Only网络: Host-Only(VMnet1)
网络拓扑结构:

在Host-Only网络中,Host-Only网络被用来设计成一个与外界隔绝的(isolated)网络,其实 Host-Only网络和
NAT网络非常相似,唯一不同的地方就是在 Host-Only网络中,没有用到 NAT服务,没有服务器为VMnet1网络做路由,它当然就没有办法访问 Internet啦,可是如果此时我的 Host要和 Guest通信怎么办呢?当然就要用到VMware Network Adapter VMnet1这块虚拟网卡了。
把虚拟机软件的网络设置成Host-Only的话,并且在Guest中设置获取IP地址的方式为 DHCP, 那么Guest会通过Host主机的系统服务(VMware DHCP Service)获取到IP地址, Guest所获得的IP和Host的VMware Network Adapter VMnet1 虚拟网卡的IP地址处于同一个网段。
如下图,这是我的 Host上的 VMware Network Adapter VMnet1虚拟网卡的配置,同样, VMware也为我自动随机分配好了它的 IP:

那么如果我把 Guest的网络设置成了 Host-Only的话,把它的 IP获取方式设置为 DHCP,它会到虚拟的
DHCP服务器上拿到 IP,这个 DHCP服务器仍然是一个虚拟的 DHCP服务器(仅仅是一个系统服务而已),而且在下图中,可以看到,这个DHCP服务器的 IP地址仍然是 192.168.X.254,这里 X=153,因为要和我的 VMnet1的网络 ID相同。所以,Guest所获得的 IP和我的 Host的 VMware Network Adapter VMnet1虚拟网卡的 IP使用同一个网络 ID:
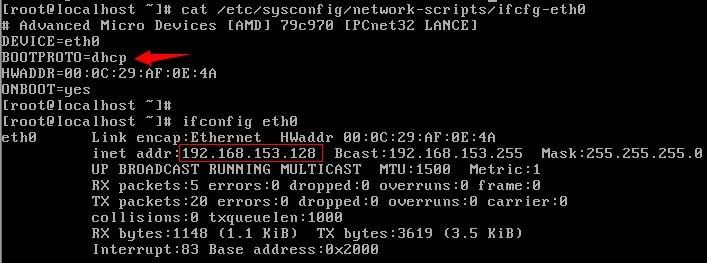
查看Guest的DHCP信息:
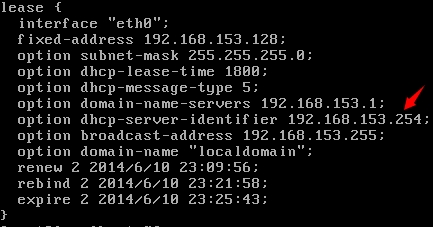
注意与NAT对比, 下图为NAT的DHCP信息:
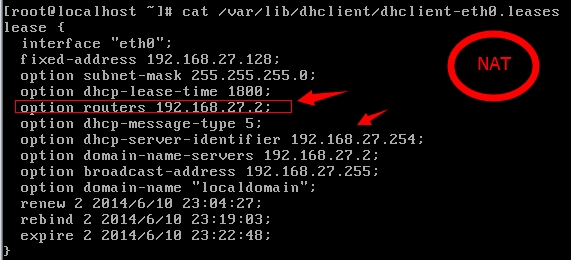
在 Host-Only网络下, Guest的 Default Gateway被设置为NULL,这是由于没有默认路由器为它到外部网络提供路由的缘故,也即是上边说到的 Host-Only网络没有 NAT服务器!如果使用 route add命令加上某个地址做为它的路由器,它仍然不能访问 Internet(实际上也没有地址可加)。
这样,我的 Guest虽然没有办法访问Internet,但是仍然可以和我的 Host进行通信,这正是因为我的 Host上的 VMware Network Adapter VMnet1虚拟网卡起到了作用,它负责和 VMnet1网络相连,为我访问 Host-Only网络下的 Guest提供了通信接口。
至于为何要把 Host-Only网络设置为没有 Default Gateway的方式,这是 VMware的设计使然,它就是让我们建立一个与外界隔离(isolated)的网络时而使用的。
VMware中对于 Host-Only网络的定义(引用自 VMware GSX Server User’s Manual):
Host-only networking creates a network that is completely contained within the host computer.
A host-only network is set up automatically if you select Use Host-Only Networking in the New Virtual Machine Wizard. On Linux hosts, this selection is available only if you enabled the host-only
networking option when you installed GSX Server.
Host-only networking provides a network connection between the virtual machine and the host computer, using a virtual Ethernet adapter that is visible to the host operating system. This approach can be useful if you need to set up an isolated virtual network.
If you use host-only networking, your virtual machine and the host virtual adapter are connected to a private TCP/IP network. Addresses on this network are provided by the VMware DHCP server. If you make some other selection in the New Virtual Machine Wizard and later decide you want to use host-only networking, you can make that change in the virtual machine settings editor (VM > Settings).
For details, see Changing the Networking Configuration.
Routing and Connection Sharing If you install the proper routing or proxy software on your host computer, you can establish a connection between the host virtual Ethernet adapter and a physical network adapter on the host computer. This allows you, for example, to connect the virtual machine to a Token Ring or other non-Ethernet network.
On a Windows 2000 or Windows Server 2003 host computer, you can use host-only networking in combination with the Internet connection sharing feature in Windows to allow a virtual machine to use the host's dial-up networking adapter or other connection to the Internet. See your Windows documentation for details on configuring Internet connection sharing.
总结
事实上,如果我足够 BT,也可以在 Host上来为 VMware Network Adapter VMnet1虚拟网卡来做路由。比如,我可以用 Windows 2000的 RRAS来做,这样的话,处于 Host-Only网络下的Guest就又可以上网了,它们只需要使用 route add命令把自己的 Default Gateway指向 Host上的 VMware Network Adapter VMnet1虚拟网卡即可,不过这样做不推荐,也没有必要.(有兴趣的朋友可以自己实际做一下看看)。下面简单演示一下
(1)虚拟机设置, 网络连接方式 host only
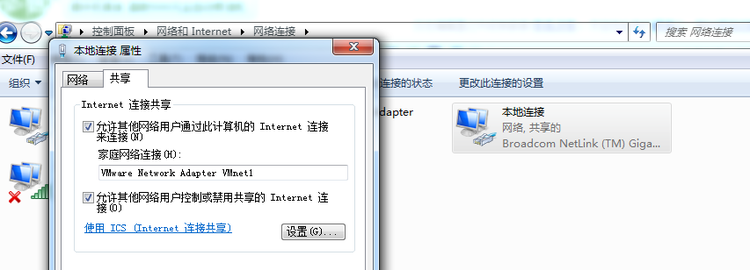
(2)Host上面打开网络连接, 设置 “本地连接” 属性(如果是无线网卡,这里要配置无线网卡属性), 配置共享。 勾上 Internet 共享2个勾, 选择共享给: VMware Network Adapter VMnet1 。
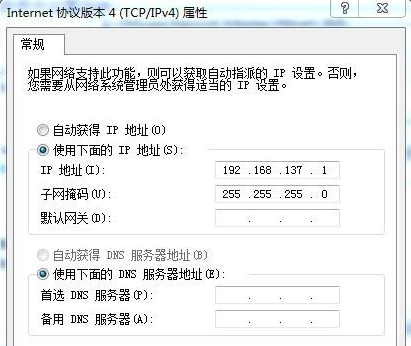
配置共享时, 提示会把 VMware Network Adapter VMnet1的IP地址更改 192.168.137.1 , 确定即可。 我们晚点可以修改它, 或者修改VMware虚拟机相关设置(确认dhcp分配的IP地址网段)。
(3)修改Guest虚拟机的网络配置(可以手动、也可以dhcp), 或者Host的 VMware Network Adapter VMnet1虚拟网卡配置,保证处于同一个网段。
关键是: 把Guest的默认网关指向 Host主机的虚拟网卡 VMnet1 。
至此,VMware的 3种网络,就应该可以理解了。可以看到,如果想要 Guest上网,在 3种网络模型中:
四、VMware NAT 网络模型 端口映射
(1)网络环境:
(2)系统工具:
下面简单介绍一下端口映射步骤:
(1)创建虚拟机的时候,或者调整虚拟机的网卡的网络模式, 选择 NAT 模式。
(2)配置我们的虚拟机系统,网络为dhcp自动获取。
# vi /etc/sysconfig/network-scripts/ifcfg-eth0

DEVICE=eth0
HWADDR=00:0C:29:27:C6:10
TYPE=Ethernet
ONBOOT=yes
NM_CONTROLLED=yes
BOOTPROTO=dhcp

# 输入 :wq 保存后,重启网络服务
# service network restart

# ifconfig
(3)设置NAT连接
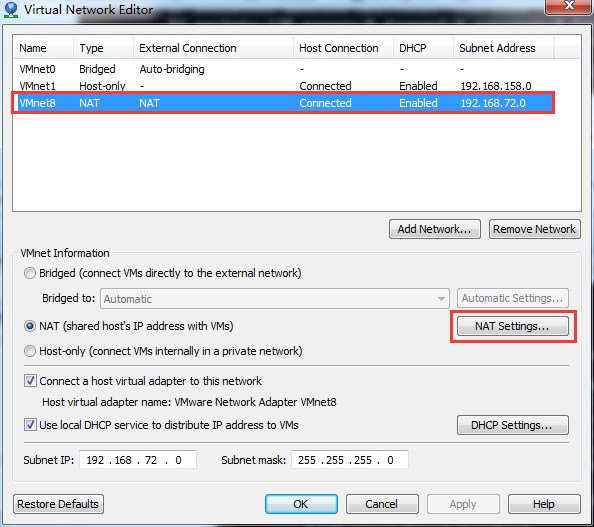
在VMWare主页面上,点 “编辑” - “编辑虚拟网络”,英文版: “ Edit | Virtual Network Editor...”
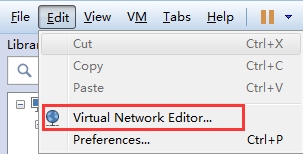
找到 NAT 虚拟交换机设置, 选择Type 类型为NAT模式的一行(VMnet8),点击 "NAT Settings..."
然后,点击“Add” 添加端口映射(Port Forwarding)

在弹出的标签中,从上到下填写和选择宿主机监听的端口、端口协议类型、虚拟机的IP地址、虚拟机监听的端口、描述。设置好后,一路按OK回到虚拟机主界面即可。

需要注意的是: Host port 必须为宿主机没有正在使用的端口(否则会出现冲突),可以用netstat -an 命令查看。
C:\Windows\system32>netstat -p tcp -bn | find "22"
  TCP    127.0.0.1:50922        127.0.0.1:50923        ESTABLISHED
  TCP    127.0.0.1:50923        127.0.0.1:50922        ESTABLISHED
  TCP    127.0.0.1:55822        127.0.0.1:15485        TIME_WAIT
  TCP    192.168.3.100:22       192.168.3.100:55789    ESTABLISHED
  TCP    192.168.3.100:55789    192.168.3.100:22       ESTABLISHED
连接测试:
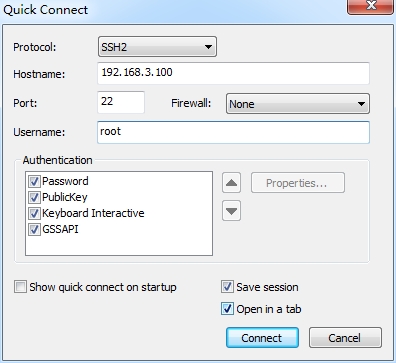
此时,我们通过SecureCRT连接的IP地址,就填写我们宿主机(win 7)的 IP地址, Port 为刚刚设置的 端口 22。
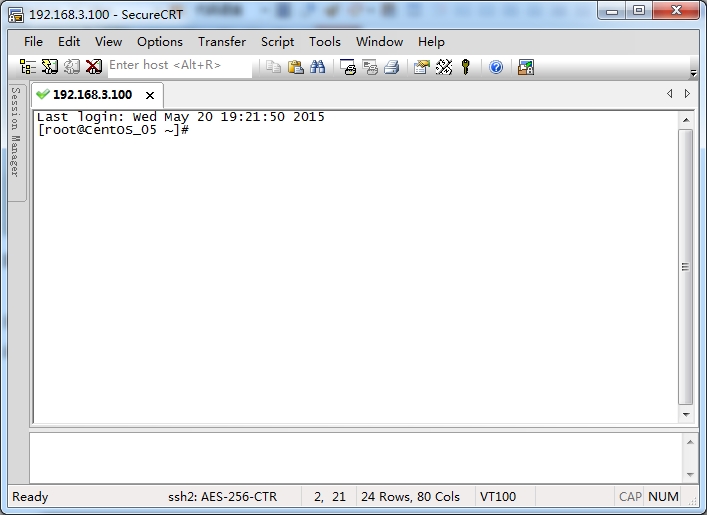
OK,我们看到,已经成功连接到我们的Linux机器。
win 7 防火墙设置
如果上述操作,还无法SSH连接到虚拟机,那么需要检查一下,Linux虚拟机iptables设置,以及 win7防火墙设置。如果 Windows 防火墙阻止某一程序,而您希望允许该程序通过防火墙进行通信,通常可以通过在 Windows 防火墙允许的程序列表(也称为“例外列表”)中选中该程序来实现。若要了解如何进行此操作。
(1)通过单击「开始」按钮  ,然后单击“控制面板”,打开“Windows 防火墙”。 在搜索框中,键入防火墙,然后单击“Windows 防火墙”。
(2)在左窗格中,单击“高级设置”。  如果系统提示您输入管理员密码或进行确认,请键入该密码或提供确认。
(3)在“高级安全 Windows 防火墙”对话框的左窗格中,单击“入站规则”,然后在右窗格中,单击“新建规则”。
(4)按照新建入站规则向导中的说明进行操作。
参考:
http://net.chinaunix.net/8/2007/05/23/1144999.shtml
http://garth.im/2014/05/ssh-connect-virtualbox-host-of-nat/
上一篇: MYSQL-3m架构回顾
下一篇: h3c ×××安全协议之IPsec
- openvpn linux客户端使用
52052
- H3C基本命令大全
51915
- openvpn windows客户端使用
42145
- H3C IRF原理及 配置
38993
- Python exit()函数
33490
- openvpn mac客户端使用
30441
- python全系列官方中文文档
29078
- python 获取网卡实时流量
24108
- 1.常用turtle功能函数
24017
- python 获取Linux和Windows硬件信息
22366
- LangChain1.0-Agent-部署/上线(开发人员必备)
110°
- LangChain1.0-Agent-Spider实战(爬虫函数替代API接口)
147°
- LangChain1.0-Agent(进阶)本地模型+Playwright实现网页自动化操作
159°
- LangChain1.0-Agent记忆管理
148°
- LangChain1.0-Agent接入自定义工具与React循环
170°
- LangChain1.0-Agent开发流程
159°
- LangChain1.0调用vllm本地部署qwen模型
175°
- LangChain-1.0入门实践-搭建流式响应的多轮问答机器人
184°
- LangChain-1.0入门实战-1
184°
- LangChain-1.0教程-(介绍,模型接入)
192°
- 姓名:Run
- 职业:谜
- 邮箱:383697894@qq.com
- 定位:上海 · 松江
